SMART Health IT Sandbox: Build and Test SMART on FHIR Apps

SMART Health IT Sandbox: Build and Test SMART on FHIR Apps
Building a SMART on FHIR app means you need a place to test it before connecting to real EHR systems. You need sample patient data. You need to verify your OAuth flows work correctly. You need to confirm your app can read FHIR resources without breaking. But setting up your own FHIR server and authorization infrastructure takes weeks and pulls your team away from actual product development.
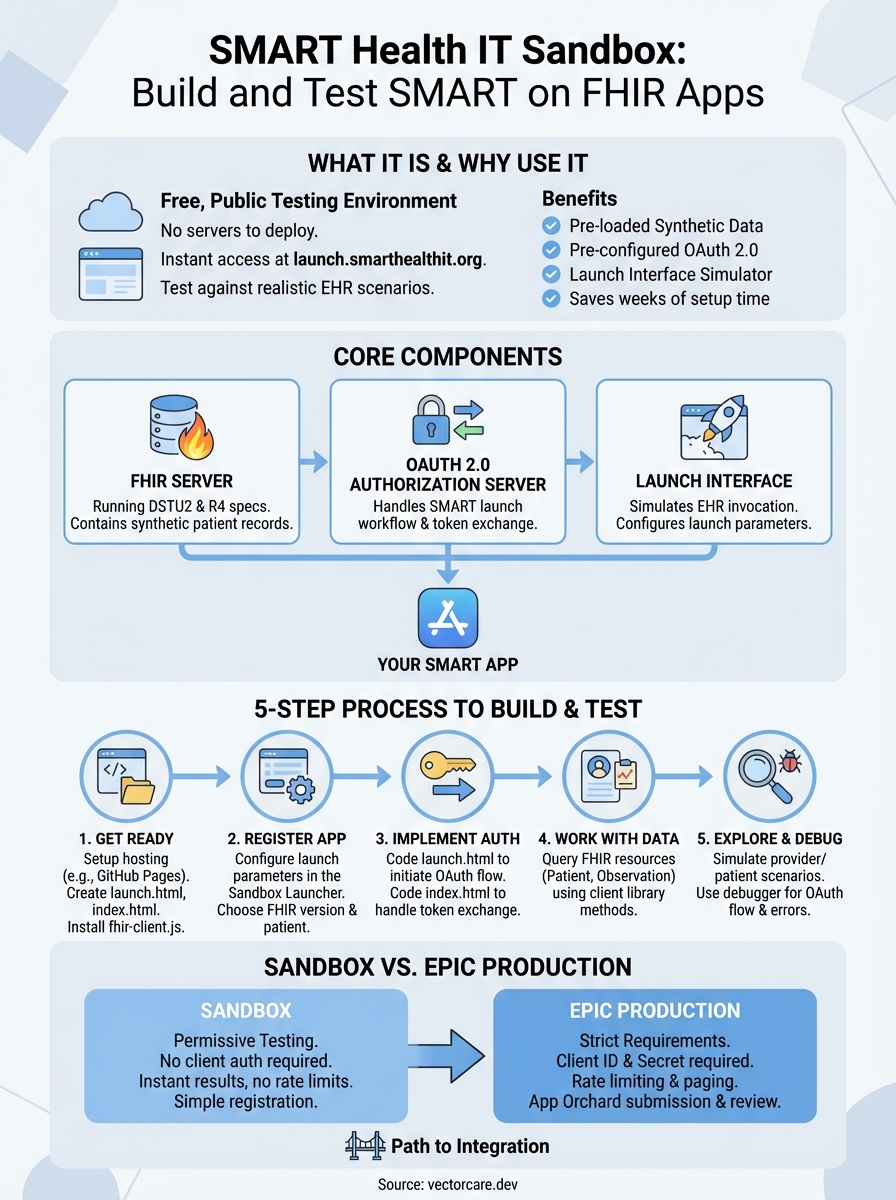
The SMART Health IT Sandbox gives you a free testing environment with everything already configured. You get a FHIR server pre loaded with synthetic patient data. You get an authorization server that handles OAuth 2.0. You get a launch interface that simulates how EHRs like EPIC will invoke your app. No setup required.
This guide walks you through every step of using the SMART Health IT Sandbox. You will learn how to register your app in the launcher. You will implement the authorization flow. You will query FHIR resources and work with sample patients. You will explore advanced debugging tools. By the end you will have a working SMART on FHIR app ready to move beyond sandbox testing.
What is the SMART Health IT Sandbox
The SMART Health IT Sandbox is a free, publicly available testing environment maintained by Boston Children's Hospital. It gives developers a complete FHIR infrastructure where you can build and test SMART on FHIR applications without deploying your own servers. You access the sandbox through a web interface at launch.smarthealthit.org, and within minutes you can launch your app against realistic EHR scenarios.
Core components of the sandbox
The sandbox provides three essential pieces of infrastructure that mirror what you will encounter in production EHR environments. First, it includes a FHIR server running the DSTU2 and R4 specifications with pre-populated synthetic patient records. Second, it operates an OAuth 2.0 authorization server that handles the SMART launch workflow and token exchange. Third, it offers a launch interface that simulates how EHRs invoke SMART apps, letting you configure launch parameters and test different clinical contexts.
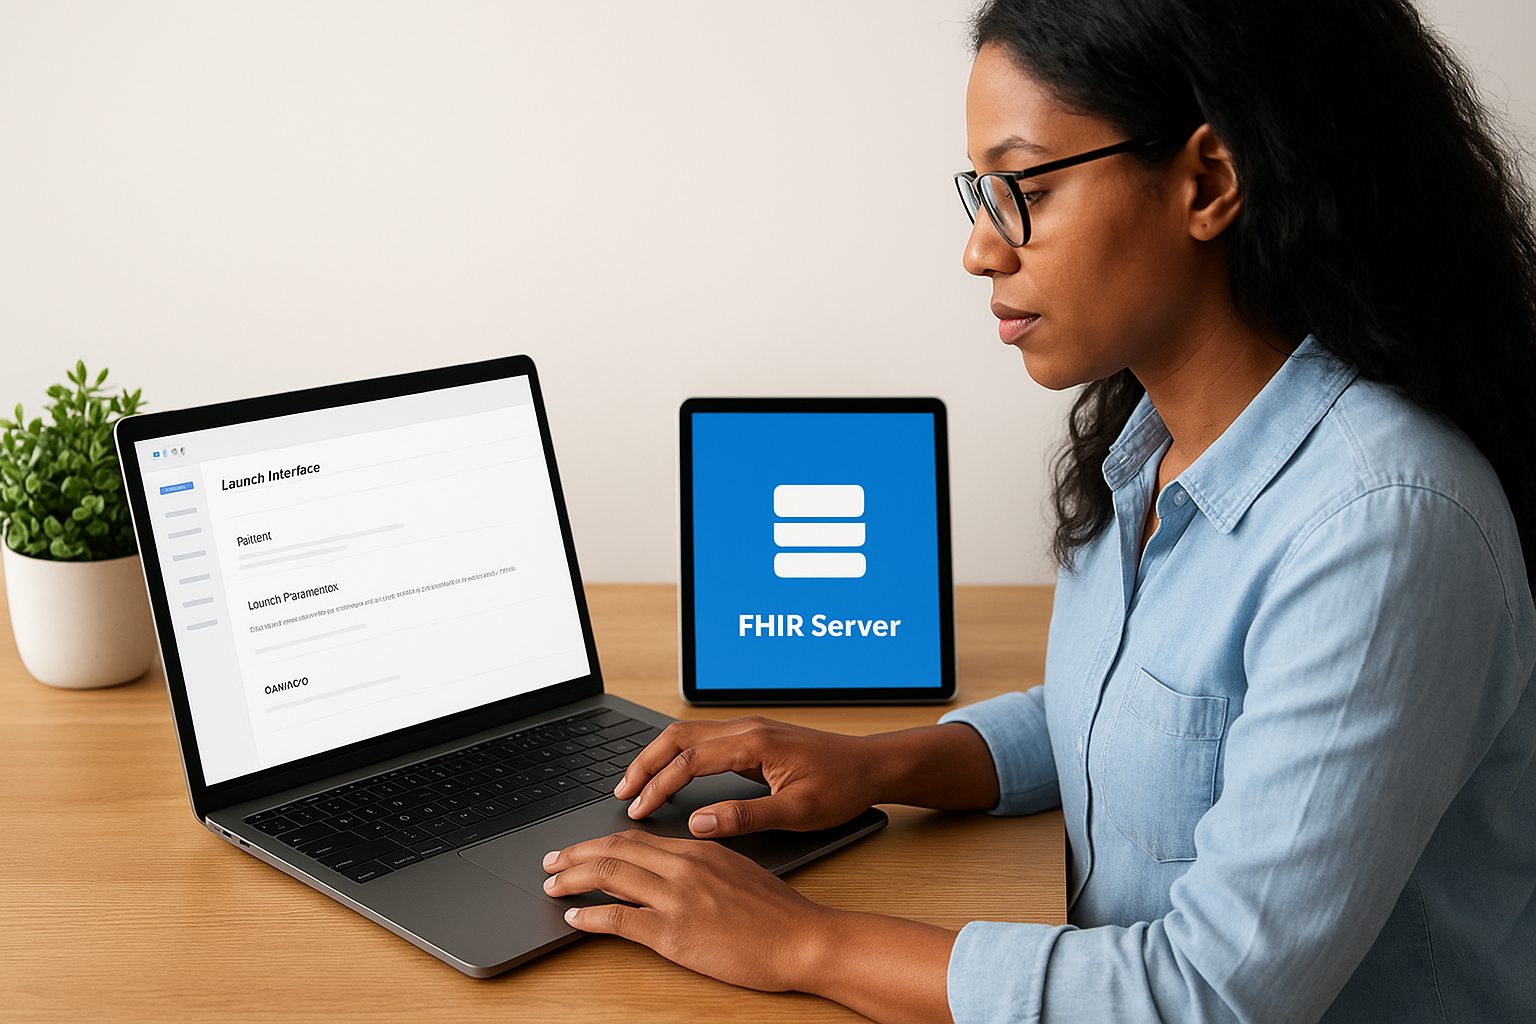
You can access the smart health it sandbox without creating an account or requesting credentials. The platform includes sample patients with realistic medical histories, observations, medications, and conditions. You test your app by configuring a launch URL and redirect URL, then clicking a button to initiate the SMART authorization flow. The sandbox handles all the OAuth complexity behind the scenes and redirects back to your app with an access token.
The sandbox strictly follows SMART on FHIR specifications, which means apps that work in the sandbox will work with any standards-compliant EHR.
Why developers choose this sandbox
Traditional FHIR development requires you to set up your own FHIR server, configure an authorization server, create test data, and maintain the entire stack. This process consumes weeks of engineering time before you write a single line of application code. The sandbox eliminates this overhead entirely. You point your app at the sandbox endpoints and start testing immediately.
Healthcare vendors building EPIC integrations use this sandbox as a first step before moving to EPIC's own sandbox environment. The standards-based approach means your core FHIR logic remains consistent across platforms. You develop faster, test more scenarios, and catch integration issues early in your development cycle.
Step 1. Get ready to build your SMART app
You need to prepare your development environment before you can test against the smart health it sandbox. This step covers the hosting setup, file structure, and client library installation that your app requires to communicate with the SMART authorization server and FHIR API. The preparation takes about 15 minutes and requires only basic web development tools.
Set up your app hosting and files
Your SMART app needs publicly accessible hosting because the sandbox authorization server must redirect users back to your app after authentication. GitHub Pages provides a free option that works perfectly for development and testing. Create a new repository, enable GitHub Pages on the main or gh-pages branch, and you will have a live URL within minutes.
Create three essential HTML files in your repository root. First, build launch.html as your entry point that initiates the SMART authorization workflow. Second, create index.html as your redirect URI where users land after authorization completes. Third, add health.html as a simple endpoint to verify your app is accessible. Each file plays a specific role in the SMART launch sequence.
Your launch URL and redirect URL must use HTTPS. GitHub Pages provides this automatically, but if you host elsewhere, ensure SSL certificates are configured.
Install the SMART client library
Download the fhir-client.js library from the SMART Health IT GitHub repository to handle OAuth flows and FHIR API calls. This JavaScript library manages the authorization workflow, token exchange, and FHIR resource queries without requiring you to write low-level HTTP requests. Place the library file in a lib folder within your project structure.
Add the script reference to both your launch.html and index.html files:
<script src="lib/fhir-client-v2.5.2.js"></script>
The library exposes a global FHIR object that provides methods like FHIR.oauth2.authorize() for launching the auth flow and FHIR.oauth2.ready() for retrieving access tokens. You will use these methods in the next steps to connect your app to the sandbox. Keep your file structure organized with separate folders for scripts, styles, and library dependencies.
Step 2. Register your app in the SMART launcher
Registering your app in the smart health it sandbox requires no account creation or approval process. You visit the launcher interface, enter your app URLs, select the FHIR version and scopes, and click launch. The entire registration happens in real time through the web interface, letting you test different configurations instantly without waiting for administrative approval.
Navigate to the launcher and configure your app
Open your browser and go to launch.smarthealthit.org. The interface displays a form where you configure your app's launch parameters. You will see sections for app details, FHIR version selection, patient selection, and launch options. Each field controls how the sandbox simulates an EHR launching your application.

Start by selecting your FHIR version from the dropdown menu. Choose R2 (DSTU2) if you are building for older EHR integrations or R4 for newer implementations. Most production systems now support R4, but EPIC still maintains DSTU2 endpoints for legacy apps. Your choice here determines which FHIR resources and data elements become available during testing.
Set your launch parameters
Configure your app URLs in the Launch section of the form. Enter your App Launch URL as the public URL to your launch.html file, for example: https://yourusername.github.io/your-app/launch.html. This is where the sandbox will redirect when initiating your app. Enter your Redirect URL as the location where users land after authorization, typically: https://yourusername.github.io/your-app/index.html.
Select a patient from the patient picker by clicking the dropdown button. The sandbox provides dozens of synthetic patients with different medical conditions, medications, and observation histories. Pick a patient that matches your testing scenario, such as a patient with diabetes if you are building a glucose monitoring app.
The sandbox does not validate your URLs before launch, so double-check that your hosting is live and accessible via HTTPS before clicking the launch button.
Leave the Client ID field with any value since the sandbox does not enforce client authentication for testing purposes. Configure your scopes based on what FHIR resources your app needs to access. Common scopes include patient/Patient.read for demographics, patient/Observation.read for clinical measurements, and launch/patient to receive patient context. Check the boxes for launch, online_access, openid, and profile to enable the full SMART workflow. Click Launch App when your configuration is complete.
Step 3. Implement the SMART on FHIR auth flow
The SMART authorization flow moves through two distinct phases that your app must handle correctly. Your launch.html file initiates the process by redirecting users to the authorization server with required parameters. After the user authorizes your app, the server redirects back to your index.html file with an authorization code that you exchange for an access token. Both files require specific JavaScript code to complete this workflow successfully.
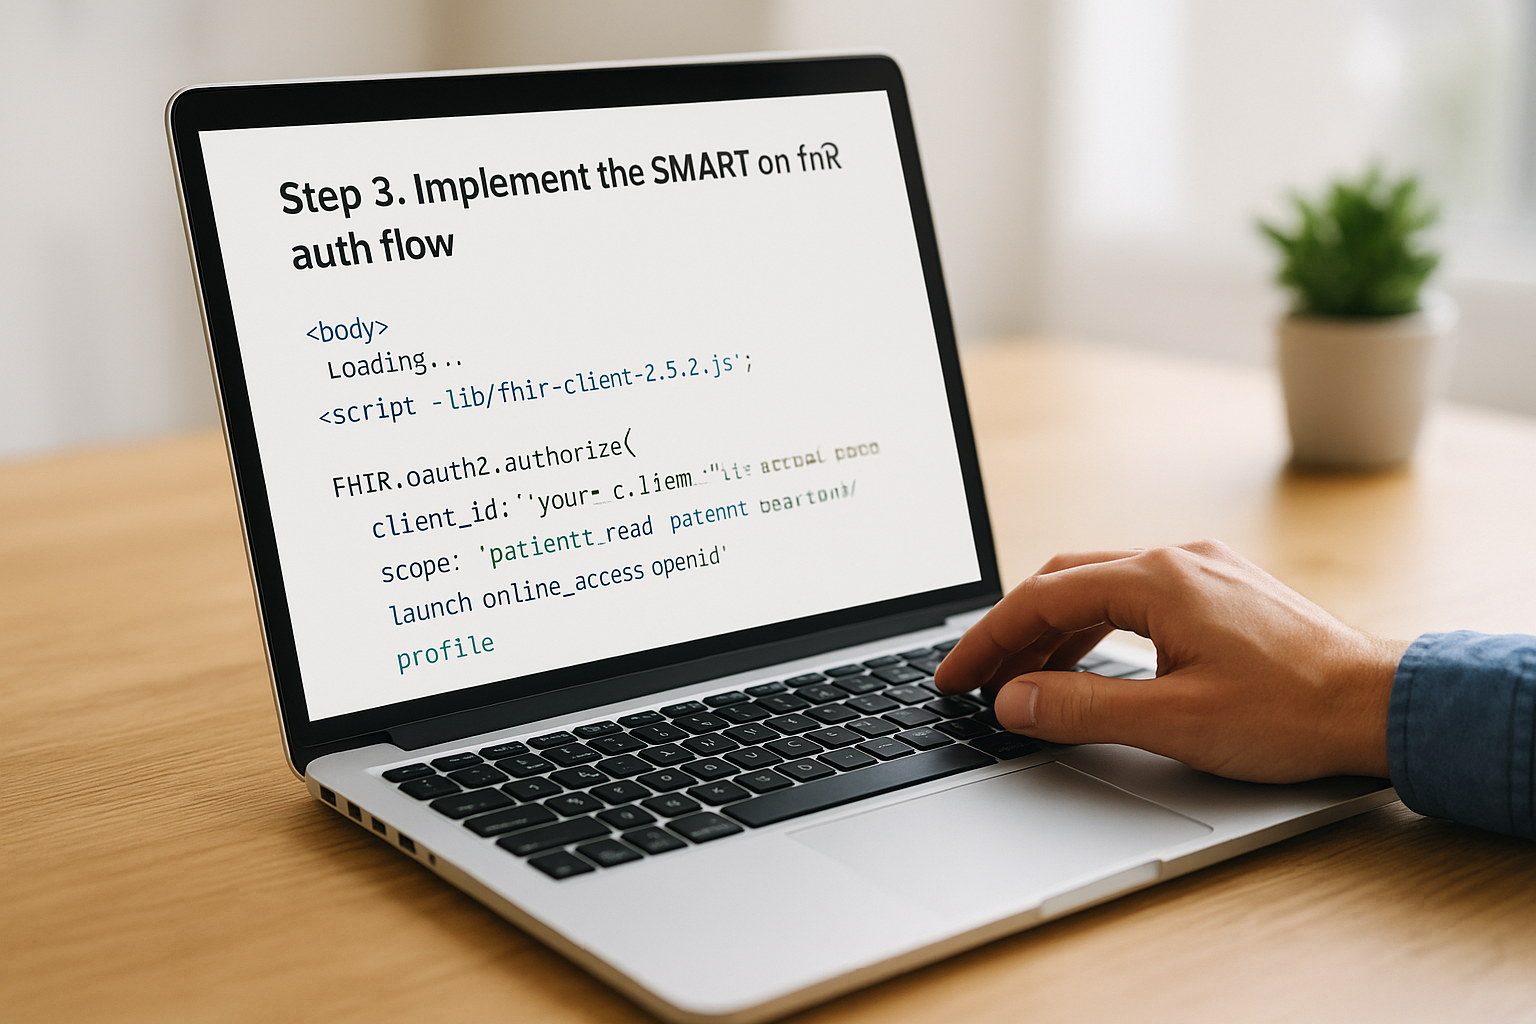
Build your launch.html entry point
Your launch.html file receives two query parameters from the EHR when your app launches: iss (the FHIR server base URL) and launch (an opaque identifier for this launch session). The fhir-client.js library automatically reads these parameters and constructs the authorization request. You need minimal code to trigger this process.
Add this JavaScript to your launch.html file inside the body tags:
<body>
  Loading...
  <script src="lib/fhir-client-v2.5.2.js"></script>
  <script>
    FHIR.oauth2.authorize({
      'client_id': 'your_client_id',
      'scope': 'patient/Patient.read patient/Observation.read launch online_access openid profile'
    });
  </script>
</body>
The authorize method reads the iss and launch parameters from your URL, queries the FHIR server's metadata endpoint to discover authorization URLs, then redirects to the authorization server. Your scope string defines which FHIR resources your app can access. The launch scope signals this is an EHR launch, while online_access requests a refresh token for maintaining sessions.
The smart health it sandbox does not enforce client authentication during testing, so you can use any string for client_id without registration.
Handle the authorization callback
After successful authorization, the server redirects users to your redirect URI with a code parameter in the URL. Your index.html file must exchange this authorization code for an access token before making FHIR API calls. The fhir-client.js library handles this token exchange automatically when you invoke the ready method.
Implement the token retrieval in your index.html file:
<body>
  <div id="patient-info">Loading patient data...</div>
  <script src="lib/fhir-client-v2.5.2.js"></script>
  <script>
    FHIR.oauth2.ready()
      .then(function(client) {
        // Client object contains access token and FHIR context
        return client.patient.read();
      })
      .then(function(patient) {
        document.getElementById('patient-info').innerHTML =
          'Patient: ' + patient.name[0].given[0] + ' ' + patient.name[0].family;
      })
      .catch(function(error) {
        console.error('Authorization failed:', error);
        document.getElementById('patient-info').innerHTML = 'Error loading patient';
      });
  </script>
</body>
The ready method completes the token exchange and returns a client object that includes your access token, the patient ID in context, and helper methods for querying FHIR resources. This client object persists in session storage, allowing your app to make authenticated API calls throughout the user session. Deploy these changes to your hosting platform and test the complete flow by launching from the sandbox interface.
Step 4. Work with FHIR data and sample patients
Once your app completes the authorization flow, you gain access to FHIR resources for the patient in context. The smart health it sandbox provides synthetic patient data that mirrors real EHR records, including demographics, vital signs, lab results, medications, and conditions. Your app queries this data through the client object returned by the ready method, using either the built-in helper methods or direct API calls to the FHIR server.
Query FHIR resources with the client library
The client object provides specialized methods for common FHIR queries that handle authentication headers and response parsing automatically. You access patient demographics through client.patient.read(), which returns a Promise containing the Patient resource. For other resource types like Observation or Condition, you use client.request() with search parameters.
Retrieve multiple observations for a patient with this code:
client.request('Observation?patient=' + client.patient.id + '&category=vital-signs')
  .then(function(data) {
    // data.entry contains array of observation resources
    data.entry.forEach(function(entry) {
      var observation = entry.resource;
      console.log(observation.code.text + ': ' + observation.valueQuantity.value);
    });
  });
The request method constructs the full FHIR URL, adds your access token to headers, and parses the JSON response. You can search by date ranges, filter by codes, or include related resources using standard FHIR search parameters. The sandbox returns results immediately since all data loads into memory.
Access specific FHIR data elements
Patient resources contain structured name components, contact information, gender, birth date, and identifiers. You extract individual fields by navigating the JSON structure according to FHIR specifications. Names appear as arrays because patients can have multiple names, and each name breaks into given names and family names.
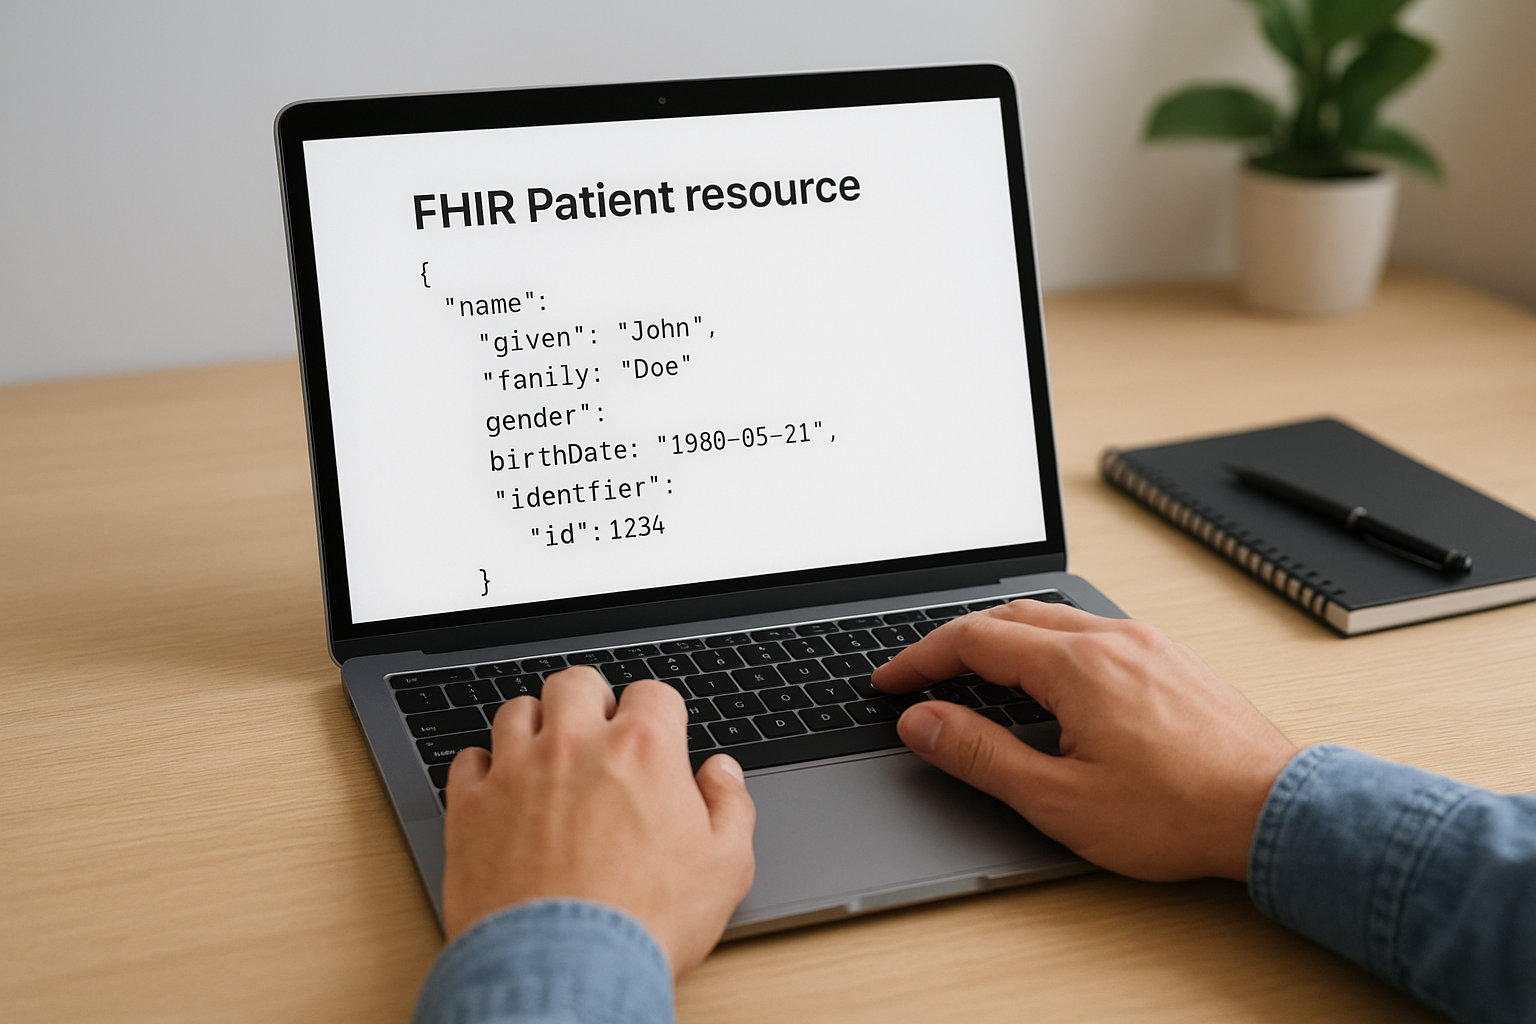
Parse patient demographics with this approach:
client.patient.read().then(function(patient) {
  var firstName = patient.name[0].given.join(' ');
  var lastName = patient.name[0].family;
  var birthDate = new Date(patient.birthDate);
  var age = calculateAge(birthDate);

  displayPatient(firstName, lastName, age, patient.gender);
});
Observation resources follow a consistent pattern regardless of the clinical measurement type. Each observation includes a code (what was measured), a value (the measurement result), effective date (when measured), and status (final, preliminary, amended). The sandbox populates observations for vital signs, laboratory results, and social history based on realistic clinical patterns.
The FHIR specification defines standard LOINC codes for common observations, ensuring your app works across different EHR systems without code mapping.
Handle missing or optional data
FHIR resources contain many optional fields that may not exist for every patient. Your code must check for undefined values before accessing nested properties to prevent runtime errors. The sandbox includes patients with varying data completeness to help you test these scenarios.
Implement defensive checks when parsing observations:
if (observation.valueQuantity && observation.valueQuantity.value) {
  var value = observation.valueQuantity.value;
  var unit = observation.valueQuantity.unit || '';
} else if (observation.valueCodeableConcept) {
  var value = observation.valueCodeableConcept.text;
}
Test your app against multiple sandbox patients with different medical histories to verify your parsing logic handles all data variations correctly. Some patients have extensive medication lists while others have minimal records, reflecting the diversity you will encounter in production EHR environments.
Step 5. Explore advanced launch and debug options
The smart health it sandbox includes advanced testing features that help you verify your app handles edge cases and different launch contexts correctly. You can simulate provider launches versus patient launches, test with different FHIR versions simultaneously, and access debugging tools that expose the complete OAuth flow. These capabilities let you catch integration issues before connecting to production EHR systems, where troubleshooting becomes significantly harder.
Simulate different launch scenarios
The sandbox launcher lets you configure launch contexts beyond basic patient selection to test how your app responds to various clinical workflows. You switch between provider-facing launches and patient-facing standalone launches by selecting the appropriate launch type in the interface. Provider launches include practitioner context and location data, while patient launches restrict access to only the authenticated patient's records.
Test these common launch scenarios to verify your app adapts correctly:
- Provider EHR launch: Simulates a clinician launching your app from within the EHR workflow with full patient chart access
- Patient standalone launch: Tests a patient launching your app independently without EHR context, requiring patient login
- Multi-patient context: Checks how your app handles launches with multiple patients selected for batch operations
- No patient context: Validates your app's behavior when launched without a specific patient, requiring your app to provide patient search
Each scenario generates different OAuth scopes and launch parameters that your app must parse correctly. You configure these options in the launcher interface before clicking the launch button, and the sandbox adjusts its authorization behavior accordingly.
Provider and patient launches use different scope patterns, so your app needs conditional logic to handle both workflows if you support multiple user types.
Debug authorization failures
The sandbox provides a built-in debugger that displays every step of the OAuth flow, including the authorization request URL, token exchange payload, and resulting access token claims. You access this debugger by appending ?debug=true to your launch URL or enabling the debug option in the launcher interface before launch.
When authorization fails, check these common issues:
// Verify your redirect URI matches exactly (including trailing slashes)
console.log('Expected redirect:', 'https://yourapp.com/index.html');
console.log('Actual redirect:', window.location.href);

// Check that all required scopes are included in your authorize call
var requiredScopes = ['launch', 'patient/Patient.read', 'openid', 'profile'];
The debugger output shows you the exact parameters sent in each request, making it easy to spot mismatched URLs, missing scopes, or incorrect state parameters. You can copy the authorization URL from the debugger and inspect it in your browser's developer tools to verify all parameters are encoded correctly.
Test with multiple FHIR versions
You can switch between R2 (DSTU2) and R4 FHIR specifications in the launcher dropdown to verify your app handles both versions correctly. Different FHIR versions structure resources differently, particularly around naming conventions and value types. Testing both versions ensures your app works with older EPIC implementations still running DSTU2 and newer systems using R4.
Compare how patient names appear across versions by logging the response structure and adjusting your parsing logic to handle both formats. Your code should detect the FHIR version from the server's capability statement and adapt its resource parsing accordingly.
From sandbox experiments to EPIC integration
Your app works in the smart health it sandbox, but production EPIC environments operate with stricter requirements and different authentication patterns. You need to adjust your authorization logic, register with EPIC's App Orchard, and configure your app to handle multiple EPIC instances across different health systems. The transition requires understanding which technical elements remain constant and which require modification for production deployment.
Understand the differences between sandbox and production
EPIC production environments enforce client authentication using registered client IDs and secrets, unlike the sandbox's permissive testing mode. You must include your client credentials in the token exchange request to the authorization server. EPIC also validates your redirect URIs exactly, rejecting requests that do not match your registered URLs down to the trailing slash and protocol.
Your FHIR queries remain structurally identical, but EPIC implements rate limiting and paging differently than the sandbox. Production environments may restrict query result sizes to 50 resources per page, requiring you to follow pagination links to retrieve complete data sets. You implement a loop that checks for next links in the Bundle response and continues fetching until no more pages exist.
Handle rate limits by implementing exponential backoff when you receive 429 status codes:
function queryWithRetry(client, url, retries = 3) {
  return client.request(url).catch(function(error) {
    if (error.status === 429 && retries > 0) {
      var delay = Math.pow(2, 4 - retries) * 1000;
      return new Promise(resolve => setTimeout(resolve, delay))
        .then(() => queryWithRetry(client, url, retries - 1));
    }
    throw error;
  });
}
Prepare for EPIC App Orchard submission
Registering with EPIC App Orchard requires clinical validation and technical compliance documentation that exceeds sandbox testing requirements. You submit your app for review, provide screenshots demonstrating clinical workflows, and document how your app handles errors and missing data. EPIC reviews your submission to verify compliance with their integration standards before approving your app for health system installation.
Moving from sandbox to production requires re-registering your app with each EPIC instance, since health systems maintain separate authorization servers and FHIR endpoints.
Complete your EPIC registration by providing your redirect URIs, supported FHIR versions, and required scopes in the App Orchard portal. EPIC generates production client credentials that you store securely and use for all token exchanges. Your app must support dynamic FHIR endpoint discovery, allowing health systems to configure their specific instance URLs without requiring code changes for each deployment.
Next steps
You now have a working SMART on FHIR app running against the smart health it sandbox. You understand how to register your app, implement the authorization flow, query FHIR resources, and debug common issues. Your app retrieves patient demographics and observations successfully in the testing environment.
Your next move is to expand your FHIR queries to include additional resource types like Medication, Condition, or Procedure that your app requires. Test your app against multiple sandbox patients with different medical histories to verify your error handling works correctly. Document any edge cases you discover during testing before moving to production environments.
If you want to skip the complexity of building production-ready EPIC integrations yourself, VectorCare deploys your SMART on FHIR app in weeks instead of months. The platform handles all the technical requirements, compliance certifications, and EPIC App Orchard submissions while you focus on your core product features.
The Future of Patient Logistics
Exploring the future of all things related to patient logistics, technology and how AI is going to re-shape the way we deliver care.
Thank you! Your submission has been received!
Oops! Something went wrong while submitting the form.