OpenID Connect Hybrid Flow: How It Works And When To Use

The OpenID Connect Hybrid Flow combines elements of the Authorization Code flow and the Implicit flow into a single authentication sequence. It returns an authorization code and tokens directly from the authorization endpoint, giving your application immediate access to identity information while still allowing a secure back-channel token exchange. This matters when you're building applications that need to authenticate users quickly on the front end without sacrificing the security guarantees of server-side code redemption.
For healthcare vendors integrating with EPIC EHR systems through SMART on FHIR, understanding OIDC flows isn't optional, it's foundational. Every SMART on FHIR launch involves an OAuth 2.0 and OpenID Connect handshake to verify clinician identity and authorize access to patient data. Choosing the wrong flow (or misconfiguring the right one) can stall your EPIC App Orchard submission or introduce security gaps that violate HIPAA requirements. At VectorCare, we handle this authentication layer as part of our no-code platform, so healthcare vendors don't need to wire up OIDC flows manually. But knowing how these flows work gives you a clearer picture of what's happening under the hood.
This article breaks down exactly how the Hybrid Flow works, what distinguishes it from the Authorization Code and Implicit flows, and when it's the right choice for your application. You'll walk away with a practical understanding of the token mechanics, security trade-offs, and real-world scenarios where this flow fits best.
Why the OIDC hybrid flow exists and when to use it
The Authorization Code flow and the Implicit flow each solve part of the authentication problem, but neither handles every scenario on its own. The Authorization Code flow keeps tokens off the browser by exchanging a short-lived code server-side, which is secure but means your front-end client has to wait for a back-channel round trip before it can do anything useful. The Implicit flow skips that round trip and delivers tokens directly to the browser, which speeds things up but exposes tokens in the URL fragment where they're vulnerable to interception and leakage. The openid connect hybrid flow sits between these two, letting your application receive something immediately from the authorization endpoint while still completing a secure server-side exchange for sensitive tokens.
The limitations that motivated a hybrid approach
When you build a client application with a front-end component and a server-side backend, you run into a fundamental tension. Your front end might need to display the user's name or verify their identity the moment the authentication redirect completes, but the Authorization Code flow forces you to complete the back-channel code exchange first, adding latency. On the other hand, if you use the Implicit flow to get the ID token immediately, you're exposing your access token in the browser's URL history and referrer headers, which creates a real attack surface. Neither pure flow solves both requirements cleanly, and that gap is exactly what motivated the hybrid approach.
If your application needs immediate identity confirmation on the front end and secure access token handling on the back end, you need a flow that can do both at once.
When to choose the hybrid flow over alternatives
You should reach for the hybrid flow when your application architecture requires a web server backend that will consume access tokens while your front end needs identity information right away. A classic example is a server-rendered web application that also runs client-side JavaScript: the server needs a code to exchange for an access token, but the browser needs an ID token immediately to personalize the UI on redirect. Healthcare vendors building SMART on FHIR applications that pull patient context into a clinical interface face exactly this pattern, where the clinician-facing front end needs immediate identity confirmation and the server needs authorized FHIR access tokens to query patient records.
Avoid the hybrid flow when you're building a pure single-page application with no backend, or when you're using a confidential server-side client that has no need to deliver tokens to the browser at all. In those cases, the simpler Authorization Code flow with PKCE covers your needs without the added complexity of managing tokens across two channels simultaneously.
How the hybrid flow works end to end
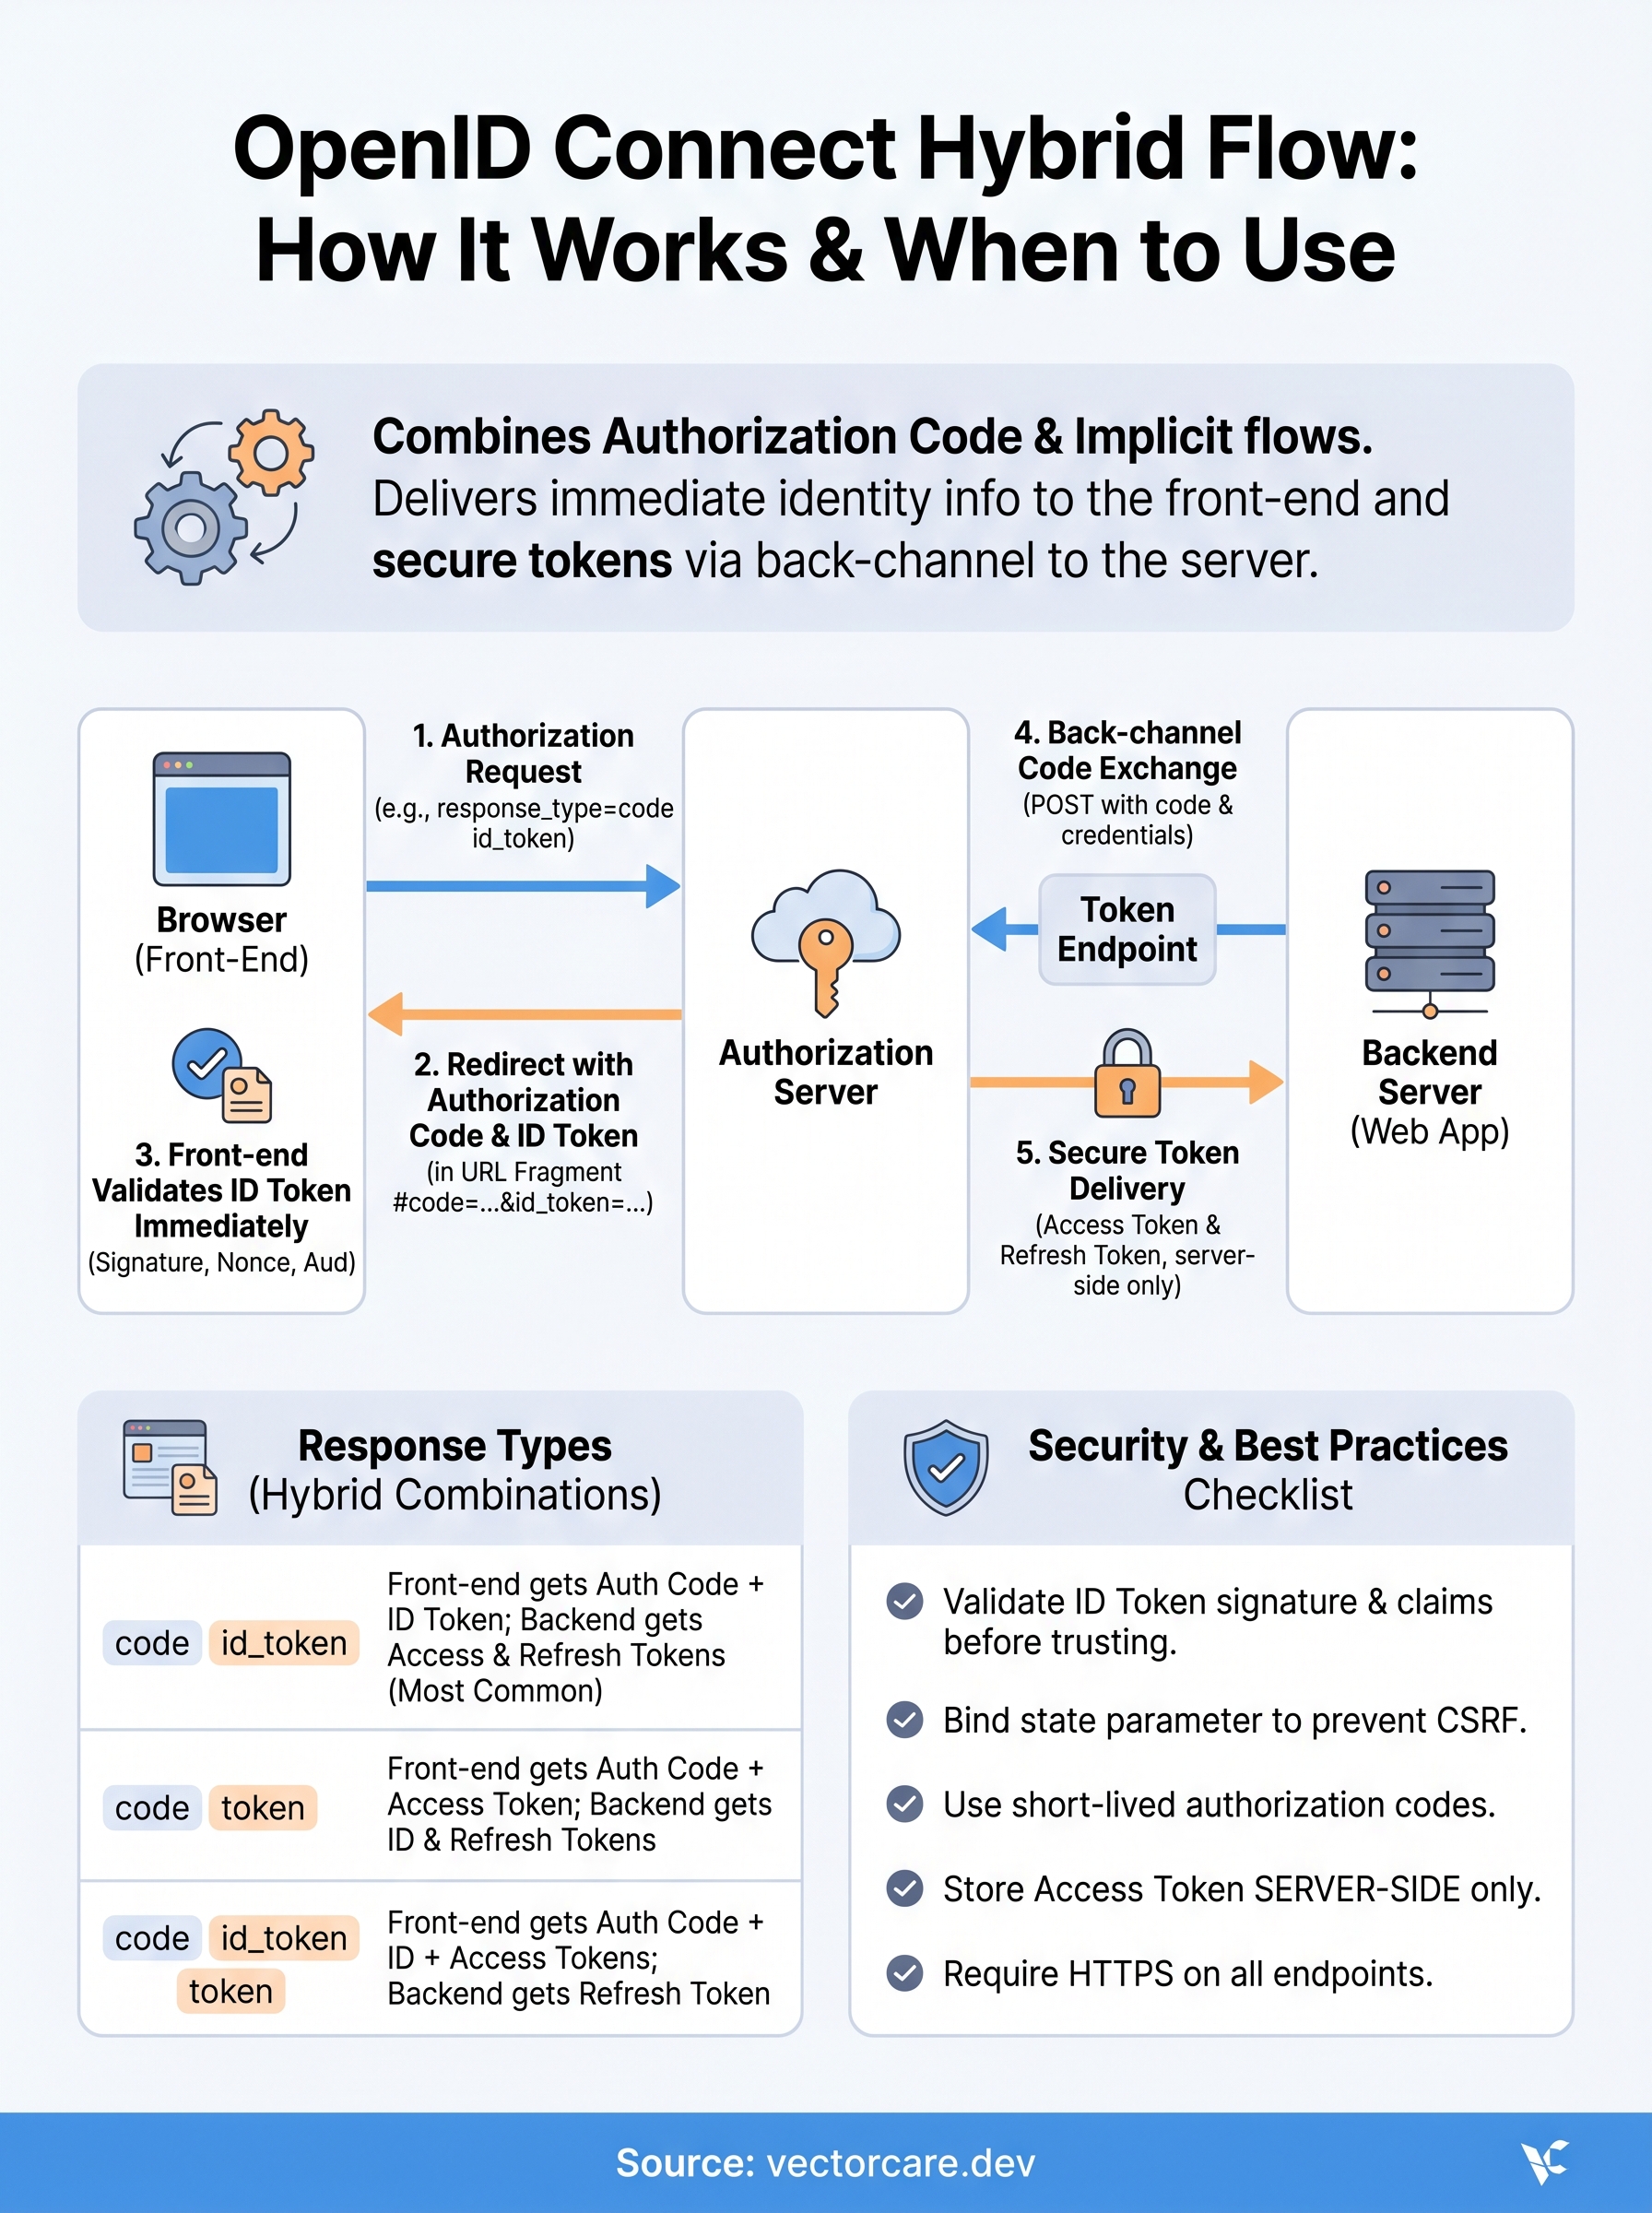
The openid connect hybrid flow follows a specific sequence that separates what gets returned at each stage. Your client sends a single request to the authorization endpoint, receives a response containing a mix of tokens and codes, and then your backend completes a token endpoint exchange to retrieve the remaining tokens securely. Understanding each step in order prevents the most common configuration mistakes.

The authorization request
Your application initiates the flow by redirecting the user to the authorization server with a request that includes a response_type parameter set to a combination like code id_token or code token. The authorization server authenticates the user, obtains their consent, and sends the browser back to your registered redirect URI. That redirect carries the authorization code and any tokens specified in the response_type, all delivered as URI fragment parameters so they stay client-side and out of server logs.
The exact combination in your response_type determines which tokens arrive at the front end immediately and which ones require a back-channel call to retrieve.
The token endpoint exchange
Once your backend receives the authorization code from the redirect, it sends a POST request to the token endpoint using your client credentials. The authorization server validates the code, confirms it matches the original request parameters, and returns the access token and refresh token over a secure server-to-server HTTPS connection. This back-channel exchange keeps your access token out of the browser entirely, which is the core security advantage over using the Implicit flow alone. Your frontend gets identity information fast from the initial redirect while your server handles the privileged access credentials through the protected exchange.
Response types and what the client receives
The response_type parameter is where you configure exactly what comes back in the authorization endpoint redirect versus what requires a back-channel call. In the openid connect hybrid flow, valid combinations always include code paired with at least one token type. Each combination changes the security profile of your application and determines what your front end can use immediately.
The three valid response_type combinations
The specification defines three response_type values for the hybrid flow, and each serves a distinct architectural need. Choosing the right one depends on whether your front-end client needs an ID token, an access token, or both before the back-channel exchange completes.

| Response Type | Front-end receives | Back-channel retrieves |
|---|---|---|
code id_token |
Authorization code + ID token | Access token, refresh token |
code token |
Authorization code + Access token | ID token, refresh token |
code id_token token |
Authorization code + ID token + Access token | Refresh token |
What each token actually gives your application
Your ID token is a signed JWT that carries identity claims like the user's subject identifier, name, and authentication time. Your application can verify this token immediately using the authorization server's public keys without making any additional network calls. Your access token is what your server presents to resource servers like a FHIR endpoint to authorize API requests on behalf of the authenticated user.
The
code id_tokencombination is the most common choice because it gives your front end immediate identity confirmation while keeping your access token off the browser entirely.
The authorization code in every hybrid response is single-use and short-lived, typically expiring within minutes. Your backend must exchange it at the token endpoint before it expires, or the entire flow fails and the user must re-authenticate.
Security checklist and common pitfalls
The openid connect hybrid flow introduces a wider attack surface than the Authorization Code flow alone because tokens arrive at the browser before your backend completes the token exchange. Two specific risks demand your attention: token leakage in the browser and replay attacks against the authorization code or ID token. Handling both correctly separates a secure implementation from one that will fail a security review.
Validate the ID token before trusting it
Your front end receives an ID token directly in the redirect fragment, but receiving it does not mean it is safe to use. You must verify the token's signature against the authorization server's public keys, confirm the nonce claim matches the value you sent in the original request, and check that the aud claim matches your client ID. Skipping any of these steps opens your application to token substitution attacks where a malicious actor injects a token issued to a different client or session.
Never use claims from an unverified ID token to make authorization decisions, even if the token appears structurally valid.
Pitfalls that break your implementation
Several configuration mistakes consistently cause production failures or compliance gaps. Check each of these before you go live:
- Bind the state parameter to your session to prevent cross-site request forgery on the redirect.
- Set a short expiry on the authorization code, typically under 60 seconds, and reject any reuse attempt immediately.
- Store your access token server-side only and never write it to localStorage or a JavaScript-accessible cookie.
- Register an exact redirect URI with your authorization server and reject any redirect that does not match character-for-character.
- Require HTTPS on every endpoint involved in the flow, including your redirect URI, with no HTTP fallback.
How to implement the hybrid flow in practice
Implementing the openid connect hybrid flow requires coordinating configuration across your authorization server, your front-end client, and your backend. Getting the sequence right from the start saves you from debugging obscure token validation errors later. The steps below follow the order your code will execute at runtime.
Configure your authorization request
Your implementation starts with registering your client at the authorization server. Set your client type to confidential since the hybrid flow requires a backend capable of securely storing client credentials. Register your exact redirect URI, select the hybrid flow response type you need, and enable the openid scope along with any additional scopes like profile or the FHIR-specific scopes your resource server requires.
Register scopes at the authorization server level first. Requesting a scope your client is not registered for causes the authorization request to fail before the user ever sees a login prompt.
When you build the authorization URL, include a cryptographically random nonce and a state parameter tied to the user's session. Both values must be generated fresh for each request and validated on return.
Handle the redirect and token exchange
When the authorization server redirects the user back to your application, your front-end JavaScript reads the fragment parameters, extracts the ID token and authorization code, and immediately validates the ID token's signature, nonce, and audience claims before doing anything else with it.
Your backend server then takes the authorization code and sends a POST request to the token endpoint with your client ID, client secret, and the original redirect URI. The token endpoint returns an access token and refresh token over a secure server-to-server connection. Store these server-side only, and never pass the access token to the browser.
Next steps
The openid connect hybrid flow gives you a precise tool for applications that need immediate front-end identity confirmation and secure back-channel access token handling at the same time. You now understand how the response_type combinations control what arrives at the browser versus what your server retrieves, where the key security risks live, and what a working implementation looks like from authorization request through token exchange.
Your next move depends on your architecture. If you're building a SMART on FHIR application for EPIC integration, the authentication layer is just one piece of a larger compliance and deployment challenge that includes FHIR data access, HIPAA requirements, and the EPIC App Orchard submission process. Handling all of that from scratch takes months and significant engineering resources.
If you want to skip the manual implementation entirely and get your application into EPIC in weeks rather than months, see how VectorCare handles SMART on FHIR authentication for you.
The Future of Patient Logistics
Exploring the future of all things related to patient logistics, technology and how AI is going to re-shape the way we deliver care.
Thank you! Your submission has been received!
Oops! Something went wrong while submitting the form.