AWS IAM Identity Center SSO: Setup Across Accounts & CLI

Managing access across multiple AWS accounts used to mean juggling separate IAM users, credentials, and policies for every account in your organization. AWS IAM Identity Center SSO, formerly known as AWS SSO, replaced that mess with a single place to manage workforce authentication and authorization across your entire AWS environment.
If you're a healthcare vendor building integrations that touch protected health information, getting identity management right isn't optional. SOC2 and HIPAA compliance both demand tight control over who can access what, and when. At VectorCare, we run SMART on FHIR applications on AWS for healthcare vendors integrating with EPIC EHR systems, so we've configured IAM Identity Center across multi-account setups more times than we can count. It's foundational to how we keep our managed hosting environments secure and auditable.
This guide walks you through what IAM Identity Center actually is, why AWS renamed it, and, most importantly, how to set it up from scratch. You'll learn how to configure SSO across multiple AWS accounts, connect it to your preferred identity provider, assign permission sets, and authenticate through the CLI. Whether you're consolidating access for a growing team or preparing for a compliance audit, this is the setup to get right early.
Step 1. Understand IAM Identity Center vs AWS SSO
In July 2022, AWS renamed AWS Single Sign-On (AWS SSO) to AWS IAM Identity Center. The name changed; the service did not break. If you have existing AWS SSO configurations, they carried over automatically. AWS made the change to better reflect the service's expanded scope, since it handles far more than just single sign-on. It manages workforce identities, permission sets, and multi-account access across an entire AWS Organization. Knowing this distinction matters because documentation, Terraform providers, CLI commands, and older tutorials still reference the old name, and you will encounter both in the wild.
Why AWS Renamed the Service
AWS had expanded the service significantly before the rename. Originally, AWS SSO focused narrowly on console access and a handful of SAML applications. Over time, AWS added attribute-based access control (ABAC), deeper AWS Organizations integration, and the AWS access portal. The new name, IAM Identity Center, signals that this is the central hub for identity in AWS, not just a login gateway. When you search for documentation today, the official AWS IAM Identity Center user guide still uses the endpoint sso.amazonaws.com, which is a leftover from the old branding.
AWS IAM Identity Center is the recommended approach for any organization running more than one AWS account, and AWS explicitly deprecated the practice of creating individual IAM users per person for workforce access.
What the Service Actually Does
IAM Identity Center sits at the AWS Organizations level. It gives you one place to define who your users are, what permission sets they carry, and which AWS accounts or applications those permission sets apply to. When a user logs in through the AWS access portal, they see only the accounts and roles you've assigned to them. This eliminates the need to create separate IAM users in each account, which becomes unmanageable at any real scale.
The service supports three identity source options:
- Identity Center directory: A built-in directory you manage directly in AWS, best for small teams or when you have no external identity provider.
- Active Directory: Connects to AWS Managed Microsoft AD or your on-premises AD via AD Connector.
- External SAML 2.0 IdP: Integrates with providers like Okta, Azure AD (Entra ID), Google Workspace, or Ping Identity.
Key Concepts Before You Configure
Before you touch any settings, you need to understand three core building blocks. Permission sets are the reusable role definitions you attach to users or groups in a given account. Assignments link a permission set to a specific AWS account and a specific user or group. The identity source determines where IAM Identity Center looks up your users and groups when someone tries to authenticate.
| Concept | What It Controls |
|---|---|
| Permission Set | Which AWS permissions a user gets in a given account |
| Assignment | Which user or group gets a permission set in which account |
| Identity Source | Where user records and authentication live |
Getting these three concepts clear before setup prevents most of the configuration mistakes people run into when configuring aws iam identity center sso for the first time.
Step 2. Gather prerequisites and choose a model
Before you open the AWS console, you need a few things in place. Skipping this step is the fastest way to get halfway through configuring aws iam identity center sso and hit a wall because a missing dependency blocks you from completing the setup in a single session.
What You Need Before You Start
You need AWS Organizations enabled with all features turned on in your root management account. IAM Identity Center must be enabled from the management account or a delegated administrator account you designate. You also need a user with sufficient IAM permissions to enable the service, which at minimum requires sso:* and organizations:* access. If you plan to use an external identity provider, locate your IdP metadata XML file or metadata URL before you begin.
Here's a quick checklist to verify before moving forward:
- AWS Organizations enabled with all features active (not just consolidated billing)
- Management account credentials with administrator-level access
- A chosen AWS region for IAM Identity Center (you configure it in one region, but assignments apply across your entire organization)
- Your identity provider metadata ready if you're using an external SAML 2.0 provider
IAM Identity Center operates as a regional service at the configuration level, but the access portal and account assignments work globally across all AWS regions once deployed.
Pick Your Identity Model
Your choice of identity source shapes every subsequent step in the setup, so decide before you enable the service. If your team is small with no existing directory, the Identity Center built-in directory is the fastest path. If your organization already manages users in Okta, Azure AD (Entra ID), or Google Workspace, connecting your external SAML 2.0 IdP keeps user provisioning centralized and avoids duplicate account management.
| Identity Model | Best For | Provisioning Method |
|---|---|---|
| Identity Center directory | Small teams, no existing IdP | Manual creation or CSV import |
| AWS Managed Microsoft AD | Windows-heavy orgs with existing AD | Automatic sync via AD Connector |
| External SAML 2.0 IdP (Okta, Azure AD) | Orgs with an established IdP | SCIM automatic provisioning |
Switching your identity source after the initial setup resets all existing assignments, which means you rebuild every user-to-account mapping from scratch. Make this call once, make it deliberately, and document the decision for whoever manages the environment after you.
Step 3. Enable Identity Center and connect your IdP
Opening the AWS console in your management account is where this step begins. Navigate to IAM Identity Center in the console search bar and click Enable. AWS provisions the service within seconds and assigns it to the region you're currently logged into. You cannot move the service to another region after enabling it, so confirm your target region before you click anything.
Enable the Service in the Console
Once the service is active, AWS prompts you to review your identity source. The default is the Identity Center built-in directory. If you're staying with the built-in directory, you can skip the IdP connection steps below and move directly to creating users. If you chose an external IdP in Step 2, you need to change the identity source now before adding any users or groups.

To change your identity source, follow these steps:
- In the IAM Identity Center console, go to Settings in the left navigation.
- Under the Identity source tab, click Change identity source.
- Select External identity provider.
- Download the IAM Identity Center SAML metadata file from the console, then upload it to your IdP.
- Upload your IdP metadata XML (or paste the metadata URL) into the console.
- Confirm the change by typing ACCEPT when prompted.
Changing the identity source after you have existing assignments deletes all user and group assignments, so complete this step before you build out any permission sets or account mappings.
Enable SCIM Provisioning for Automatic User Sync
Manual user creation works for tiny teams, but automatic SCIM provisioning keeps your Identity Center directory in sync with your IdP without manual intervention. In the IAM Identity Center Settings page, navigate to the Automatic provisioning section and enable it. AWS generates a SCIM endpoint URL and an access token. Copy both values immediately since the token displays only once.
Enter the SCIM endpoint and access token into your IdP's provisioning configuration. For Okta, this lives under the provisioning tab of your AWS IAM Identity Center SSO application. For Azure AD, you'll find it under the provisioning settings in the enterprise application. Once connected, user and group changes in your IdP sync automatically to IAM Identity Center on a schedule your IdP controls.
Step 4. Build permission sets and assignments
With your identity source connected, you're ready to define what access looks like for each role in your organization. This is where aws iam identity center sso delivers its real value: you define a permission set once and reuse it across as many accounts and users as needed, instead of recreating IAM roles in every individual account.
Create a Permission Set
In the IAM Identity Center console, select Permission sets from the left navigation, then click Create permission set. You have two options: use an AWS managed policy like AdministratorAccess or ReadOnlyAccess as a starting point, or build a custom permission set using inline policies or customer-managed policies you define in IAM.
Keep permission sets narrow by role rather than creating one broad set for the entire team. Granular sets make audits faster and reduce the blast radius of any compromised credential.
For a standard engineering team, a useful starting set of permission sets looks like this:
- AdministratorAccess: For account owners and senior engineers, scoped only to development accounts
- PowerUserAccess: For engineers who need broad service access without IAM management rights
- ReadOnlyAccess: For auditors, security reviewers, or non-engineering stakeholders
- Custom billing policy: For finance team members who need cost explorer and billing access only
Set a session duration on each permission set, which controls how long a user's credentials stay valid after login. For production accounts, keep this at one hour or less.
Assign the Permission Set to Accounts
Once your permission sets exist, you assign them to accounts. Navigate to AWS accounts in the left navigation, select one or more accounts from your organization, and click Assign users or groups. Choose the user or group from your identity source, select the permission set, and confirm.
| Assignment Combination | Result |
|---|---|
| Group + AdministratorAccess + Dev account | All group members get admin access in that dev account |
| User + ReadOnlyAccess + Production account | That single user gets read-only access in production |
Repeat this process for each account and role pairing your team needs. Batch selections let you assign one permission set to multiple accounts in a single action, which saves significant time in large organizations.
Step 5. Configure AWS CLI access and troubleshoot
Once your assignments are live in the console, your team needs CLI access to actually use those credentials for scripting, deployments, and infrastructure work. The AWS CLI v2 handles aws iam identity center sso authentication natively, so you don't need any third-party tools or workarounds.
Configure the CLI with aws configure sso
Run the following command to start the interactive SSO profile setup:
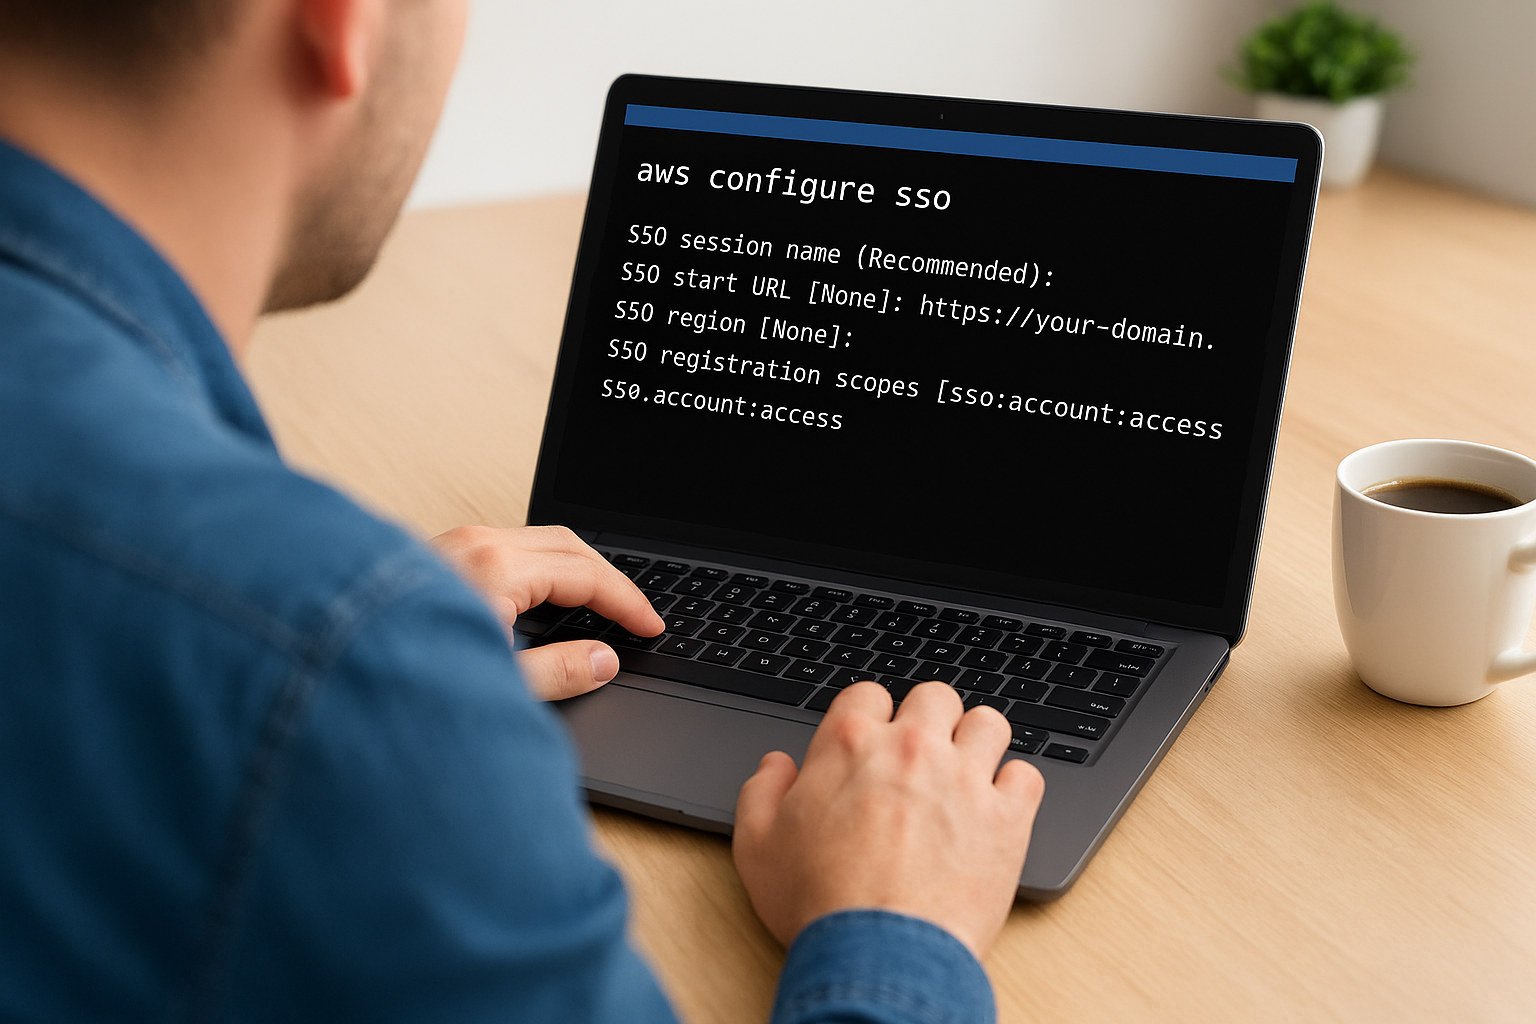
aws configure sso
The CLI prompts you for four values. Enter them as shown below, substituting your actual details:
SSO session name (Recommended): my-sso-session
SSO start URL [None]: https://your-domain.awsapps.com/start
SSO region [None]: us-east-1
SSO registration scopes [sso:account:access]: sso:account:access
After you complete the prompts, the CLI opens a browser window to authenticate through your identity provider. Once you approve the request, the CLI lists the accounts and roles available to your user based on the assignments you configured in Step 4. Select the account and role you want for this profile, then give the profile a name. To use the profile in any command, append --profile your-profile-name or set the AWS_PROFILE environment variable.
Run
aws sso login --profile your-profile-nameto refresh credentials when your session expires, rather than re-running the full configure flow.
Fix the Most Common Login Errors
Token expiration errors are the most frequent issue. They appear as Error loading SSO Token in the terminal and mean your session has expired or the cached token is corrupt. Fix this by running aws sso login --profile your-profile-name to generate a fresh token. If the error persists, delete the cached files in ~/.aws/sso/cache/ and log in again.
Mismatched region errors occur when your CLI profile specifies a different region than the one where you enabled IAM Identity Center. The SSO start URL and the sso_region value in your ~/.aws/config file must both match the region you chose during setup. Open ~/.aws/config, locate the [profile your-profile-name] block, and verify the sso_region field matches your Identity Center region exactly.

Wrap up and keep access tidy
You now have a working aws iam identity center sso setup that covers everything from initial configuration to CLI access. The real work starts after launch: review permission set assignments at least quarterly and remove any user-to-account mappings that no longer reflect someone's current role. Stale assignments are the most common audit finding in multi-account environments, and they're entirely preventable with a regular access review cadence.
Keep your permission sets narrow and named clearly so anyone inheriting this environment can read the config and understand who has what without digging through inline policies. If you rotate IdP SCIM tokens, update the token in IAM Identity Center the same day to avoid provisioning failures. Small habits like these keep your identity layer clean as your organization scales. If you're building healthcare applications that need this same level of access control and security rigor, see how VectorCare handles managed SMART on FHIR deployments on your behalf.
The Future of Patient Logistics
Exploring the future of all things related to patient logistics, technology and how AI is going to re-shape the way we deliver care.
Thank you! Your submission has been received!
Oops! Something went wrong while submitting the form.