HHS HIPAA Security Risk Assessment Tool: How To Use It

Every healthcare vendor handling protected health information (PHI) is required to conduct a security risk assessment under the HIPAA Security Rule, no exceptions. The HHS HIPAA Security Risk Assessment Tool is a free, government-built resource designed to walk small and medium-sized organizations through that exact process. Yet many vendors either don't know it exists or find it intimidating once they open it.
This guide breaks down how to download the tool, what each section asks of you, and how to work through a complete assessment without hiring an outside consultant. You'll get a clear, step-by-step walkthrough so you can identify gaps in your security posture and document your compliance, something health systems increasingly demand before signing contracts.
At VectorCare, we build and manage SMART on FHIR applications that integrate healthcare vendors into EPIC EHR systems, and HIPAA compliance is baked into everything we deliver, from SOC2-certified infrastructure to signed Business Associate Agreements. But compliance doesn't stop at the platform level. Your organization still owns its own risk assessment obligations, and completing an SRA is one of the fastest ways to demonstrate to health system partners that you take security seriously.
Let's walk through the tool from start to finish.
What the SRA tool is and who should use it
The HHS HIPAA Security Risk Assessment Tool is a free application built jointly by the Office for Civil Rights (OCR) and the Office of the National Coordinator for Health Information Technology (ONC). Its job is straightforward: walk your organization through the HIPAA Security Rule requirements one question at a time, collect your answers, and generate a report that shows where your controls hold up and where they fall short. You don't need a compliance attorney to open it, but you do need to take every question seriously and answer based on how your environment actually operates, not how you wish it did.
The tool does not prove you are compliant. It proves you went through the structured process of finding out where you stand.
What the tool actually does
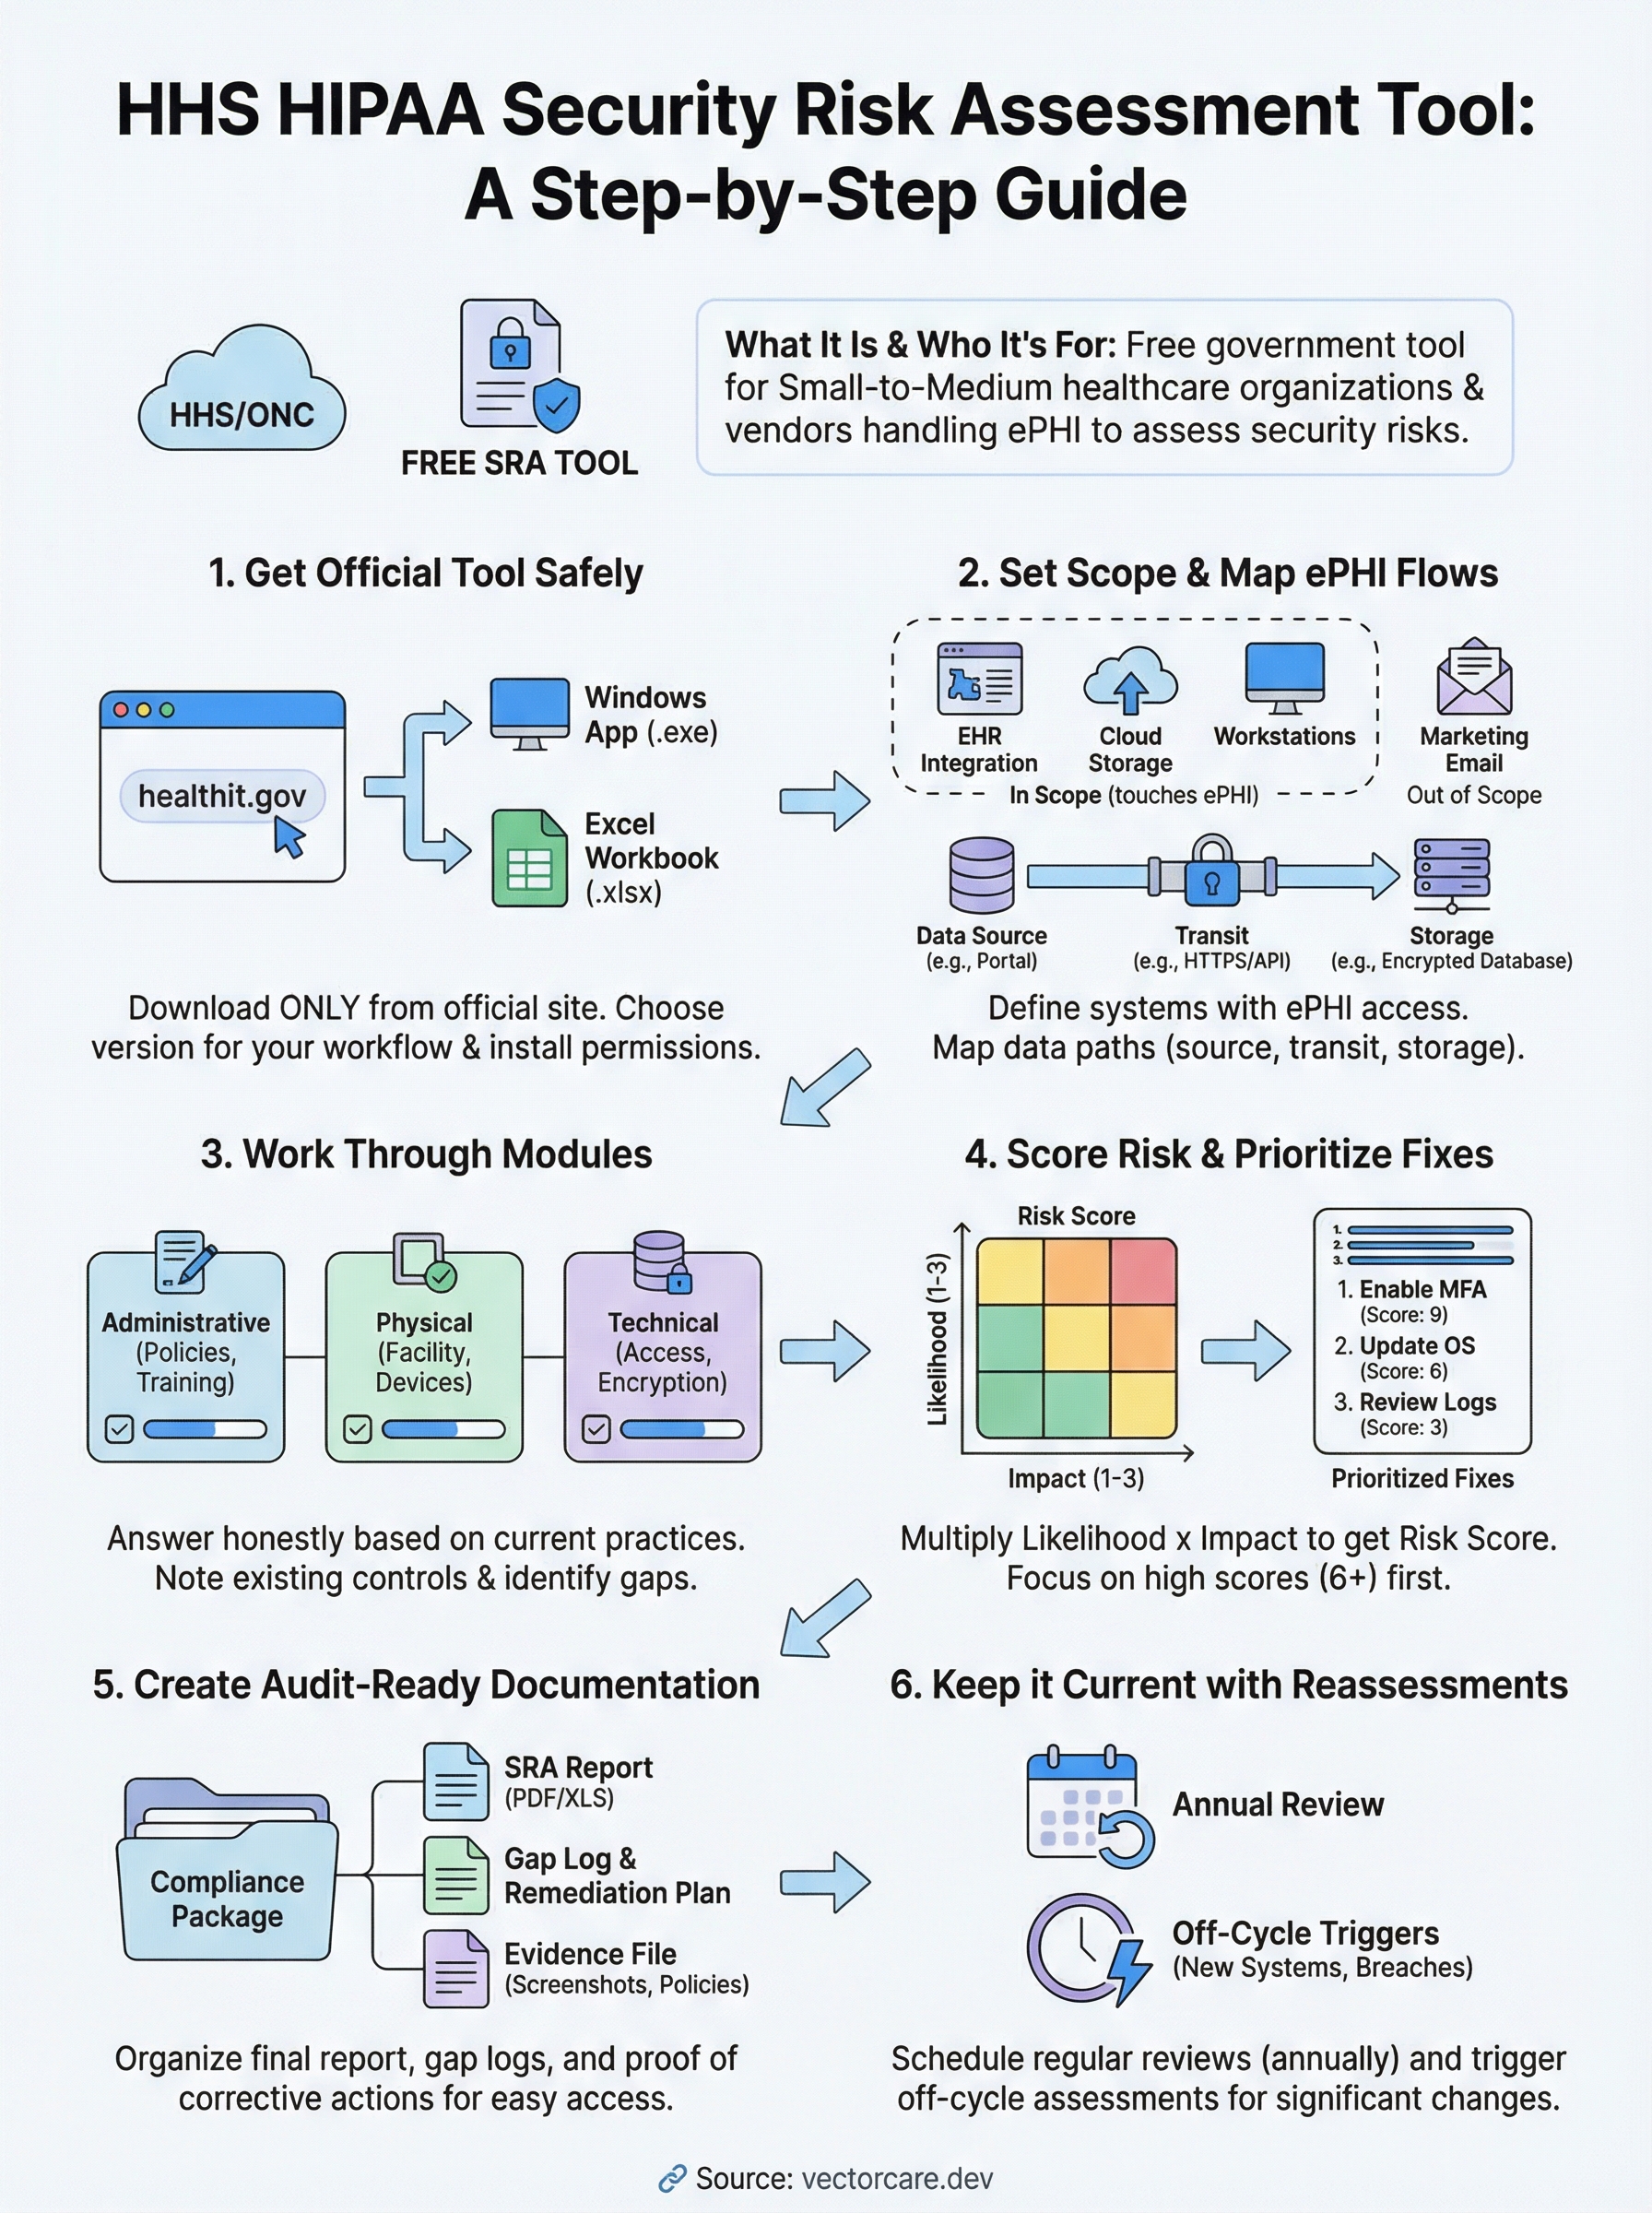
The tool breaks the HIPAA Security Rule into manageable modules, each tied to a specific administrative, physical, or technical safeguard requirement. For every requirement, it prompts you to answer a set of guided questions, flag the threats that apply to your environment, document existing controls you already have in place, and rate the likelihood and impact of each identified risk. At the end of each module, you get a risk score and a running record of your responses that you can export as documentation for audits or health system partners.

The application runs on Windows and is available as a desktop install directly from the official HHS website. ONC also offers a companion Excel-based version for organizations that prefer a spreadsheet format or work in environments where installing new software requires IT approval. Both versions cover the same content, so your choice comes down to workflow preference and what your team will actually use consistently.
Who the tool is built for
ONC and OCR designed this tool specifically for small to medium-sized covered entities and business associates. That includes physician practices, dental offices, behavioral health clinics, and healthcare vendors, such as digital health companies, remote patient monitoring providers, and clinical decision support vendors, that handle electronic protected health information (ePHI) on behalf of health systems.
If your organization touches ePHI in any capacity, federal law requires you to conduct a security risk assessment under 45 CFR § 164.308(a)(1). The SRA tool gives you a structured way to satisfy that requirement without building your assessment process from scratch. Here is a quick breakdown of where it fits:
| Organization type | Good fit? | Why |
|---|---|---|
| Small to mid-size physician practice | Yes | Designed for limited IT staff and budgets |
| Digital health vendor with ePHI access | Yes | Covers business associate obligations directly |
| Large hospital or health system | Partial | May need supplemental tools for full scope |
| Health IT developer without ePHI access | No | HIPAA Security Rule does not apply |
What the tool does not replace
Running the SRA tool is not the same as running a full information security program. The tool helps you identify, score, and document risks, but it does not configure your firewalls, encrypt your databases, or train your workforce on security policies. Those are actions your team needs to take based on what the assessment turns up, and the tool is designed to point you toward exactly those gaps.
The tool also does not satisfy every element of a HIPAA investigation on its own. Auditors will want to see your completed reports alongside concrete evidence that your organization acted on the findings, such as remediation plans, updated security policies, and records of follow-up reviews. Treat the tool as your foundation and your paper trail, not the endpoint of your compliance work.
What you need before you start
Jumping into the hhs hipaa security risk assessment tool without preparation wastes time and produces incomplete results. Before you download anything, gather the specific inputs the tool will ask you about throughout each module. Organizations that prepare in advance typically complete their assessment in a few focused sessions rather than stopping repeatedly to hunt down basic information.
Know your ePHI inventory
The tool will ask you to identify every location where electronic protected health information exists in your environment. That means servers, workstations, laptops, mobile devices, cloud storage, and any third-party applications your team uses to store, transmit, or process patient data. Walk through your environment and list each system by name, its function and access permissions before you open the tool.
An incomplete ePHI inventory is the single most common reason organizations produce inaccurate risk scores during their assessment.
Your inventory does not need to be a formal IT asset management system. A simple spreadsheet with columns for device or system name, location, data type handled, and responsible owner is enough to keep your answers consistent as you move through each module.
Gather your existing security documentation
The tool will ask whether you have specific policies and controls already in place, such as access controls, audit logging, encryption standards, and workforce training records. If you walk in without knowing what you already have, you will either overstate your protections or miss controls that would lower your risk scores. Pull together your current security policies, any previous risk assessments, vendor contracts with Business Associate Agreements, and records of security training your staff has completed.
If your organization lacks formal documentation, note that now. The tool will flag those gaps explicitly, and your remediation work after the assessment will start with those missing controls as the first priority.
Identify your assessment team
Running the assessment solo is possible for very small organizations, but most vendors benefit from including at least one person who manages IT or system administration and one person familiar with day-to-day clinical or operational workflows. The tool asks questions that span both technical controls and organizational practices, and answers are more accurate when both perspectives are represented.
Assign a single owner who will enter responses into the tool and keep the session files organized. That person should also own the final report output and any follow-up remediation tracking so nothing gets lost after the assessment closes.
Step 1. Get the official HHS SRA tool safely
Downloading the wrong version of a compliance tool, or pulling it from a third-party site, can introduce security risks into the very environment you are trying to protect. The hhs hipaa security risk assessment tool is available at no cost directly from the government, and you should only pull it from the official ONC source to make sure you are working with the current, unaltered release.
Find the official download page
Navigate directly to healthit.gov, the website maintained by the Office of the National Coordinator for Health Information Technology. From there, search for "Security Risk Assessment Tool" or browse to the SRA Tool page under the Privacy and Security section. The current version number and release date are listed on the download page, so confirm those details before you save any file to your machine.
Never download the SRA tool from a vendor website, a blog, or a file-sharing service. Only the official HHS and ONC distribution guarantees an unmodified file.
Two formats are available: a Windows desktop installer (.exe) and an Excel workbook for teams that cannot install new software without IT approval. Both cover the same question set and produce comparable documentation, so pick the one your team will actually open and revisit over time.
Choose the right version for your team
Your decision between the Windows app and the Excel version comes down to two factors: install permissions on your machines and the size of your review team. The desktop application walks you through each module with guided prompts and handles scoring automatically, which makes it easier for teams running their first assessment. The Excel version lets you share the file across multiple reviewers without requiring a software installation on every machine, which is useful when more than one person needs to contribute answers.
| Version | Best for | Key advantage |
|---|---|---|
| Windows desktop app | First-time users, small practices | Guided prompts, automatic scoring |
| Excel workbook | Teams with install restrictions | Easy file sharing, no installation needed |
Verify the download before you install
Before you run the installer or open the workbook, check the file size and version number against what the official download page shows. If anything looks different, discard the file and re-download directly from the source. For the Windows version, right-click the .exe, select Properties, and confirm the digital signature traces back to a recognized government or HHS-affiliated publisher.
Once you verify the file, install or open it on the machine your assessment owner will use as the primary working environment throughout the full process.
Step 2. Set your scope and map ePHI flows
Before you answer a single question in the hhs hipaa security risk assessment tool, you need to define exactly what your assessment covers. Scope creep is a real problem here: organizations that try to include every system at once end up with vague answers and inflated risk scores that are hard to act on. Nail down your boundaries first, then map how ePHI actually moves inside them.
Define your scope boundary
Your scope is the set of systems, people, and processes that your assessment will cover. Start by asking one question: does this system create, receive, maintain, or transmit ePHI? If the answer is yes, it belongs inside your scope. If the answer is no, document that exclusion so auditors can see your reasoning. A tight, well-documented scope produces cleaner risk scores and a more actionable remediation plan than a sprawling, everything-included approach.
A scope that is too broad makes your assessment impossible to finish accurately; a scope that is too narrow leaves real risks invisible.
Use this template to define your boundary before opening the tool:
| Item | In scope? | Reason |
|---|---|---|
| EHR integration platform | Yes | Transmits ePHI to EPIC |
| Internal HR system | No | No ePHI contact |
| Cloud file storage (patient records) | Yes | Stores ePHI |
| Marketing email platform | No | No ePHI contact |
Fill in every row honestly. If you are unsure whether something belongs, include it and document why.
Map where ePHI moves
Once your scope is set, trace every path ePHI takes through that defined boundary. Think of this as drawing a simple flow diagram that shows where data enters, where it sits, and where it leaves. Your map should capture the origin, destination, and transmission method for each ePHI flow so you can match those paths to the tool's questions about access controls, encryption, and audit logging.
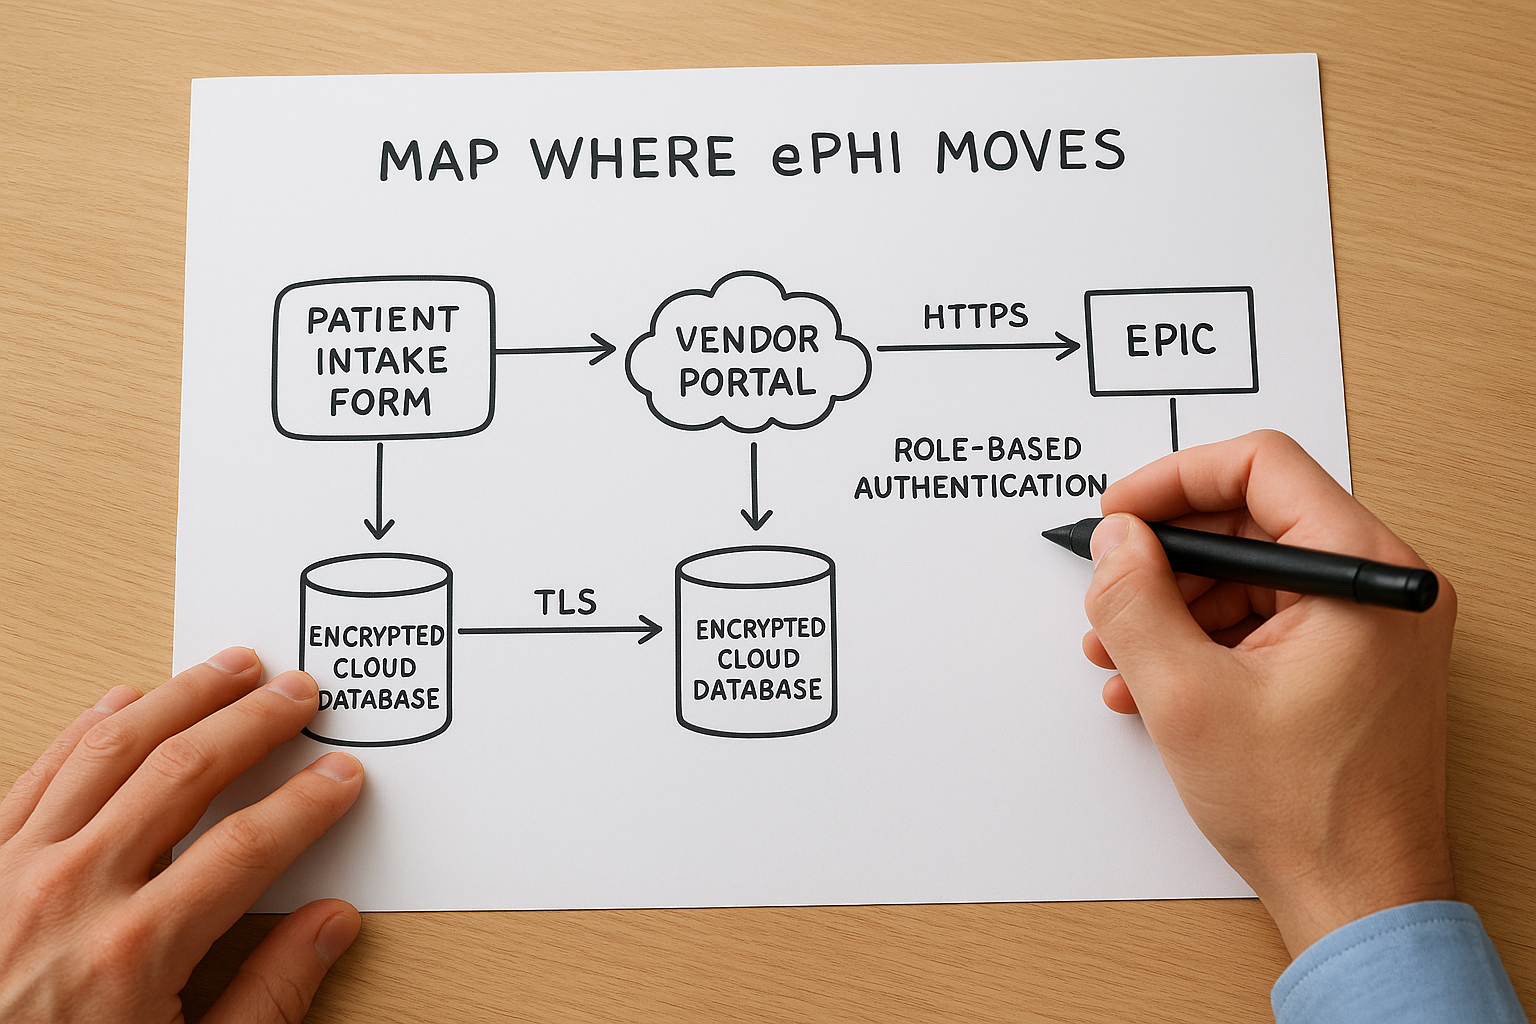
A basic ePHI flow entry looks like this:
- Data source: Patient intake form submitted via vendor portal
- Transit path: HTTPS to application server, then HL7 FHIR API call to EPIC
- Storage location: Encrypted cloud database (TLS at rest and in transit)
- Access controls: Role-based authentication, MFA required
Build one entry like this for each distinct flow in your environment. When the tool asks about specific transmission or storage controls, you will have a concrete answer ready instead of guessing.
Step 3. Work through the tool modules
Once your scope is defined and your ePHI map is complete, open the hhs hipaa security risk assessment tool and work through each module in sequence. The tool organizes questions by safeguard category, starting with administrative controls and moving through physical and technical requirements. Resist the urge to skip ahead or mark questions as not applicable without reading them carefully. Every answer you log becomes part of your audit record, so accuracy here matters more than speed.
Administrative safeguard questions
The administrative safeguard section covers workforce training, access management, contingency planning, and incident response procedures. These questions ask how your organization assigns security responsibilities, how you train staff on handling ePHI, and whether you have formal policies for responding to a security incident. Answer each question based on what your organization actually does today, not what your policies say you should do. The gap between written policy and real practice is exactly what this section is designed to surface.
For each question, the tool prompts you to note existing controls alongside your answer. Use this format to keep your notes consistent across every module:
- Question topic: Workforce security training
- Current control: Annual online training completed, records kept in HR system
- Gap identified: No documented sanctions policy for policy violations
- Owner: HR Manager
Physical and technical safeguard questions
Physical safeguards cover facility access controls, workstation security, and device management, including how your organization handles lost or stolen devices that may contain ePHI. Technical safeguards move into access controls, audit logging, data encryption, and automatic logoff settings across your systems. Both sections will feel more concrete if you referenced your ePHI inventory and flow map from Step 2, since many questions ask about specific system types you already identified there.
Answer every question for every system in your defined scope, even if the same control applies across multiple systems. Auditors want to see system-level documentation, not a blanket response.
Keep a running log of gaps
As you work through each module, flag every question where your answer reveals a missing or incomplete control in a separate document alongside the tool. Do not wait until the full assessment is finished to start that list. Capturing gaps in real time keeps your remediation work organized and prevents you from losing context about why a particular control was marked as absent when you revisit the report weeks later.
Step 4. Score risk and prioritize fixes
After working through the modules of the hhs hipaa security risk assessment tool, you will have a set of identified threats, existing controls, and gaps documented across your defined scope. The next step is to assign risk scores to each identified gap so you can separate critical exposures from lower-priority issues and build a remediation plan your team can actually execute. Skipping this step and treating every finding as equally urgent is one of the fastest ways to burn through resources without making meaningful security improvements.
How the tool calculates risk scores
The tool uses a likelihood-times-impact model to generate a risk score for each threat. Likelihood reflects how probable it is that a specific threat will actually occur given your current controls. Impact reflects how severe the damage would be to patient data, operations, or your organization's standing if that threat materialized. You enter ratings for both factors, and the tool multiplies them to produce a composite risk level for each finding.

Your risk scores are only as accurate as the likelihood and impact ratings you assign, so base every rating on real evidence from your environment, not on optimistic assumptions.
Use this scale as a reference when you assign your ratings inside the tool:
| Rating | Likelihood | Impact |
|---|---|---|
| 1 | Rare: controls are strong, threat requires unusual conditions | Minimal: no ePHI exposure, minor disruption |
| 2 | Possible: some controls exist but gaps remain | Moderate: limited ePHI exposure, recoverable |
| 3 | Likely: controls are weak or absent | High: significant ePHI breach, regulatory exposure |
Apply this consistently across every finding so your final scores reflect a comparable baseline rather than ratings that shift depending on how tired your team was when they answered a particular module.
Rank your findings and choose what to fix first
Once scoring is complete, pull your gap log from Step 3 and add the composite risk score next to each finding. Sort the list from highest score to lowest. Your remediation work starts at the top and moves down, not in the order the tool presented the questions. Focus your first sprint on any finding scored 6 or above using the 3-point scale above, since those represent threats where both likelihood and impact are elevated.
A prioritized remediation entry should capture four things:
- Finding: No multi-factor authentication on remote access
- Risk score: 9 (Likelihood 3, Impact 3)
- Remediation action: Enable MFA on all VPN and remote desktop access points
- Owner and deadline: IT lead, 30 days
Build one entry like this for every scored finding, then assign owners and deadlines before the next assessment cycle begins.
Step 5. Create audit-ready documentation
The hhs hipaa security risk assessment tool generates a report you can export at any point during or after your assessment, but a raw export is not the same as audit-ready documentation. Health systems and OCR investigators want to see a complete, organized package that shows what you assessed, when you assessed it, who was responsible, and what actions followed from your findings. Putting that package together now saves you from scrambling when a business partner or auditor requests proof of your compliance work.
Organize your report output
Export your completed assessment report from the tool and save it in a dedicated compliance folder with a clear file name that includes the assessment date and version number, for example: SRA_Report_2026-04-07_v1.pdf. Store this alongside your ePHI inventory, your scope definition document, and the gap log you built during Step 3. Auditors follow a paper trail, and your goal is to make that trail easy to navigate without your help.

If an auditor cannot find your documentation in under five minutes, your documentation is not ready.
Use this checklist to confirm your report package is complete before you close out the assessment:
- Completed SRA tool export (PDF or Excel)
- Signed scope definition document with date
- ePHI inventory with system names, data types, and owners
- Gap log with risk scores, owners, and remediation deadlines
- Copy of all relevant Business Associate Agreements
- Workforce training completion records for the assessment period
Build your remediation evidence file
A completed assessment report shows what you found. A remediation evidence file shows what you did about it. Start a separate folder that collects the artifacts tied to each corrective action from your prioritized remediation list, such as screenshots of MFA being enabled, updated security policy documents, or records of additional staff training. Attach each piece of evidence to its corresponding finding from the gap log so the connection between the identified risk and the corrective action is clear and direct.
Reviewers at health systems routinely ask vendors for both the assessment report and proof of follow-through before signing contracts. Your remediation evidence file answers that second request. Label each file clearly, date every artifact when you create or collect it, and store the full folder alongside your SRA report so both documents share the same location and can be delivered together as a single, coherent compliance package.
Step 6. Keep it current with reassessments
A completed assessment is not a permanent record of your security posture. Your environment changes, threats evolve, and new ePHI flows appear every time you add a vendor, update software, or expand your team. The hhs hipaa security risk assessment tool is designed to be used repeatedly, and OCR expects covered entities and business associates to conduct reassessments on a regular, documented schedule, not just once during initial compliance setup. Treating your first completed assessment as a finished product is one of the most common and costly mistakes healthcare vendors make.
HIPAA does not specify how often you must reassess, but OCR investigators consistently look for evidence of ongoing, periodic reviews tied to organizational changes.
When to schedule your next assessment
Build your reassessment schedule into your compliance calendar immediately after you close your current assessment. Most small to mid-sized vendors run a full reassessment annually, which gives you a consistent baseline to compare year over year and catches drift in controls that gradual operational changes tend to create. Mark a specific date on your calendar, assign an assessment owner responsible for initiating the next cycle, and treat that date as a fixed commitment rather than a flexible target.
Use this schedule as a starting point and adjust it based on how rapidly your environment changes:
| Organization type | Recommended reassessment cycle |
|---|---|
| Stable environment, no major changes | Annual |
| Rapid growth or frequent vendor additions | Every 6 months |
| Post-breach or post-audit | Immediately, then resume normal cycle |
| New EPIC integration or ePHI expansion | Triggered review within 30 days |
What triggers an off-cycle review
Certain events require you to conduct a partial or full reassessment outside your scheduled cycle. Do not wait for your annual review date if a significant change occurs before then. Off-cycle reviews are shorter and more targeted than full assessments, but they need to be documented with the same level of rigor so your compliance record reflects the actual state of your environment at each point in time.
Run an off-cycle review whenever any of the following occur: you add a new system that touches ePHI, a workforce member reports a potential security incident, you sign a new Business Associate Agreement with a vendor who will access patient data on your behalf, or you make a significant change to your EPIC integration architecture. Log the trigger event, the date the review was initiated, and the findings and actions that resulted, then file that documentation alongside your scheduled assessment reports in your compliance folder.
A simple plan for your next assessment
The hhs hipaa security risk assessment tool gives you a clear path from zero to documented compliance, but only if you follow through on what it surfaces. Download the tool from the official ONC site, define your scope, map your ePHI flows, work through each module with honest answers, score your findings, and build a remediation evidence file that proves you acted on what you found. Each step builds on the last, so skipping ahead produces gaps that auditors will find.
Your compliance work does not stop at the risk assessment. Health systems increasingly require vendors to demonstrate end-to-end security, from their own internal controls through to every platform they use to deliver services. If you need HIPAA-compliant EPIC integration without the engineering overhead, see how VectorCare builds and manages SMART on FHIR applications so your team can focus on what it does best.
The Future of Patient Logistics
Exploring the future of all things related to patient logistics, technology and how AI is going to re-shape the way we deliver care.
Thank you! Your submission has been received!
Oops! Something went wrong while submitting the form.