Epic FHIR Documentation: How To Navigate Specs & Testing

Epic FHIR Documentation: How To Navigate Specs & Testing
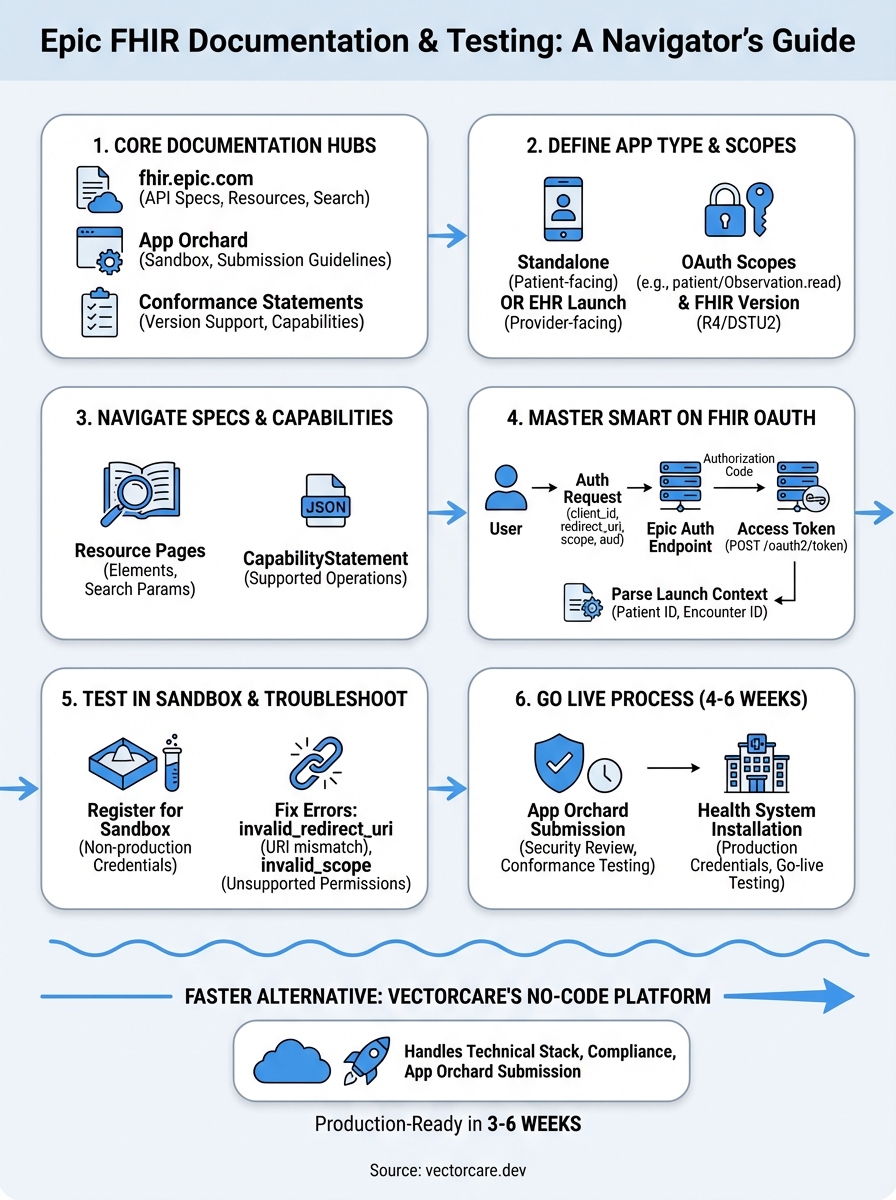
Building a SMART on FHIR application for EPIC means navigating extensive Epic FHIR documentation, API references, authentication flows, sandbox configurations, and compliance specs scattered across multiple portals. For healthcare vendors without a dedicated integration team, locating the right resources and understanding how to apply them can consume weeks before you write a single line of code.
This guide breaks down where to find Epic's FHIR specifications, how to interpret the key technical requirements, and what testing protocols you'll need to satisfy before going live. Whether you're building your first Epic integration or troubleshooting authentication issues with an existing app, you'll get a clear path through the documentation.
At VectorCare, we've helped healthcare vendors bypass much of this complexity with our no-code SMART on FHIR platform, handling the technical heavy lifting so you can focus on your core product. But if you're taking the custom development route, the sections ahead will point you to exactly what you need and explain how each piece fits together.
What Epic on FHIR includes and where to start
Epic's FHIR implementation provides a RESTful API that lets your application read and write patient data from Epic EHR systems using standardized HL7 FHIR resources like Patient, Observation, Condition, and MedicationRequest. The platform supports both backend service integrations (system-to-system) and patient-facing apps (consumer mobile or web), each with different authentication patterns and scope requirements. You'll also find specifications for SMART App Launch, which controls how your application launches within the Epic user interface and receives context about the current patient or encounter.
Core documentation resources
Epic maintains its FHIR documentation across several key portals that you'll reference throughout development. The primary hub is fhir.epic.com, which houses API specifications, supported FHIR resources, search parameters, and examples for each resource type. You'll also need access to Epic's App Orchard Developer Portal for sandbox credentials, testing environments, and submission guidelines when you're ready to list your application. Additionally, Epic publishes conformance statements and capability statements that define exactly which FHIR operations and resource profiles each Epic version supports.

Start with Epic's "Getting Started" guide at fhir.epic.com to understand the authentication flow before diving into individual resource specifications.
Starting point recommendations
Begin by identifying whether you need patient-centered access (apps used by patients) or provider-centered access (apps launched by clinicians within Epic). Patient apps use standalone launch with OAuth redirect flows, while provider apps typically use EHR launch with embedded context passing. Review Epic's sandbox registration process next, as you'll need a non-production ClientID to test API calls before building features. Map out which FHIR resources your application requires (medications, labs, appointments) and check Epic's compatibility matrix to confirm those resources are available in your target Epic version.
Step 1. Define your app type, FHIR version, and scopes
Your first technical decision determines how your application authenticates and what data it can access. Epic supports two primary launch contexts: standalone launch (patient-initiated apps) and EHR launch (provider-initiated apps embedded in Epic workflows). You'll also need to specify which FHIR version your app targets (R4 is the current standard, though some Epic systems still run DSTU2) and declare the exact OAuth scopes that define your data access permissions before you write any integration code.
Choose between standalone and EHR launch
Standalone launch works for patient-facing applications where users authenticate through MyChart or another patient portal, triggering an OAuth redirect flow that returns access tokens. EHR launch applies to provider applications that launch directly from within Epic's interface, receiving patient context automatically through launch parameters. Your choice affects which endpoints you'll call in the epic fhir documentation, what testing scenarios you'll need to build, and how you'll handle session management.
Identify required OAuth scopes
Declare your scopes using the SMART on FHIR format (patient/Observation.read, user/MedicationRequest.write) to specify exactly which resources and operations your app requires. Epic validates these scopes during authentication and blocks any API calls that exceed your declared permissions.
Requesting broader scopes than necessary will trigger security reviews during Epic's approval process and may delay your App Orchard listing.
Build your scope list by mapping each feature in your application to the corresponding FHIR resource types and access levels (read vs. write).
Step 2. Navigate Epic's specifications pages with confidence
The fhir.epic.com portal organizes specifications by resource type, but finding the exact parameters, search capabilities, and examples you need requires understanding how Epic structures its documentation hierarchy. Each FHIR resource page includes supported elements, search parameters, capability statements, and example requests, though not every Epic installation supports all listed features. You'll cross-reference these specs with Epic's conformance statements to verify which operations your target health system actually implements.
Find resource-specific specifications
Start at the FHIR Resource List on fhir.epic.com and select the resource type you need (Patient, Observation, MedicationRequest). Each resource page shows supported elements in a table format with Epic-specific notes about required vs. optional fields. Check the search parameters section to identify which query filters Epic supports, as standard FHIR parameters like _lastUpdated or _count may have Epic-specific limitations.
Epic's documentation shows theoretical capabilities, but individual health systems may restrict certain operations through their security configurations.
Decode capability statements and versions
Download the CapabilityStatement JSON from Epic's conformance endpoint to see exactly which FHIR operations (read, search, create, update) each resource supports. Compare this against the epic fhir documentation version notes, as R4 implementations offer broader resource support than older DSTU2 systems. Verify which Epic version (2020, 2021, 2022) your target health system runs to avoid building features they cannot support.
Step 3. Use SMART on FHIR OAuth and launch context correctly
Authentication failures cause most integration issues with Epic systems, so you need to implement the SMART on FHIR OAuth flow exactly as Epic's specifications require. The authentication process involves registering your redirect URI, requesting authorization codes, exchanging codes for access tokens, and handling token refresh. Epic enforces strict validation on each step, rejecting requests that deviate from the documented parameters or security requirements.
Implement the authorization code exchange
Your application initiates OAuth by redirecting users to Epic's authorization endpoint with specific query parameters including your client_id, redirect_uri, scope, state, and aud (FHIR base URL). After the user approves access, Epic redirects back to your application with an authorization code that you exchange for an access token by posting to the token endpoint.

POST /oauth2/token
Content-Type: application/x-www-form-urlencoded

grant_type=authorization_code&
code=AUTHORIZATION_CODE&
redirect_uri=YOUR_REDIRECT_URI&
client_id=YOUR_CLIENT_ID
Store your access token securely and never log it in plain text, as it provides direct access to protected patient data.
Handle launch context parameters
EHR-launched apps receive launch context through a launch parameter that contains the patient ID, encounter ID, or other contextual information. Parse this context immediately after receiving your access token to determine which patient record your application should display, avoiding the need for additional user input.
Step 4. Test in the sandbox and troubleshoot common failures
Epic's sandbox environment lets you test API calls, authentication flows, and data retrieval without accessing real patient records. You'll request sandbox credentials through the App Orchard Developer Portal, which provides non-production endpoints and synthetic patient data for integration testing. Most authentication and API errors surface during sandbox testing, so identifying and fixing issues here prevents costly delays when you submit your application for production approval.
Register for sandbox access
Navigate to the App Orchard portal and complete the sandbox registration form with your application details, including OAuth redirect URIs and requested FHIR scopes. Epic assigns you a non-production client ID within 2-3 business days, along with access to test FHIR endpoints and synthetic patient identifiers. Use these credentials to configure your authentication flow and verify your token exchange logic works correctly before building additional features.
Common authentication errors
The most frequent failure you'll encounter is invalid_redirect_uri, which occurs when the redirect URI in your authorization request doesn't exactly match the URI registered in your sandbox configuration. Check for trailing slashes, http vs https mismatches, and query parameter differences. Another common issue is invalid_scope errors when requesting scopes your application hasn't declared or that Epic doesn't support.
{
  "error": "invalid_scope",
  "error_description": "Requested scope patient/DiagnosticReport.write is not supported"
}
Review Epic's error response codes in the epic fhir documentation to decode cryptic authentication failures and adjust your implementation accordingly.
Next steps for going live in real health systems
Once you've validated your integration in Epic's sandbox, you'll submit your application through the App Orchard portal for production approval, which typically requires 4-6 weeks of security review and conformance testing. Prepare documentation showing your OAuth implementation, data handling procedures, HIPAA compliance measures, and examples of how your application uses each requested FHIR resource. Epic will test your app against their production conformance servers and may request modifications if your implementation deviates from their epic fhir documentation standards.
After approval, each health system you work with will need to install your application and configure specific security policies for their environment. You'll coordinate with their IT teams to exchange production credentials, verify connectivity, and complete go-live testing with real patient data under controlled conditions.
If building and maintaining this integration seems overwhelming, VectorCare's no-code SMART on FHIR platform handles the entire technical stack, compliance requirements, and App Orchard submission process for you. We deploy production-ready Epic integrations in 3-6 weeks instead of 12-18 months, letting you focus on your core healthcare product rather than integration engineering.
The Future of Patient Logistics
Exploring the future of all things related to patient logistics, technology and how AI is going to re-shape the way we deliver care.
Thank you! Your submission has been received!
Oops! Something went wrong while submitting the form.