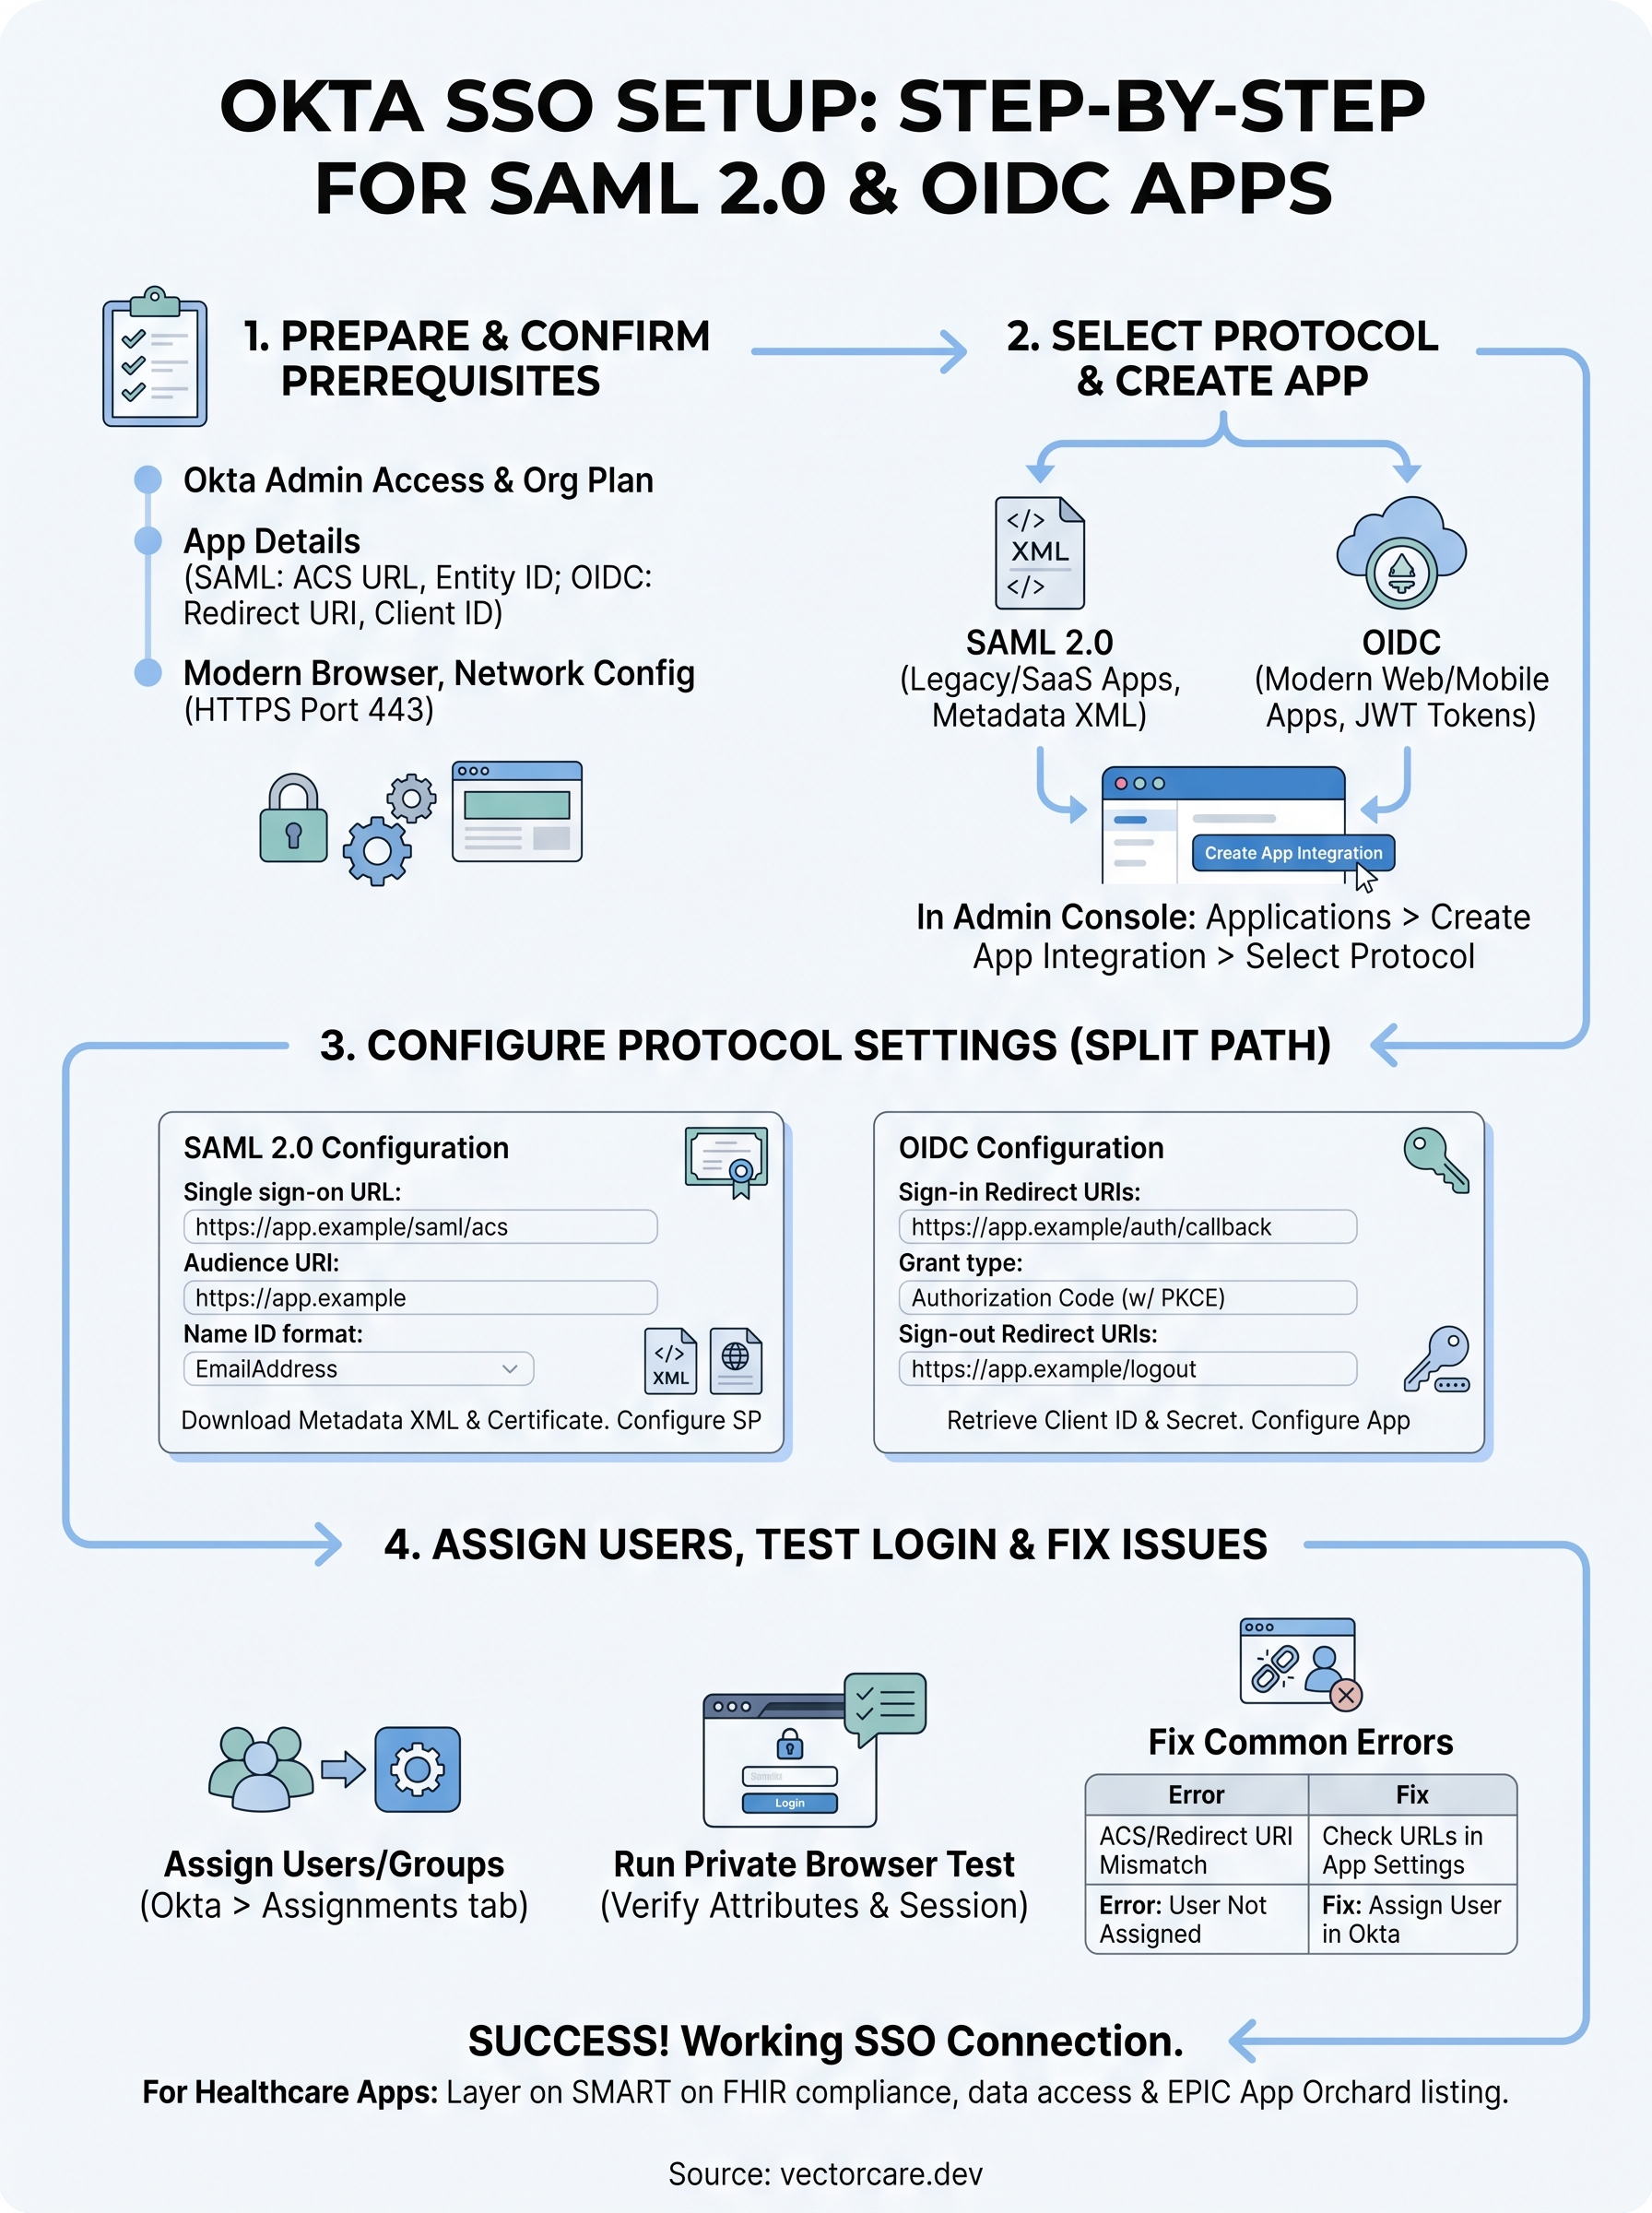
Okta SSO Setup: Step-By-Step Guide for SAML 2.0 & OIDC Apps

Getting Okta SSO setup right is one of those tasks that looks straightforward on paper but quickly turns into a maze of redirect URIs, certificate configurations, and protocol-specific quirks. Whether you're connecting an internal tool or a customer-facing healthcare application, SSO is a non-negotiable piece of your security and compliance posture, especially in environments governed by HIPAA and SOC 2.
This guide walks you through configuring SSO in Okta using both SAML 2.0 and OpenID Connect (OIDC), the two protocols you'll encounter most often. You'll get clear, step-by-step instructions for each approach, along with guidance on choosing the right protocol for your use case, testing your configuration, and troubleshooting common errors before they become production incidents.
At VectorCare, we deal with SSO and identity management constantly. Our no-code platform helps healthcare vendors build and deploy SMART on FHIR applications that integrate directly with EPIC EHR systems, and every one of those integrations demands rock-solid authentication. We've configured enough Okta connections across health system environments to know exactly where teams get stuck, so we built this guide from that hands-on experience. Whether you're setting up Okta for an EPIC-integrated app or any other enterprise application, the steps below will get you from zero to a working SSO connection.
What you need before you start
Before you touch a single configuration field in Okta, you need to confirm that all prerequisites are in place. Missing even one item means you'll hit a wall partway through the okta sso setup process, and backtracking mid-configuration wastes time and introduces mistakes. Take ten minutes now to verify everything below before you open the Admin Console.
Okta account and admin access
You need an active Okta organization (also called an "org") and an account with at least Super Administrator or Application Administrator privileges. Without admin rights, you cannot create new application integrations or modify identity provider settings. If you're working inside a company account, confirm with your IT team that your role grants the necessary permissions before you proceed.
Okta offers a free developer account at developer.okta.com if you need a sandbox environment to test configurations without touching a production org.
Your org also needs to be on a plan that supports the features you intend to use. SAML 2.0 and OIDC are both available on Okta's Workforce Identity and Customer Identity plans, but some advanced features like inline hooks may require higher tiers. Check your current plan in the Okta Admin Console under Settings > Account before you start.
Your application details
You need specific technical details from the application you're connecting to Okta before you can complete the configuration. The exact values differ between SAML 2.0 and OIDC, but the table below covers what you'll need for each protocol:
| Detail | SAML 2.0 | OIDC |
|---|---|---|
| Application entry point | Assertion Consumer Service (ACS) URL | Redirect URI (callback URL) |
| App identifier | Entity ID / Audience URI | Client ID (generated after app creation) |
| Logout URL | Single Logout URL (optional) | Post-logout redirect URI (optional) |
| Signing certificate | SP signing certificate (optional) | Not required |
Gather these values from your application's documentation or admin panel before opening the Okta Admin Console. If you're connecting a healthcare application that uses SMART on FHIR, these values are typically listed in the app's integration or developer settings section.
Browser and network access
This one gets overlooked. You need a modern browser (Chrome, Firefox, or Edge) with no extensions that block cookies or redirect behavior, because Okta's login flows depend on both. SSO configurations involve HTTP redirects, and an extension that interferes with those will produce misleading test failures that look like configuration errors but are actually environment issues.
Your network also needs to allow outbound connections to Okta's endpoints. In corporate or healthcare environments, firewall rules sometimes block external identity provider traffic. Confirm with your network team that your org's domain (formatted as yourdomain.okta.com) and standard HTTPS port 443 are reachable from both your test machine and your application server before you run your first login test.
Step 1. Pick a protocol and create the Okta app
The first decision in your okta sso setup is choosing between SAML 2.0 and OIDC, and it matters because the configuration paths in Okta diverge immediately after this choice. Getting it wrong means tearing down your integration and starting over, so spend a few minutes here before you click anything.
Choose between SAML 2.0 and OIDC
Your application's architecture and the documentation it provides will point you toward the right protocol. SAML 2.0 is XML-based and browser-dependent, making it the standard choice for legacy enterprise applications, vendor-provided SaaS tools, and any app that hands you an ACS URL during setup. OIDC is token-based and built on OAuth 2.0, making it the better fit for modern single-page apps, mobile apps, and APIs that expect JSON Web Tokens (JWTs).
| Scenario | Recommended Protocol |
|---|---|
| Legacy enterprise or SaaS app with ACS URL | SAML 2.0 |
| Modern web app, SPA, or mobile app | OIDC |
| App that requires JWT-based access tokens | OIDC |
| Healthcare app using SMART on FHIR | OIDC |
| App vendor provides a metadata XML file | SAML 2.0 |
If your application documentation provides a metadata XML file or an Entity ID, choose SAML 2.0. If it gives you a redirect URI and asks for a client ID, choose OIDC.
Create the app integration in Okta
Once you know your protocol, creating the app in Okta takes under five minutes. Follow these steps exactly:
- Sign in to your Okta Admin Console at
yourdomain.okta.com/admin. - Navigate to Applications > Applications in the left sidebar.
- Click Create App Integration.
- Select SAML 2.0 or OIDC - OpenID Connect based on your protocol decision.
- For OIDC, select the application type (Web Application, Single-Page Application, or Native Application) that matches your app.
- Click Next to move into the configuration screen.
Give your app a clear, descriptive name that identifies the connected service. You'll reference this name in user assignment and audit logs, so vague labels like "Test App" create confusion later.
Step 2. Configure SAML 2.0 SSO end to end
After creating your SAML 2.0 app integration in Okta, the Admin Console drops you directly into the SAML Settings configuration screen. This is where the bulk of your okta sso setup work happens for SAML-based apps, and accuracy here prevents the authentication errors that cause most failed deployments.
Fill in the SAML settings
You'll see a form with several required fields. Enter the values you collected in the prerequisites step. The critical fields are listed below with the exact format Okta expects:
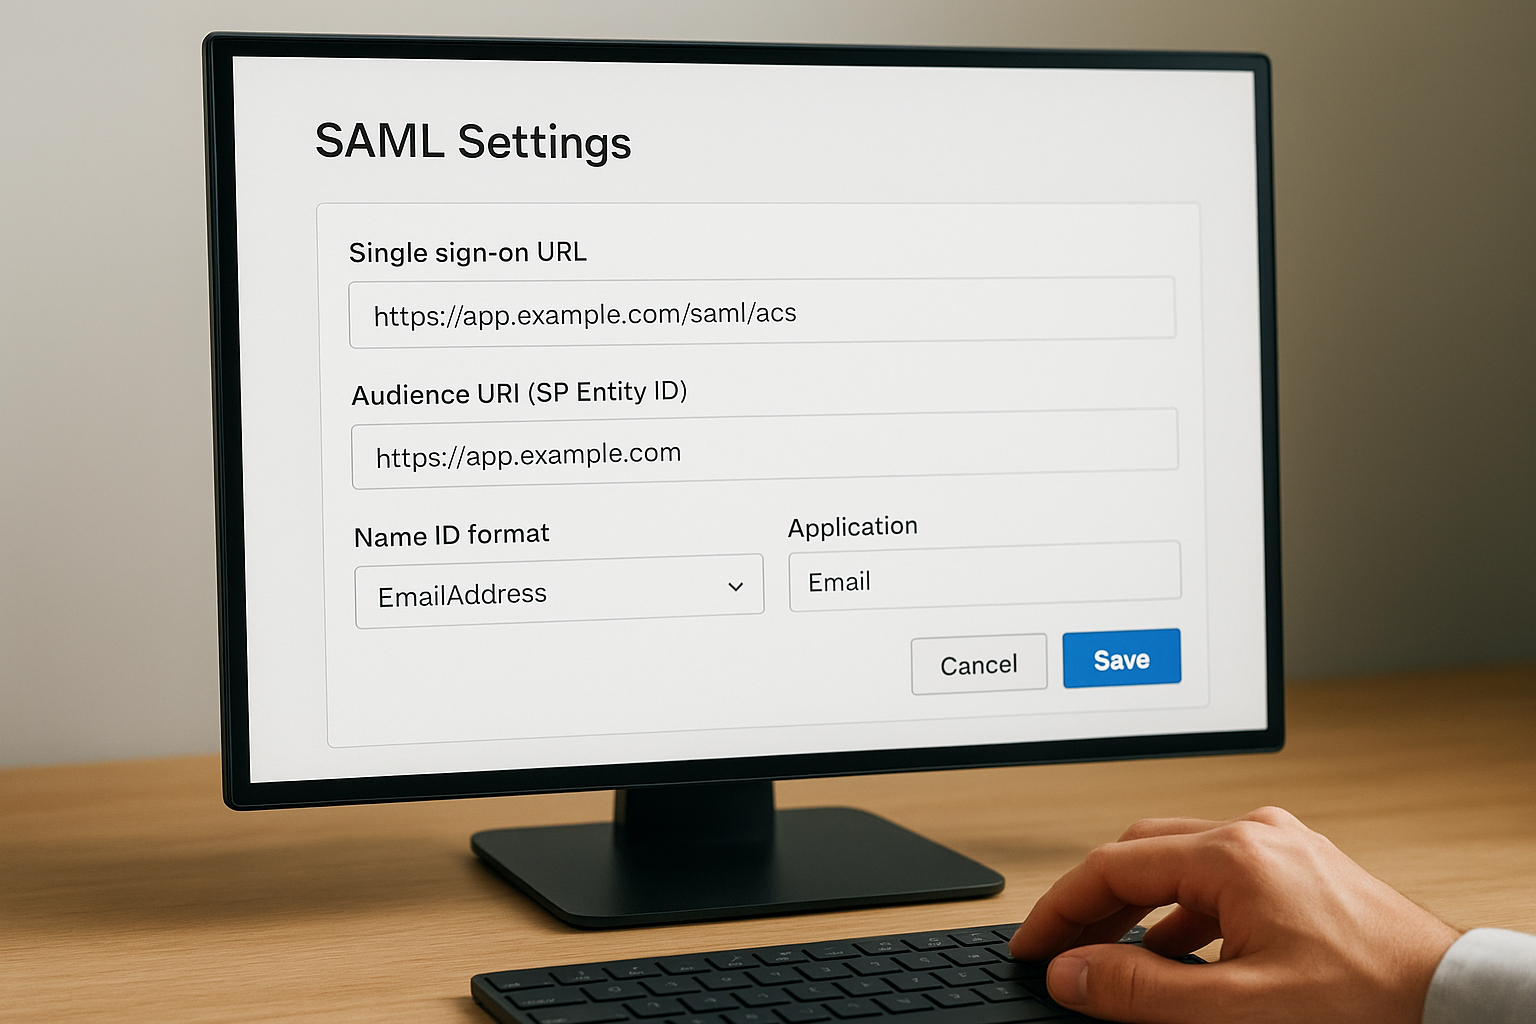
| Field | What to enter | Example |
|---|---|---|
| Single sign-on URL | Your app's ACS URL | https://app.example.com/saml/acs |
| Audience URI (SP Entity ID) | Your app's Entity ID | https://app.example.com |
| Name ID format | Match what your app expects | EmailAddress or Unspecified |
| Application username | How Okta maps users | Email or Okta username |
Name ID format is the field teams most often misconfigure. If your application expects an email address as the SAML subject, select EmailAddress in the dropdown. Select Unspecified only when your app documentation explicitly says to.
Double-check the ACS URL for trailing slashes. A mismatch as small as a missing slash causes SAML assertion failures that are difficult to trace without a SAML debugging tool.
Download the metadata and configure your SP
Once you save the SAML settings, Okta generates your Identity Provider metadata. Scroll to the bottom of the app's Sign On tab and click View SAML setup instructions to access it. Your metadata XML will look similar to this:
<EntityDescriptor entityID="http://www.okta.com/exk1abc2def3ghi">
  <IDPSSODescriptor>
    <SingleSignOnService
      Binding="urn:oasis:names:tc:SAML:2.0:bindings:HTTP-POST"
      Location="https://yourdomain.okta.com/app/yourapp/exk1abc/sso/saml"/>
  </IDPSSODescriptor>
</EntityDescriptor>
Copy the SSO URL and the X.509 certificate from this page and paste them into your application's identity provider settings. Most apps accept either the raw metadata XML or the individual values. Use the XML upload option when your app supports it, since it eliminates manual copy-paste errors.
Step 3. Configure OIDC SSO end to end
The OIDC configuration screen in Okta looks different from the SAML path, but the core okta sso setup logic is the same: you're telling Okta where to send users after authentication and how to identify your application. Work through the fields below in order, and confirm each value against your application's documentation before saving.
Fill in the OIDC app settings
After creating your OIDC app integration, Okta places you on the New Web App Integration screen. The fields you must complete are listed in the table below:
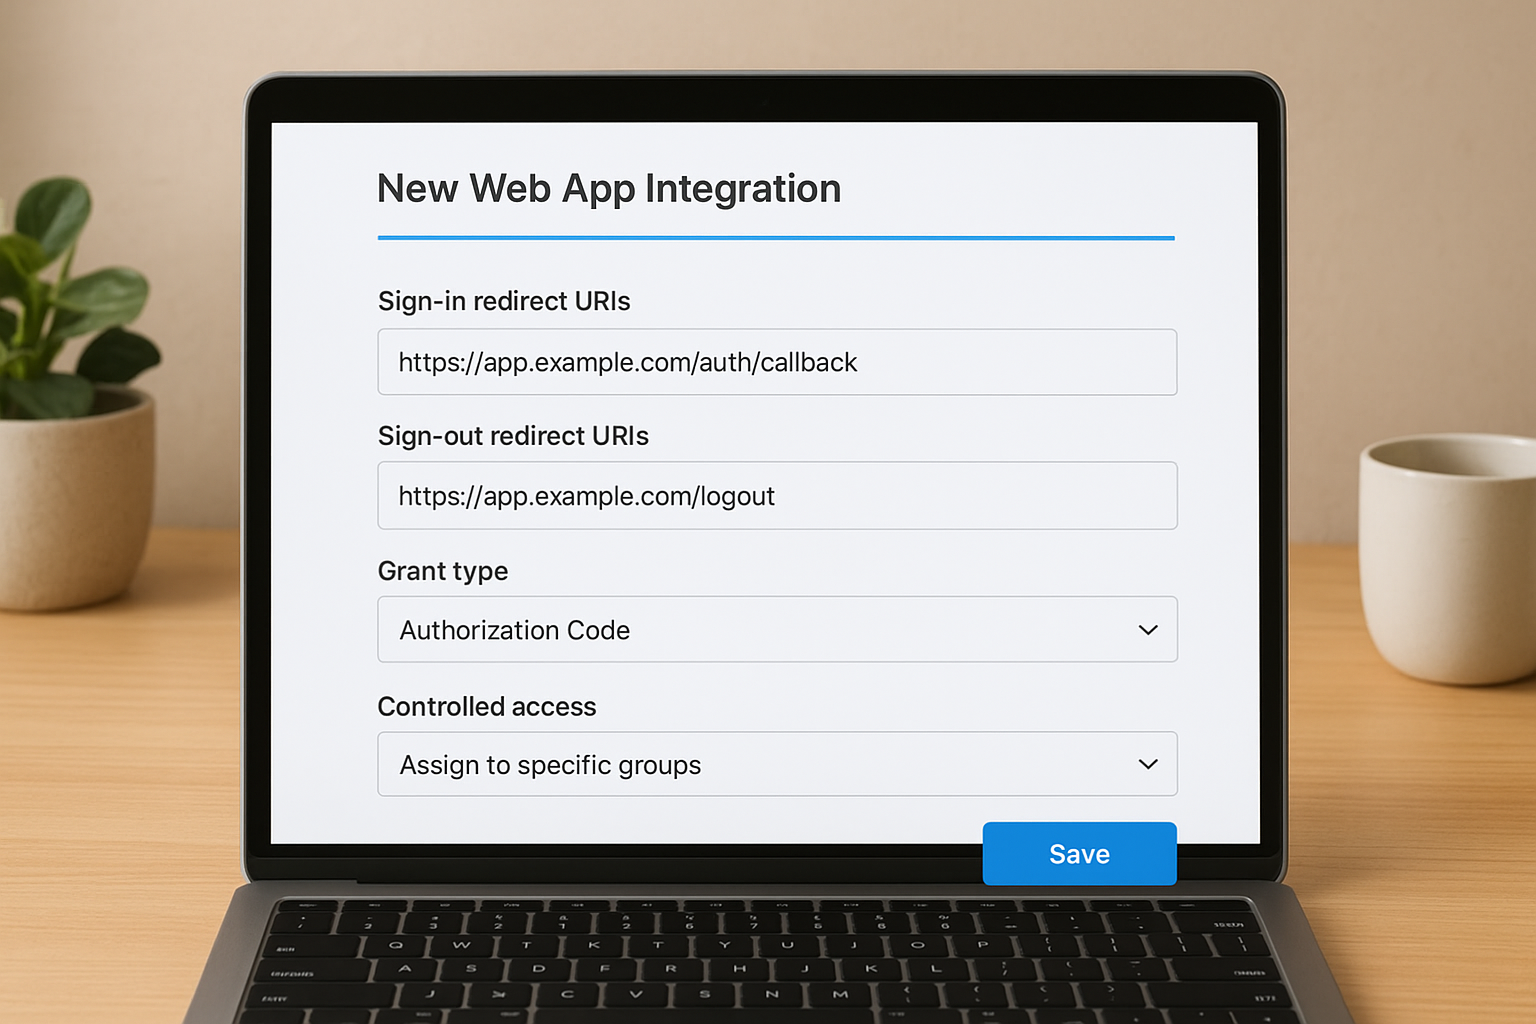
| Field | What to enter | Example |
|---|---|---|
| Sign-in redirect URIs | Your app's callback URL | https://app.example.com/auth/callback |
| Sign-out redirect URIs | Post-logout destination | https://app.example.com/logout |
| Grant type | Match your app's flow | Authorization Code |
| Controlled access | Assignment method | Assign to specific groups |
Select Authorization Code as the grant type for most web applications. Use Authorization Code with PKCE for single-page apps and mobile apps that cannot securely store a client secret.
If your app supports PKCE, always prefer it over the implicit grant type, which Okta has deprecated and removed from new integrations.
Retrieve your client credentials and update your app
Once you save the settings, Okta generates a Client ID and Client Secret on the app's General tab. Copy both values immediately and store them in your application's environment configuration. Your app uses these credentials to exchange authorization codes for tokens.
Your token endpoint and other discovery values are available at:
https://yourdomain.okta.com/oauth2/default/.well-known/openid-configuration
Paste this discovery URL into your application's OIDC configuration if it supports automatic metadata discovery. If your app requires individual values, pull the authorization_endpoint, token_endpoint, and jwks_uri from the JSON response and enter them manually into your identity provider settings.
Step 4. Assign users, test login, and fix common issues
With your SAML 2.0 or OIDC configuration saved, the final phase of your okta sso setup covers three tasks: assigning users, running a real login test, and resolving the errors that appear most often in new integrations. Skip any of these and you risk discovering problems in production rather than your sandbox.
Assign users to the app
Navigate to your app integration in the Okta Admin Console, click the Assignments tab, and select either individual users or groups. Click Assign, choose your test account, and save. Okta does not grant access automatically; a user with no assignment gets an error page before the login flow even starts.
Assign a dedicated test user account rather than your own admin account to avoid confusing authentication logs during debugging.
Run your first login test
Open a private browser window and navigate to your application's login page. Trigger the SSO flow and confirm you land on the Okta sign-in screen. After authenticating, verify that your app receives the expected user attributes and that the session is active.
For SAML, use a SAML Tracer browser extension to inspect the assertion in real time. For OIDC, check your app's token response for the correct sub, email, and any custom claims you configured. A successful test should confirm all of the following:
- The user lands on the correct post-login destination
- The app displays the right user name and email
- No error banners or redirect loops appear
- The session persists after a page refresh
Fix common errors
The table below covers the errors teams encounter most frequently, along with the exact field to check in Okta:
| Error message | Root cause | Where to fix it |
|---|---|---|
| SAML assertion validation failed | ACS URL mismatch | SAML Settings > Single sign-on URL |
| Redirect URI mismatch | Callback URL not whitelisted | OIDC Settings > Sign-in redirect URIs |
| User not assigned | No assignment for the account | App > Assignments tab |
| Invalid client_id | Wrong credential in app config | App > General > Client Credentials |
| NameID format mismatch | SP expects different subject format | SAML Settings > Name ID format |
Fixing most authentication errors comes down to a mismatch between what Okta sends and what your application expects to receive. Compare both sides field by field before making any configuration changes.
Wrap up and next steps
A complete okta sso setup covers four concrete steps: verifying prerequisites, selecting the right protocol, configuring SAML 2.0 or OIDC settings accurately, and testing with a real user account before you go live. Each phase builds on the previous one, so a gap in any step typically shows up as an authentication error in the next. Work through the guide in order and you'll have a working SSO connection without the usual back-and-forth debugging.
Your next move depends on what you're connecting. For standard enterprise apps, you're ready to assign user groups and monitor login activity in Okta's system logs. If you're building a healthcare application that needs to authenticate against EPIC EHR systems, the identity layer is just one part of the integration picture. SMART on FHIR compliance, FHIR data access, and EPIC App Orchard listing all layer on top of it. See how VectorCare handles the full integration stack so you can skip the months of custom engineering.
The Future of Patient Logistics
Exploring the future of all things related to patient logistics, technology and how AI is going to re-shape the way we deliver care.
Thank you! Your submission has been received!
Oops! Something went wrong while submitting the form.