Okta Dynamic Client Registration: API Setup And Examples

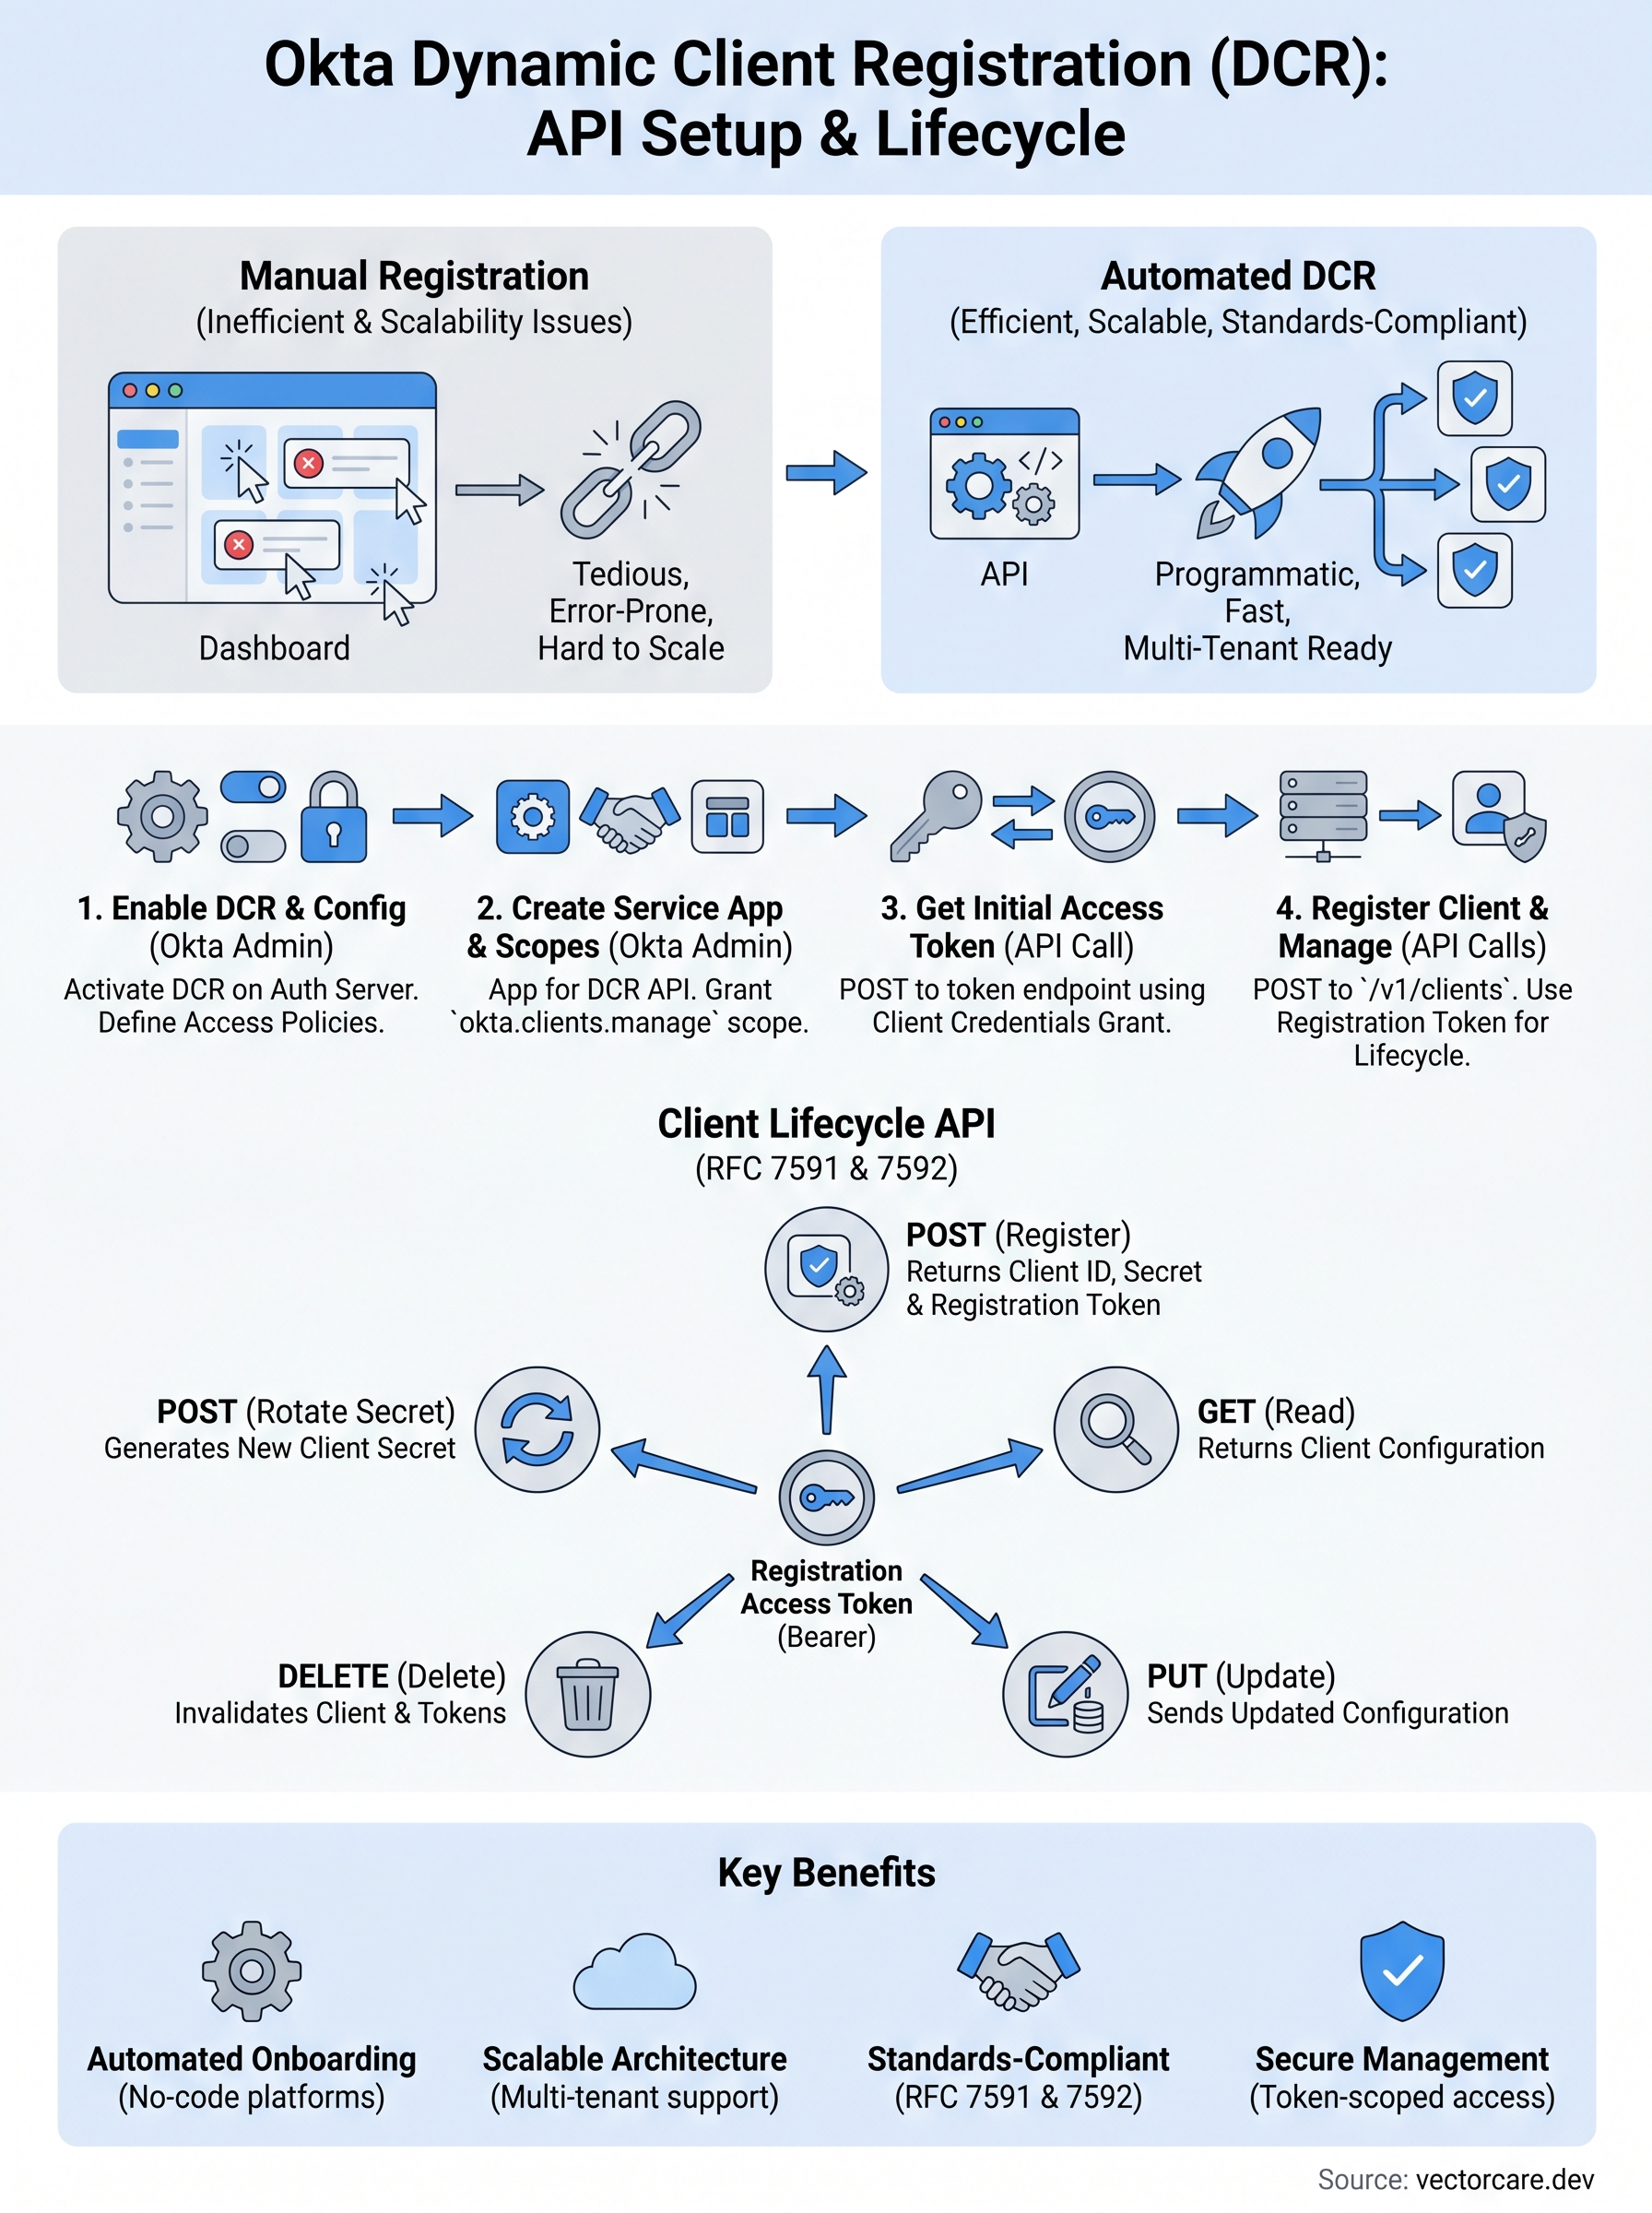
Every OAuth 2.0 client your application needs, registered manually, one at a time, through a dashboard. That workflow breaks down fast when you're onboarding multiple health systems or deploying SMART on FHIR apps across dozens of EPIC instances. Okta Dynamic Client Registration solves this by letting you programmatically create and manage OAuth clients through a single API, no manual clicks required.
At VectorCare, we deal with this exact problem daily. Our no-code platform helps healthcare vendors launch SMART on FHIR applications into EPIC's ecosystem, and OAuth client management at scale is a core piece of that infrastructure. Okta's DCR API is one of the tools that makes automated, standards-compliant client provisioning possible without burdening vendor engineering teams.
This guide walks you through the full setup: enabling DCR in your Okta org, configuring access policies, making your first registration request, and managing clients after creation. You'll get working API examples you can adapt to your own environment, along with practical notes on scopes, token handling, and common errors. Whether you're building a multi-tenant SaaS product or integrating with healthcare identity infrastructure, you'll leave with a clear implementation path from first request to production-ready registration flow.
What Okta dynamic client registration does
Okta dynamic client registration (DCR) is an implementation of RFC 7591, the OAuth 2.0 standard for programmatic client registration. Instead of creating each OAuth client by hand in the Okta Admin Console, you send a single HTTP POST request to Okta's registration endpoint with your client metadata, and Okta returns a fully provisioned client ID and secret. That shift from UI-driven to API-driven registration is the core of what DCR provides.
The RFC 7591 standard behind DCR
RFC 7591 defines how a client application can register itself with an authorization server without manual administrator intervention. The spec describes a protected registration endpoint that accepts JSON metadata describing the client, including its name, allowed redirect URIs, grant types, and token endpoint authentication method. Okta follows this spec closely, which means skills you build here transfer to other RFC 7591-compliant authorization servers.
The standard also defines a client registration access token that gets returned at registration time. You use that token for subsequent operations on the client record, like reading its current configuration or rotating its credentials. Okta extends the base spec with additional metadata fields specific to its platform, but the core request and response format stays compliant with the open standard.
RFC 7591 compliance means your DCR implementation is portable: the same patterns apply across any standards-based authorization server, not just Okta.
How Okta implements the spec
Okta exposes the DCR endpoint at /oauth2/v1/clients under your org's base URL, or at /oauth2/{authorizationServerId}/v1/clients when targeting a custom authorization server. Each registered client lives as a first-class object in Okta and inherits the access policies you configure on that authorization server, including which scopes it can request and which grant types it can use.
Okta also supports the RFC 7592 client management spec, which extends DCR with GET, PUT, and DELETE operations on individual client records. This means you can read a client's full configuration, update its metadata, and delete it entirely through the same API surface. Combined, these two specs give you a complete client lifecycle API that requires no dashboard interaction after the initial org setup.
Where DCR fits in a multi-tenant architecture
In a single-tenant setup, you might register a handful of clients manually and never revisit the process. In a multi-tenant product serving dozens or hundreds of health systems, that manual approach fails immediately. Each tenant typically needs its own OAuth client with its own redirect URIs, scopes, and credential set. DCR lets your application provision those clients automatically during onboarding, rather than queuing up admin tasks.
Your backend service calls the registration endpoint as part of the tenant onboarding flow, stores the returned client ID and secret securely, and from that point on handles token requests independently for that tenant. If a tenant offboards, you call DELETE on the client record and the credentials stop working immediately. This tight programmatic control over the client lifecycle is exactly what makes automated OAuth infrastructure viable at scale, whether you're managing SMART on FHIR app instances or any other multi-tenant OAuth deployment.
Prerequisites and required Okta permissions
Before you make your first Okta dynamic client registration API call, you need the right org configuration in place. Missing any of these pieces will produce 401 or 403 errors that are frustrating to diagnose after the fact, so take a few minutes to verify each item before you write a single line of code.
What you need in your Okta org
Your Okta org must have Dynamic Client Registration enabled on the authorization server you plan to use before the /v1/clients endpoint will accept requests. You also need at least one custom authorization server configured, unless you intend to target the Okta org authorization server directly. Each authorization server maintains its own DCR policy, so confirm you're working with the right one before you start.
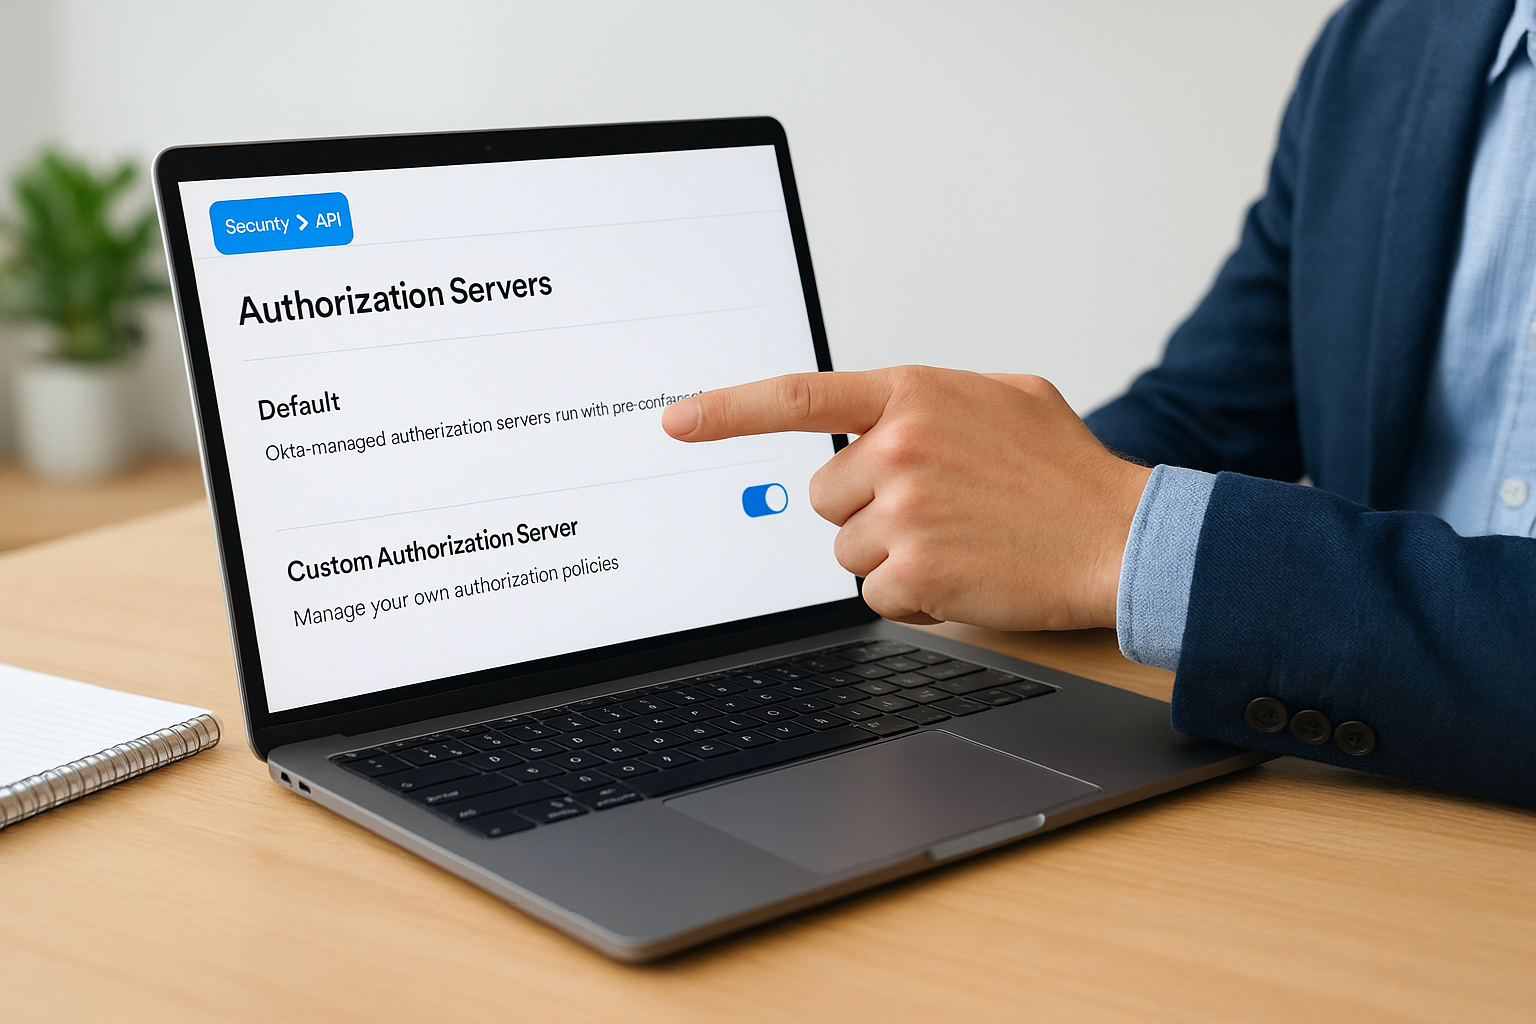
To turn on DCR for a custom authorization server, go to Security > API > Authorization Servers in the Okta Admin Console, select your server, open the Settings tab, and verify that Dynamic Client Registration is enabled. You'll also want these details ready before moving forward:
- Okta org base URL (e.g.,
https://your-org.okta.com) - Authorization server ID (listed under Security > API > Authorization Servers)
- An initial access token or service app credentials to authenticate your registration requests
- The authorization server's issuer URI for constructing the DCR endpoint URL
Required scopes and permissions
Okta's DCR endpoint requires an initial access token to authorize each registration request. Without one, the endpoint returns a 401 regardless of your other credentials. Okta supports two ways to generate this token: a static initial access token created in the Admin Console, or an OAuth 2.0 client credentials grant using a service app configured with the okta.clients.manage scope.
Use the OAuth 2.0 client credentials approach in production. Static tokens do not expire automatically and create unnecessary long-term credential risk in any environment handling patient data or health system credentials.
If your platform targets multiple authorization servers, each one requires its own DCR policy configuration and its own granted scopes for your service app. Verify that okta.clients.manage is assigned on every authorization server you plan to use, not just the one you tested first. You set scope grants per authorization server inside the access policy settings for each server in the Admin Console.
Step 1. Find your issuer and DCR endpoint
Before you send any registration requests, you need two pieces of information: your issuer URI and the exact DCR endpoint URL derived from it. Getting these wrong produces confusing errors because Okta silently routes requests to different authorization servers depending on the path, and a mismatched endpoint can cause your token to fail validation even when the credentials are correct.
Locate your Okta issuer URI
Your issuer URI is the base address Okta uses to identify a specific authorization server. You find it in the Admin Console under Security > API > Authorization Servers. Click into the server you plan to use and copy the value from the Issuer field on the Settings tab. It follows this format:
https://{yourOktaDomain}/oauth2/{authorizationServerId}
For example, if your org domain is dev-1234567.okta.com and your server ID is aus8x3abc123, your issuer is:
https://dev-1234567.okta.com/oauth2/aus8x3abc123
If you are using the Okta org authorization server instead of a custom one, your issuer is simply https://{yourOktaDomain}. Keep in mind that the org authorization server has more restricted DCR policy controls, so most production setups use a custom authorization server.
Always confirm your issuer URI by calling the
.well-known/openid-configurationendpoint. The response JSON lists the registration endpoint directly in theregistration_endpointfield, which removes any guesswork.
Construct the registration endpoint URL
Once you have the issuer URI, appending /v1/clients gives you the full DCR endpoint. The table below shows the two patterns you'll encounter depending on which authorization server type you use:
| Authorization Server Type | DCR Endpoint |
|---|---|
| Custom authorization server | https://{yourOktaDomain}/oauth2/{authServerId}/v1/clients |
| Org authorization server | https://{yourOktaDomain}/oauth2/v1/clients |
You can verify the endpoint is live by calling the OpenID Connect discovery document:
GET https://{yourOktaDomain}/oauth2/{authServerId}/.well-known/openid-configuration
Locate the registration_endpoint key in the JSON response. That value is exactly what you pass as the URL for your POST, GET, PUT, and DELETE requests throughout the rest of this guide.
Step 2. Create the right token for DCR
Every request to the Okta dynamic client registration endpoint requires a bearer token in the Authorization header. Okta supports two ways to produce that token: a static initial access token you generate once in the Admin Console, and a dynamic token you fetch on demand via the OAuth 2.0 client credentials grant. Both work, but they carry very different operational risks in production environments.
Option 1: Static initial access token
A static token is the faster path when you are testing locally or building a proof of concept. In the Admin Console, navigate to Security > API > Authorization Servers, select your server, and open the Access Policies tab. Find the Initial Access Token section, generate a token, and copy it immediately because Okta displays it only once. You then pass it as a bearer token on every registration request:
Authorization: Bearer {initialAccessToken}
Static tokens do not expire by default, which makes them a liability in any environment that touches patient data or production health system credentials. Delete them as soon as you finish testing.
Option 2: Client credentials grant (recommended for production)
The client credentials grant generates a short-lived access token your application fetches programmatically before each registration call. Start by creating a service app in Okta with machine-to-machine credentials, then grant it the okta.clients.manage scope on your target authorization server under its Access Policies tab.
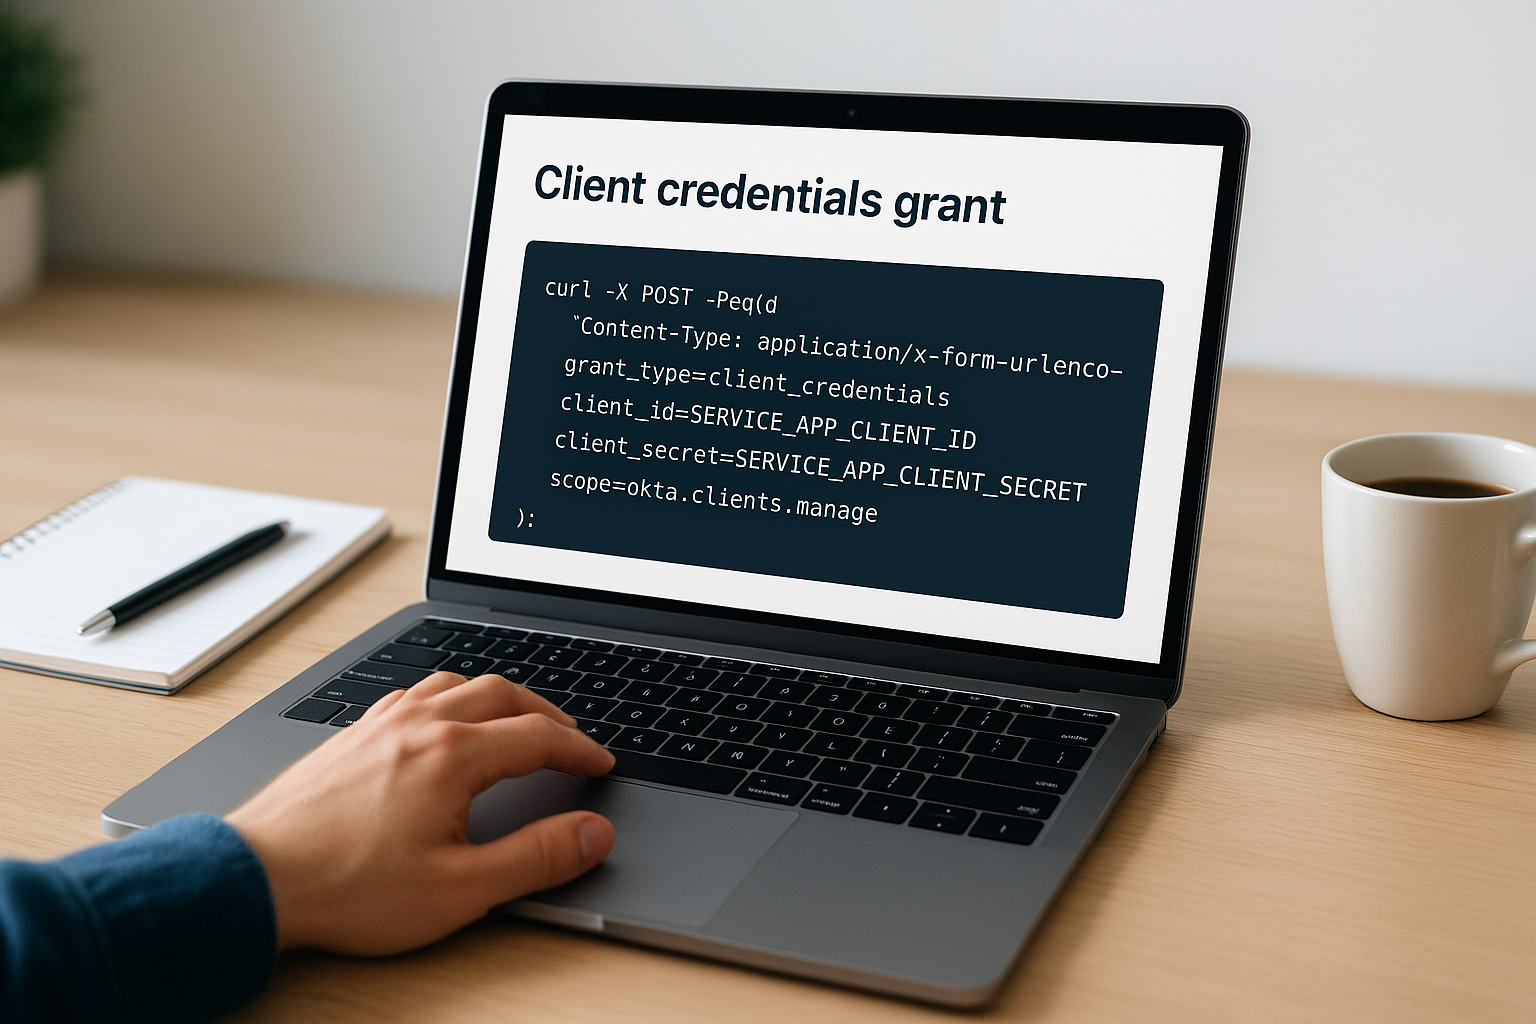
To fetch a token, send a POST request to your authorization server's token endpoint:
curl -X POST "https://{yourOktaDomain}/oauth2/{authServerId}/v1/token" \
  -H "Content-Type: application/x-www-form-urlencoded" \
  -d "grant_type=client_credentials" \
  -d "client_id={serviceAppClientId}" \
  -d "client_secret={serviceAppClientSecret}" \
  -d "scope=okta.clients.manage"
Okta returns a JSON response containing an access_token field. Pull that value out and include it as your bearer token on the registration request. Tokens expire after one hour by default, so build your integration to fetch a fresh token before each registration batch rather than caching one across sessions.
Step 3. Register a client with POST examples
With your bearer token ready and your DCR endpoint URL confirmed, you're ready to make your first registration call. A POST request to the DCR endpoint sends a JSON body describing the client you want Okta to provision and returns a client ID and optional client secret immediately. The exact fields you include depend on the grant types and token endpoint authentication method your application requires.
Minimal registration request
The minimum viable request requires three fields: client_name, redirect_uris, and grant_types. Everything else defaults to your authorization server's configured settings. Use this call first to confirm your token and endpoint are wired correctly before adding more metadata:
curl -X POST "https://{yourOktaDomain}/oauth2/{authServerId}/v1/clients" \
  -H "Authorization: Bearer {accessToken}" \
  -H "Content-Type: application/json" \
  -d '{
    "client_name": "my-test-client",
    "redirect_uris": ["https://app.example.com/callback"],
    "grant_types": ["authorization_code"],
    "response_types": ["code"],
    "token_endpoint_auth_method": "client_secret_basic"
  }'
Okta returns a 201 response containing the full client object, including the generated client_id, client_secret, and a registration_access_token. Store that registration access token immediately in encrypted storage. You will need it for every subsequent read, update, and delete operation on this client record.
Registering a SMART on FHIR client
SMART on FHIR applications follow the same registration pattern but require specific metadata fields to function inside EPIC workflows. Most SMART app launches use asymmetric key authentication, so jwks_uri replaces the client secret in the registration payload:
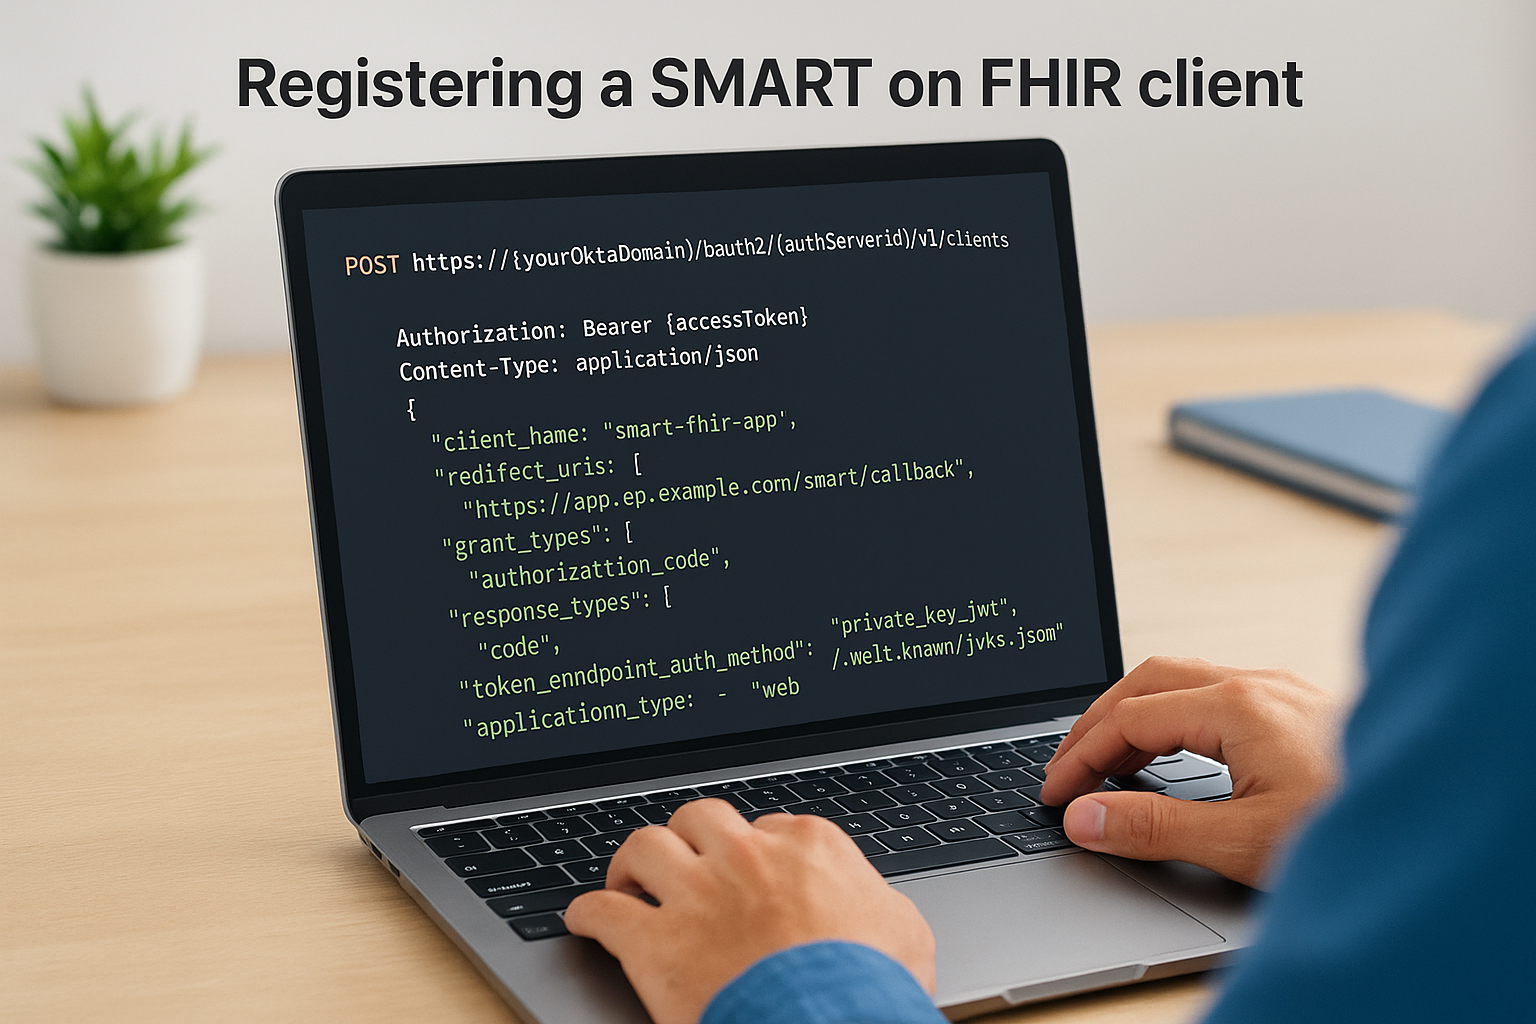
curl -X POST "https://{yourOktaDomain}/oauth2/{authServerId}/v1/clients" \
  -H "Authorization: Bearer {accessToken}" \
  -H "Content-Type: application/json" \
  -d '{
    "client_name": "smart-fhir-app",
    "redirect_uris": ["https://app.example.com/smart/callback"],
    "grant_types": ["authorization_code"],
    "response_types": ["code"],
    "token_endpoint_auth_method": "private_key_jwt",
    "jwks_uri": "https://app.example.com/.well-known/jwks.json",
    "application_type": "web"
  }'
Okta exposes the
registration_access_tokenonly once in the initial POST response. If you lose it, you cannot manage that client through the API without admin intervention.
When you integrate okta dynamic client registration into a multi-tenant onboarding pipeline, triggering this POST call automatically gives each health system its own isolated client record with no manual steps involved.
Step 4. Read, update, rotate, and delete clients
Once okta dynamic client registration provisions a client, your application manages that client exclusively through the registration access token you received in the POST response. Every subsequent operation uses the same /v1/clients/{clientId} path, with the HTTP method determining what happens to the client record. This tight, token-scoped model means your onboarding service controls each client independently without needing admin-level credentials for day-to-day operations.
Reading and updating a client record
A GET request retrieves the full current configuration for a registered client. Pass the registration_access_token as your bearer token and the client_id as the path parameter:
curl -X GET "https://{yourOktaDomain}/oauth2/{authServerId}/v1/clients/{clientId}" \
  -H "Authorization: Bearer {registrationAccessToken}"
To update the client, send a PUT request to the same URL with the complete client metadata in the request body. Okta replaces the entire client record with what you send, so your PUT body must include all fields you want to keep, not just the ones you are changing:
curl -X PUT "https://{yourOktaDomain}/oauth2/{authServerId}/v1/clients/{clientId}" \
  -H "Authorization: Bearer {registrationAccessToken}" \
  -H "Content-Type: application/json" \
  -d '{
    "client_name": "updated-client-name",
    "redirect_uris": ["https://app.example.com/callback", "https://app.example.com/new-callback"],
    "grant_types": ["authorization_code"],
    "response_types": ["code"],
    "token_endpoint_auth_method": "client_secret_basic"
  }'
Always fetch the current client record with GET before issuing a PUT so you do not accidentally overwrite fields your application did not intend to change.
Rotating credentials and deleting clients
To rotate a client secret, send a POST request to the client's /credentials/secrets sub-resource. Okta generates a new secret while the old one remains valid for a short overlap window, giving your application time to swap credentials without downtime:
curl -X POST "https://{yourOktaDomain}/oauth2/{authServerId}/v1/clients/{clientId}/lifecycle/newSecret" \
  -H "Authorization: Bearer {registrationAccessToken}"
When a tenant offboards, a DELETE request removes the client entirely and immediately invalidates all tokens issued to it:
curl -X DELETE "https://{yourOktaDomain}/oauth2/{authServerId}/v1/clients/{clientId}" \
  -H "Authorization: Bearer {registrationAccessToken}"
Okta returns a 204 No Content response on success. Store deletion timestamps alongside the client ID in your database so you maintain a clear audit trail of which clients existed for each health system tenant and when they were removed.
Troubleshooting and security hardening
When something goes wrong with your okta dynamic client registration calls, the error response usually tells you exactly what broke, but only if you know how to read it. The three most common failure classes are authentication errors (401), scope mismatches (403), and malformed request bodies (400). Checking the HTTP status code first narrows your investigation significantly before you touch any configuration.
Common errors and what they mean
Most DCR errors surface as JSON bodies with an error field and a human-readable error_description. The table below covers the errors you will encounter most often and the most likely fix for each:
| HTTP Status | Error Code | Most Likely Cause | Fix |
|---|---|---|---|
| 401 | invalid_token |
Expired or missing bearer token | Fetch a fresh token via client credentials grant |
| 401 | unauthorized_client |
Service app missing okta.clients.manage scope |
Grant the scope on the target authorization server |
| 400 | invalid_redirect_uri |
Redirect URI not HTTPS or contains wildcards | Use an exact HTTPS URI with no wildcards |
| 400 | invalid_client_metadata |
Required field missing or malformed | Validate your JSON body against the RFC 7591 spec |
| 403 | insufficient_scope |
Token lacks the required scope for the operation | Confirm scope grants per authorization server individually |
If you target multiple authorization servers, verify that scope grants are configured on each one separately, not just the first server you tested.
Security controls to add before production
Rotating registration access tokens regularly reduces the blast radius if one leaks. Okta lets you rotate these tokens programmatically through the /lifecycle/newSecret endpoint, so build a scheduled rotation job into your infrastructure from the start rather than treating it as an afterthought.
Limit your service app's permissions to only what DCR requires. Assigning broader admin scopes to the service account that drives your registration pipeline creates unnecessary risk across every health system tenant it touches. Lock the app down to okta.clients.manage on the specific authorization servers it needs, store all credentials in an encrypted secrets manager such as AWS Secrets Manager or Azure Key Vault, and route every registration, update, and deletion event through your audit logging pipeline so you maintain a clear record of client lifecycle activity.
Wrap-up
You now have a complete picture of how okta dynamic client registration works, from enabling DCR on your authorization server to making your first POST request and managing the full client lifecycle through GET, PUT, and DELETE calls. Each step in this guide builds on the last: confirm your issuer URI, generate a scoped token via client credentials, register your client with the right metadata, and store the registration access token immediately for future operations.
The security controls matter just as much as the API calls themselves. Rotating credentials on a schedule, locking your service app to the minimum required scopes, and routing every lifecycle event through your audit logs keeps your OAuth infrastructure tight across every tenant you onboard.
If you are building SMART on FHIR applications and want to skip the infrastructure work entirely, see how VectorCare handles EPIC integration for healthcare vendors so your team can focus on your core product instead.
The Future of Patient Logistics
Exploring the future of all things related to patient logistics, technology and how AI is going to re-shape the way we deliver care.
Thank you! Your submission has been received!
Oops! Something went wrong while submitting the form.