Keycloak Dynamic Client Registration: Setup And API Guide

Managing OAuth2 clients manually works fine when you have a handful of integrations. But healthcare vendors building SMART on FHIR applications for EPIC, especially those onboarding multiple health systems, hit a wall fast. Keycloak dynamic client registration solves this by letting you programmatically create and configure OAuth2 clients through APIs instead of clicking through admin consoles one at a time.
At VectorCare, we build and manage EPIC EHR integrations for healthcare vendors on a fully managed, no-code platform. Identity and access management, including how OAuth2 clients get provisioned across tenants, is a critical piece of that infrastructure. Keycloak's registration APIs are one of the tools that make scalable, compliant multi-tenant deployments possible without ballooning your engineering overhead.
This guide walks you through setting up Keycloak's Client Registration service, configuring registration policies, and calling the OIDC and Keycloak-specific endpoints to create clients programmatically. You'll come away with a working configuration and a solid grasp of how each API behaves, so you can automate client provisioning in your own integration workflows.
What dynamic client registration is in Keycloak
Keycloak dynamic client registration is a feature that lets external systems create, read, update, and delete OAuth2 clients in a Keycloak realm through HTTP APIs, without requiring a human to log into the admin console. Instead of manually configuring each client, your application sends a registration request to a dedicated endpoint, and Keycloak returns a client ID, client secret, and a registration access token that your application uses for subsequent management calls. This approach is defined by the OpenID Connect Dynamic Client Registration specification and is particularly useful when you need to spin up clients across multiple tenants at scale.
Dynamic client registration shifts client provisioning from a manual admin task into an automated API call, which is foundational to any scalable multi-tenant OAuth2 architecture.
How the registration endpoints work
Keycloak exposes its registration API under the path /realms/{realm}/clients-registrations. Every request to this base path targets a specific registration format by appending a provider identifier. When you POST a client definition to one of these endpoints, Keycloak validates the payload against the active registration policies configured for that realm, then creates the client and responds with the full client metadata plus a registration access token. That token is scoped to the specific client you just created, and you use it as a Bearer token for all future read, update, and delete operations on that client.
Authentication at the registration endpoint itself can happen in three ways: an initial access token (an admin-issued token that authorizes one or more client creations), a bearer token from a user with sufficient realm permissions, or anonymously if your realm policy explicitly allows it. For production environments, anonymous registration should always be disabled.
The three registration formats Keycloak supports
Keycloak's registration service accepts client definitions in three distinct formats, and each targets a different protocol or use case:
| Format | Endpoint path suffix | Use case |
|---|---|---|
| OIDC Client Metadata | /openid-connect |
Standard OIDC clients following the RFC spec |
| SAML Entity Descriptor | /saml2-entity-descriptor |
SAML-based service providers |
| Keycloak-specific JSON | /default |
Full access to all Keycloak client configuration fields |
The OIDC endpoint is the right choice for SMART on FHIR applications and most modern OAuth2 integrations. The Keycloak-specific JSON endpoint gives you access to fields that fall outside the OIDC spec, such as fine-grained authorization settings and protocol mappers, which makes it useful when you need precise control over client behavior.
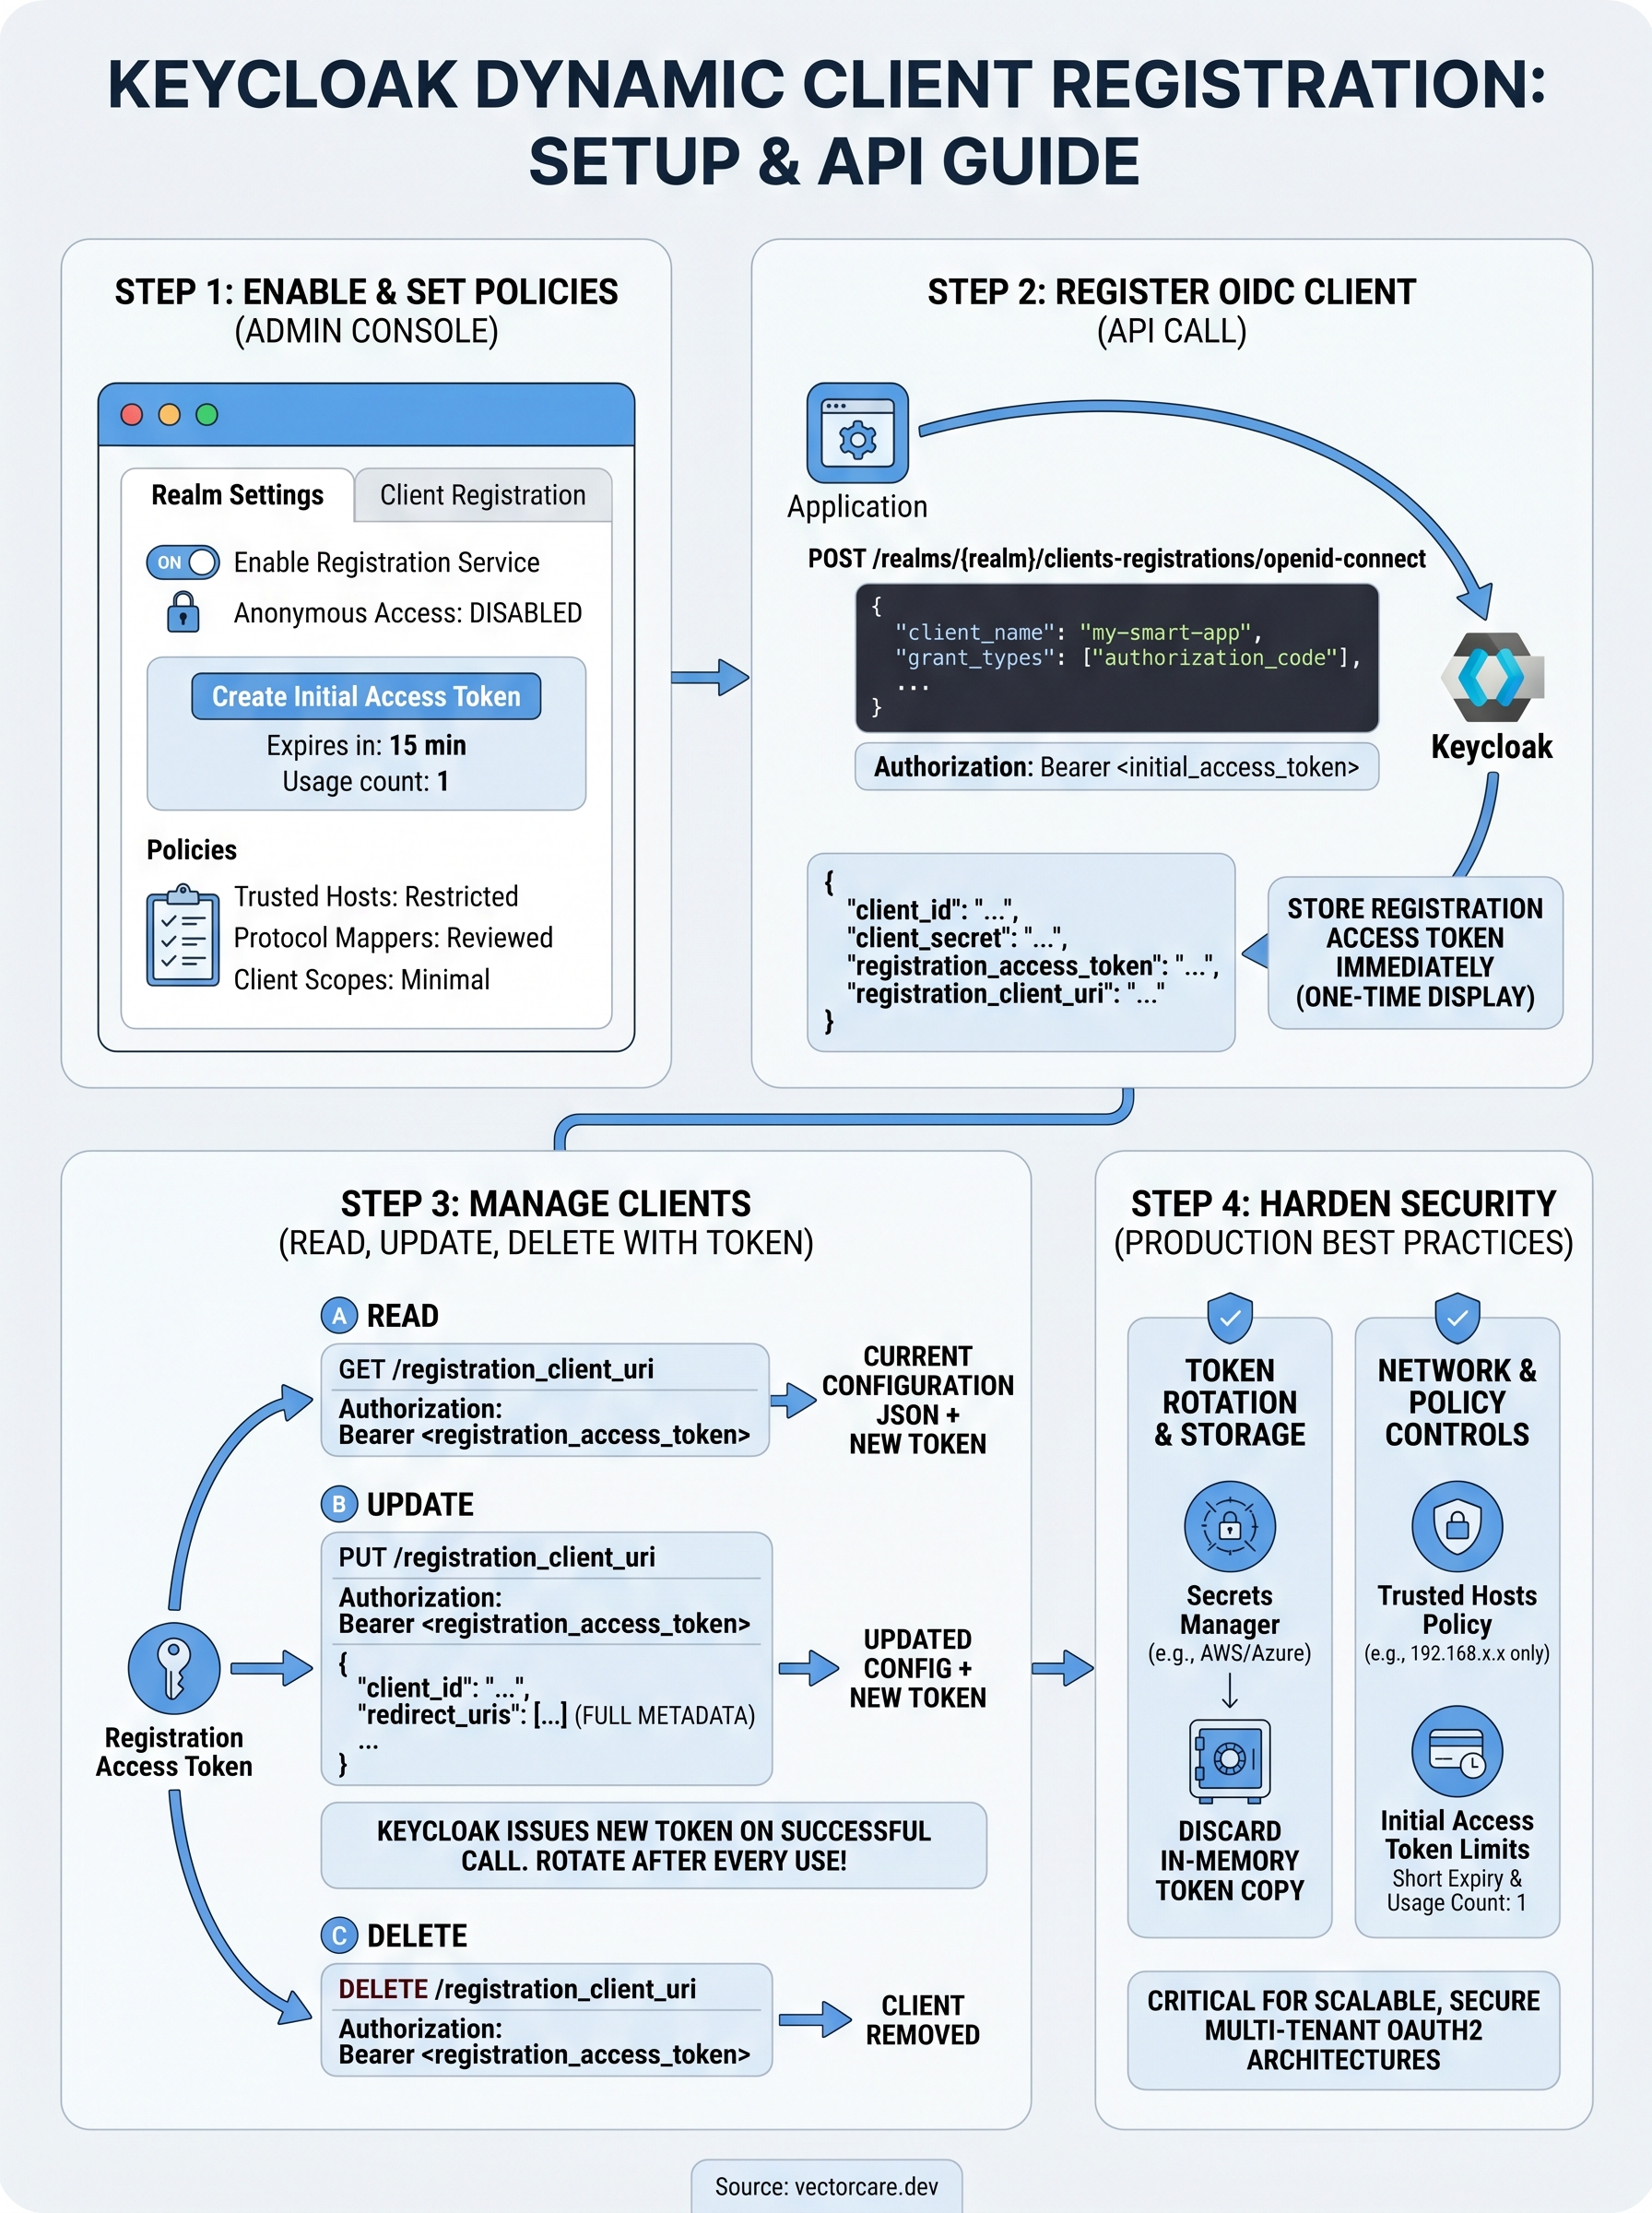
Step 1. Enable client registration and set policies
Before any Keycloak dynamic client registration request can succeed, you need to verify that the registration service is active in your realm and that your registration policies are set to the right level of strictness. By default, Keycloak's registration endpoints exist but anonymous access is blocked, which means you need to configure an initial access token before any external system can create clients.
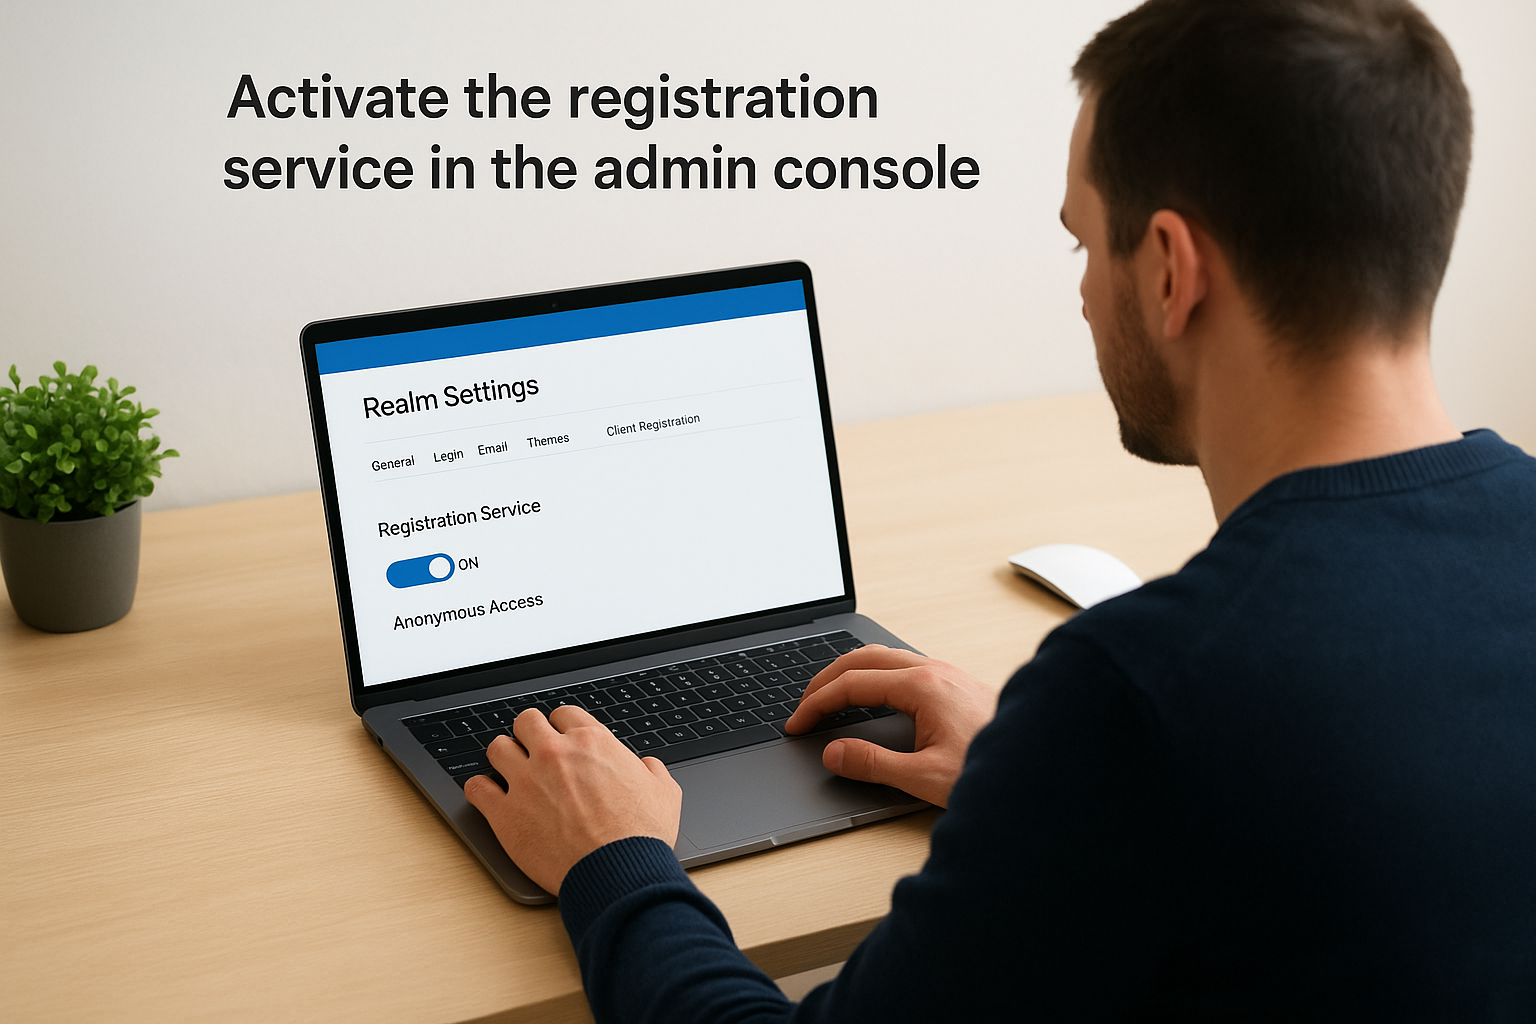
Activate the registration service in the admin console
Log into your Keycloak admin console and navigate to your target realm. Open the Realm Settings and select the Client Registration tab. You will see a toggle to enable the registration service along with options to control anonymous access. Keep anonymous access disabled for any environment beyond a local sandbox.
To generate an initial access token that external systems use to authenticate registration requests, go to Clients > Client registration > Initial access token, then click Create. Set an expiration time and a usage count limit that matches how many clients you expect to register in that provisioning window.
An initial access token is single-use by design: once a client registration succeeds, the returned registration access token takes over for all future operations on that specific client.
Configure client registration policies
Under the Client registration policies tab, Keycloak lists the default policies applied to each registration format. The Trusted Hosts policy restricts which hostnames can submit registration requests. The Protocol Mappers and Client Scope policies control which mappers and scopes a dynamically registered client is allowed to claim. Review each policy, set allowed redirect URI patterns, and remove any overly permissive defaults before you move to production.
Step 2. Register an OIDC client via the DCR endpoint
With your initial access token in hand, you can make your first keycloak dynamic client registration request. Send a POST to the OIDC registration endpoint with your client metadata as a JSON body and the initial access token as a Bearer token in the Authorization header.
Build the registration request
The example below registers a confidential OIDC client configured for the authorization code flow, which is the correct setup for a SMART on FHIR application that needs to exchange an authorization code for tokens:
curl -X POST \
  https://your-keycloak-host/realms/your-realm/clients-registrations/openid-connect \
  -H "Authorization: Bearer <initial_access_token>" \
  -H "Content-Type: application/json" \
  -d '{
    "client_name": "my-smart-app",
    "redirect_uris": ["https://your-app.example.com/callback"],
    "grant_types": ["authorization_code", "refresh_token"],
    "response_types": ["code"],
    "token_endpoint_auth_method": "client_secret_basic",
    "scope": "openid profile launch/patient"
  }'
Store the
registration_access_tokenfrom the response immediately; Keycloak will not show it again and you need it for all subsequent management calls on this client.
Parse the registration response
Keycloak returns a JSON object containing the assigned client_id, client_secret, and registration_access_token. The registration_client_uri field in the response tells you the exact URL for future read, update, and delete operations on this specific client. Save all four values in your secrets manager before proceeding.
Step 3. Read, update, and delete clients with tokens
The registration access token you saved from the previous step is your key to all lifecycle management operations on that client. Every subsequent request to the registration_client_uri must include this token as a Bearer token in the Authorization header, following the same pattern used during the initial keycloak dynamic client registration call.

Read a client's current configuration
Send a GET request to the registration_client_uri to retrieve the full current configuration of your registered client:
curl -X GET \
  https://your-keycloak-host/realms/your-realm/clients-registrations/openid-connect/<client_id> \
  -H "Authorization: Bearer <registration_access_token>"
Keycloak issues a new registration access token in every successful response, so update your stored token after each call or future requests will return a 401.
Update a client's metadata
To modify fields like redirect URIs or grant types, send a PUT request to the same URI with the full updated client metadata as the body. Partial updates are not supported on the OIDC endpoint, so you must include all required fields in every PUT request:
curl -X PUT \
  https://your-keycloak-host/realms/your-realm/clients-registrations/openid-connect/<client_id> \
  -H "Authorization: Bearer <registration_access_token>" \
  -H "Content-Type: application/json" \
  -d '{
    "client_id": "<client_id>",
    "redirect_uris": ["https://your-app.example.com/callback"],
    "grant_types": ["authorization_code", "refresh_token"]
  }'
Delete a client
Send a DELETE request to remove the client entirely from the realm. This action is immediate and irreversible through the registration API, so confirm you are targeting the correct client ID before executing:
curl -X DELETE \
  https://your-keycloak-host/realms/your-realm/clients-registrations/openid-connect/<client_id> \
  -H "Authorization: Bearer <registration_access_token>"
Step 4. Harden security for production use
A working keycloak dynamic client registration setup that runs in production needs tighter controls than the defaults provide. The registration API exposes sensitive OAuth2 lifecycle operations, so a misconfiguration here directly translates to a security risk across every client your system manages.
Rotate and store registration access tokens securely
Every successful API call returns a new registration access token that invalidates the previous one. If your application fails to capture and store the updated token after each response, your next call will return a 401 and you will have no automated recovery path. Store every token in a dedicated secrets manager such as AWS Secrets Manager or Azure Key Vault, never in environment variables or configuration files committed to source control.
Treat every registration access token as a single-use credential: read it from the response, write it to your secrets store, and discard the in-memory copy immediately.
Tighten realm and network controls
Limit the Trusted Hosts policy in your realm's Client Registration Policies to the specific IP ranges or hostnames your provisioning service uses. This blocks any registration request that originates outside your expected network boundaries, even if an attacker holds a valid initial access token.
Set short expiration windows on initial access tokens: 15 minutes is a reasonable upper bound for automated provisioning flows. Pair this with a usage count of one so that a captured token cannot be replayed for additional client registrations once your provisioning script completes.
Wrap up and next steps
You now have a complete path through keycloak dynamic client registration: from enabling the service and generating initial access tokens, to calling the OIDC endpoint, managing client lifecycles with registration access tokens, and locking down your production configuration. The key operational habits to carry forward are rotating and storing registration access tokens after every API call and keeping initial access tokens short-lived with a usage count of one.
For healthcare vendors building SMART on FHIR applications, these patterns become critical infrastructure as you scale across multiple health system deployments. Manual client provisioning simply does not hold up when each new contract requires a fresh EPIC integration with its own identity configuration. If you want to skip the infrastructure work entirely and get your SMART on FHIR app deployed in weeks instead of months, see how VectorCare handles EPIC integration end to end.
The Future of Patient Logistics
Exploring the future of all things related to patient logistics, technology and how AI is going to re-shape the way we deliver care.
Thank you! Your submission has been received!
Oops! Something went wrong while submitting the form.