Ping Identity OpenID Connect: Step-By-Step OIDC Setup Guide

If you're building applications that integrate with healthcare systems, authentication isn't optional, it's foundational. Ping Identity OpenID Connect (OIDC) is one of the most common identity configurations you'll encounter, especially when health systems use PingFederate or PingOne as their identity provider for securing EHR-connected applications. Getting it right means your app earns trust at the front door. Getting it wrong means you never get past it.
This guide walks you through the full OIDC setup process with Ping Identity, step by step. You'll learn how to register your application, configure scopes and claims, handle token endpoints, and validate ID tokens, everything needed to establish a working authentication flow between your app and a Ping Identity environment.
At VectorCare, we deal with these authentication layers daily. Our no-code platform helps healthcare vendors launch SMART on FHIR applications into EPIC EHR systems, and identity protocols like OIDC are baked into that process. We built this guide because proper identity configuration is one of the most common sticking points we see vendors struggle with, and it shouldn't be.
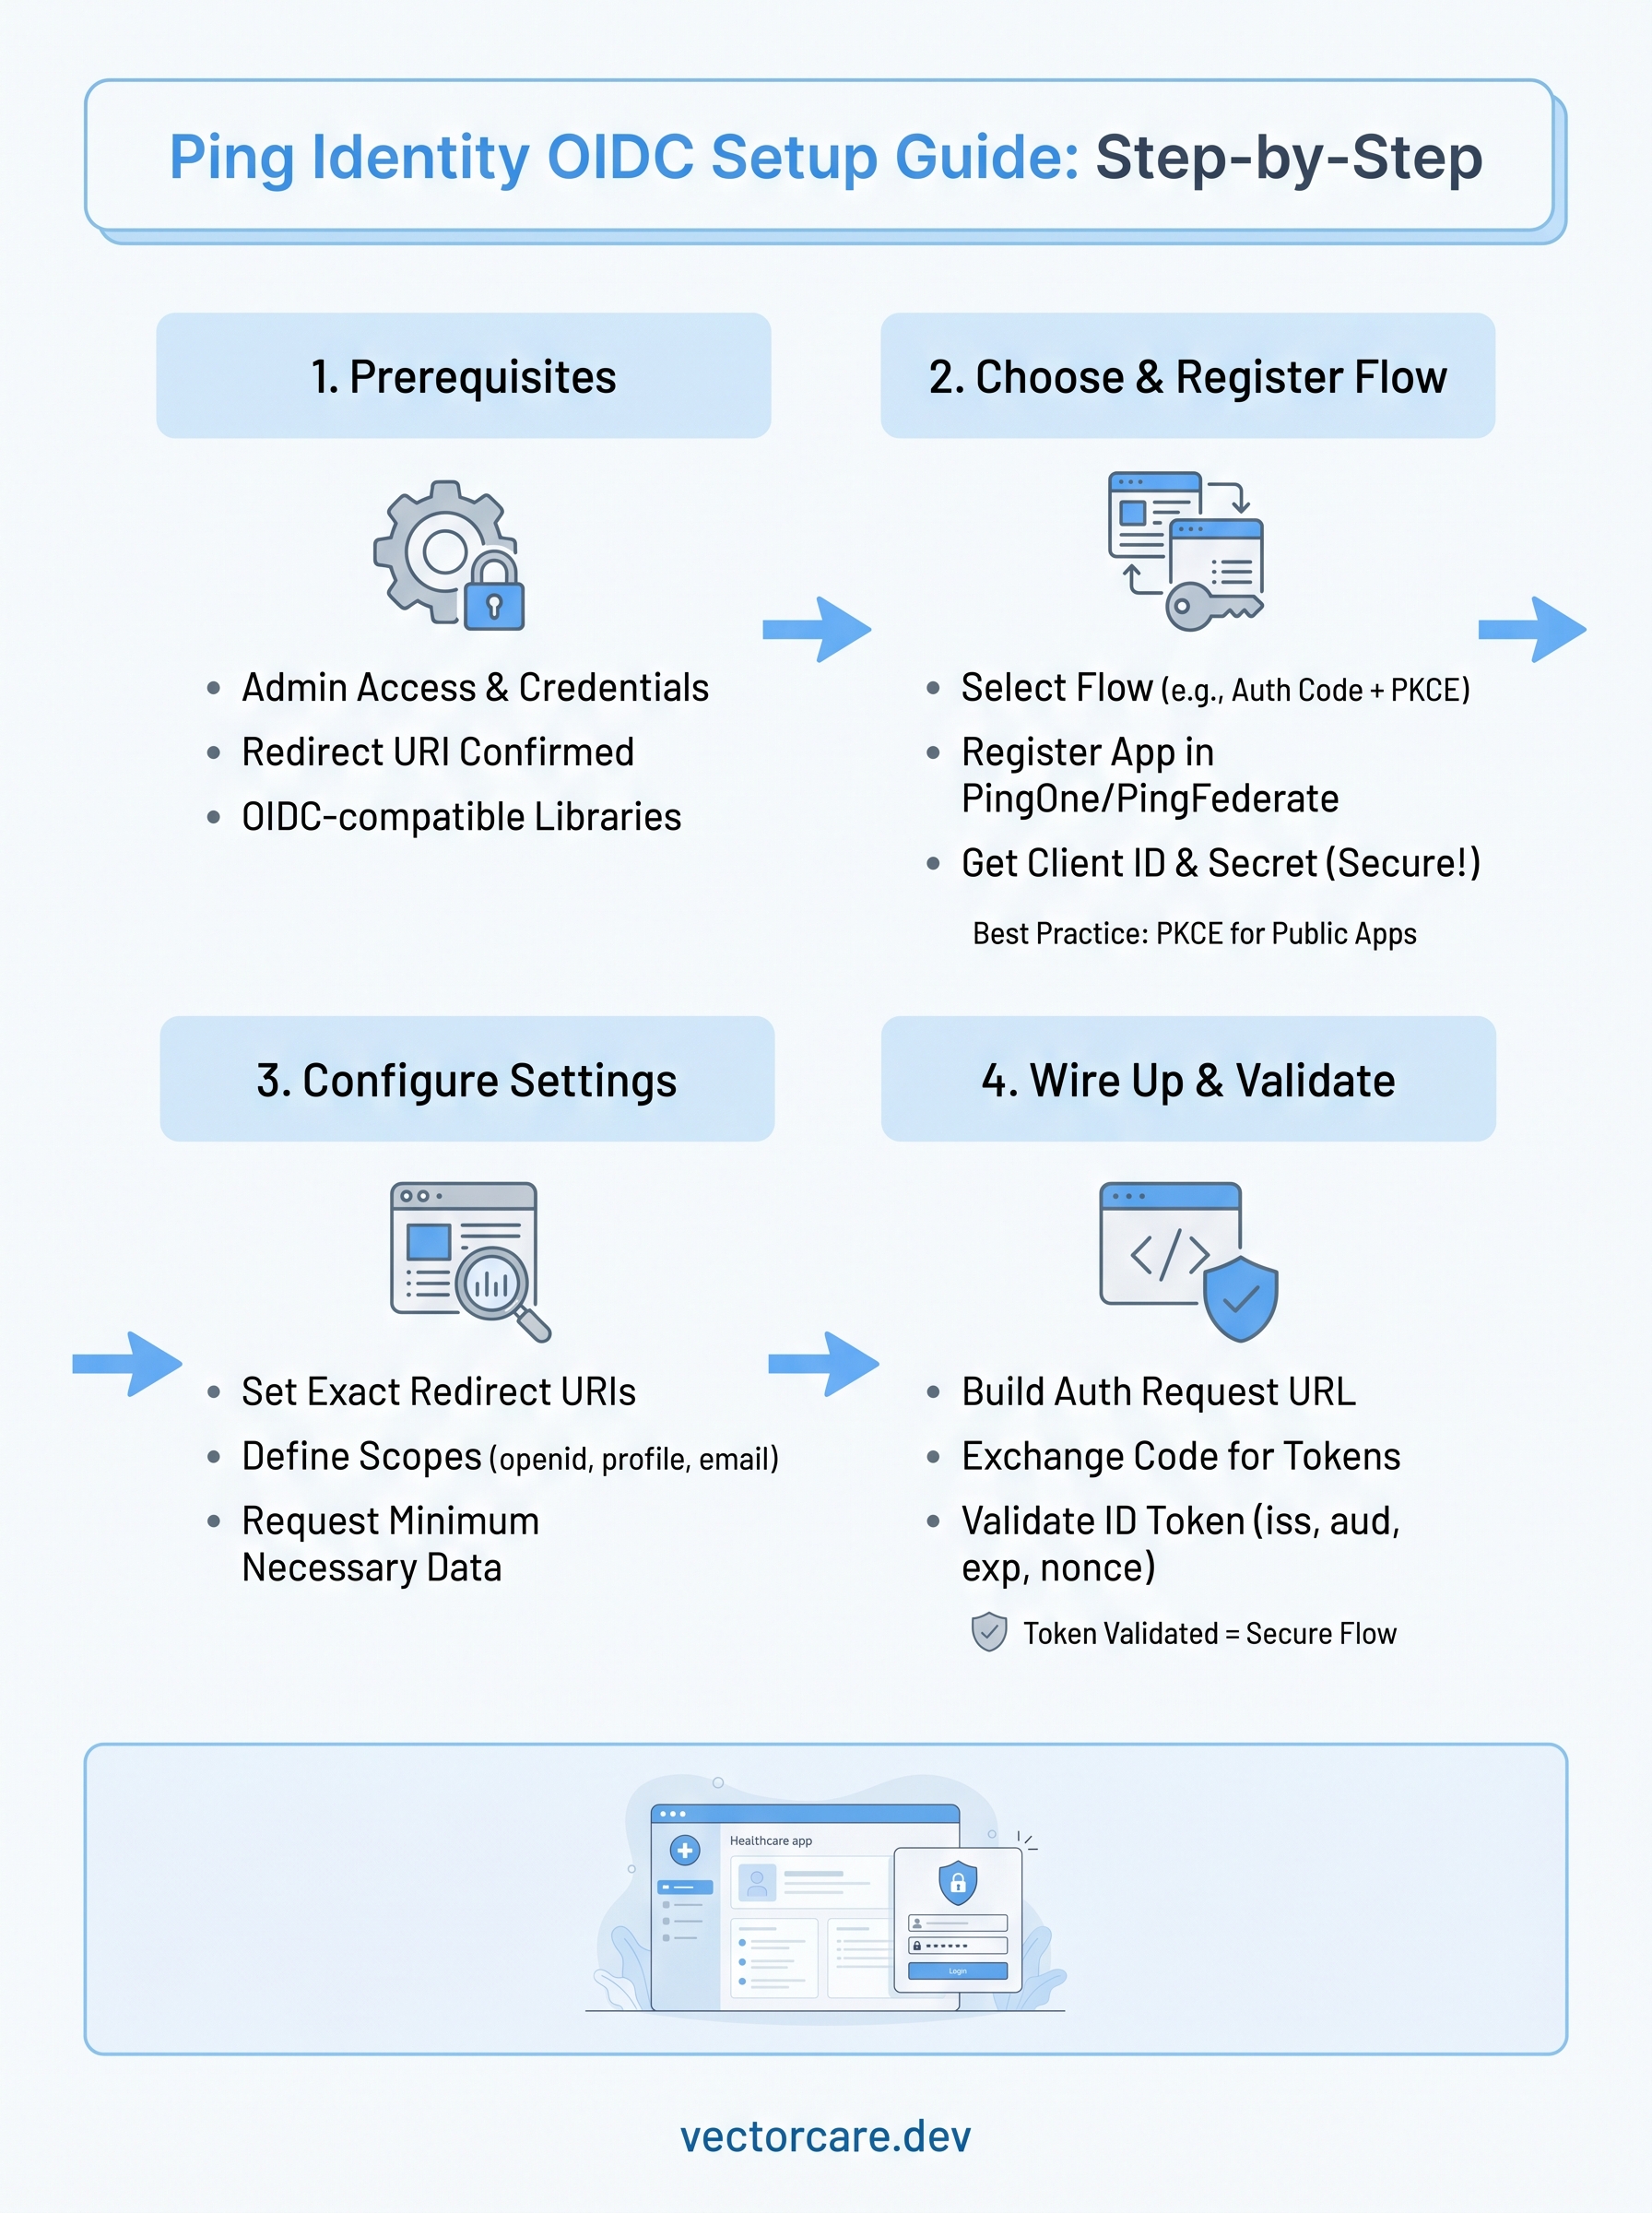
What you need before you start
Before you touch any configuration in Ping Identity OpenID Connect, make sure you have the right access and information in place. Trying to configure OIDC without these fundamentals ready wastes time and often leads to errors that are hard to trace back to their source.
Incomplete setup access is the single most common reason OIDC configurations fail on the first attempt.
Access and credentials
You need admin-level access to either PingFederate or PingOne, depending on which product your environment uses. If you're integrating with a health system's identity infrastructure, contact their IT security team to get your credentials provisioned before starting. You'll also need your application's redirect URI confirmed and ready, because you can't complete app registration without it.
Here's what to gather before you open the Ping admin console:
- PingFederate base URL or PingOne environment URL
- Admin username and password with application management permissions
- Your application's redirect URI (for example,
https://yourapp.example.com/callback) - Client application name and description
- Required scopes your app needs (for example,
openid,profile,email)
Technical requirements
Your development environment needs to support OAuth 2.0 and OIDC-compatible libraries for whatever language or framework you're using. Ping Identity supports standard OIDC flows, so most major libraries handle the token exchange without custom code. You should also confirm that your server or hosting environment can make outbound HTTPS requests to the Ping authorization and token endpoints, because firewalls that block these calls will silently break your authentication flow.
Check that you have access to a tool like Postman or curl to test token requests before wiring them into your application code. This saves significant debugging time later in the process.
Step 1. Choose the right OIDC flow and settings
Before you register anything in Ping, you need to select the correct OIDC authorization flow for your application type. Choosing the wrong flow causes authentication failures that are difficult to diagnose, and it can also create security vulnerabilities that will get flagged during health system security reviews.
The Authorization Code flow with PKCE is the current recommended standard for most application types that involve a user login.
Match the flow to your application type
Ping Identity OpenID Connect supports several OAuth 2.0 grant types, and each one maps to a specific application architecture. Use this table to pick the right flow before you open the Ping admin console:
| Application Type | Recommended Flow | Client Type |
|---|---|---|
| Web app (server-side) | Authorization Code | Confidential |
| Single-page app (SPA) | Authorization Code + PKCE | Public |
| Native/mobile app | Authorization Code + PKCE | Public |
| Machine-to-machine | Client Credentials | Confidential |
For most healthcare vendor applications that embed into clinical workflows, you'll use the Authorization Code flow with PKCE. This flow keeps access tokens out of the browser URL, prevents token interception, and meets the security standards that health systems require from third-party integrations.
Step 2. Create an OIDC app in Ping
Once you know which flow you're using, log into your Ping admin console and navigate to the Applications section. The registration process differs slightly between PingFederate and PingOne, but the core fields are the same across both products.
Creating a dedicated application registration for each environment (development, staging, production) prevents credential conflicts and makes security audits easier.
Register your app in PingOne
In PingOne, go to Connections > Applications and click the "+" button to add a new application. Select OIDC Web App as your application type, give it a clear name that identifies your service, and save the initial configuration. PingOne will generate a Client ID and Client Secret automatically once you save.
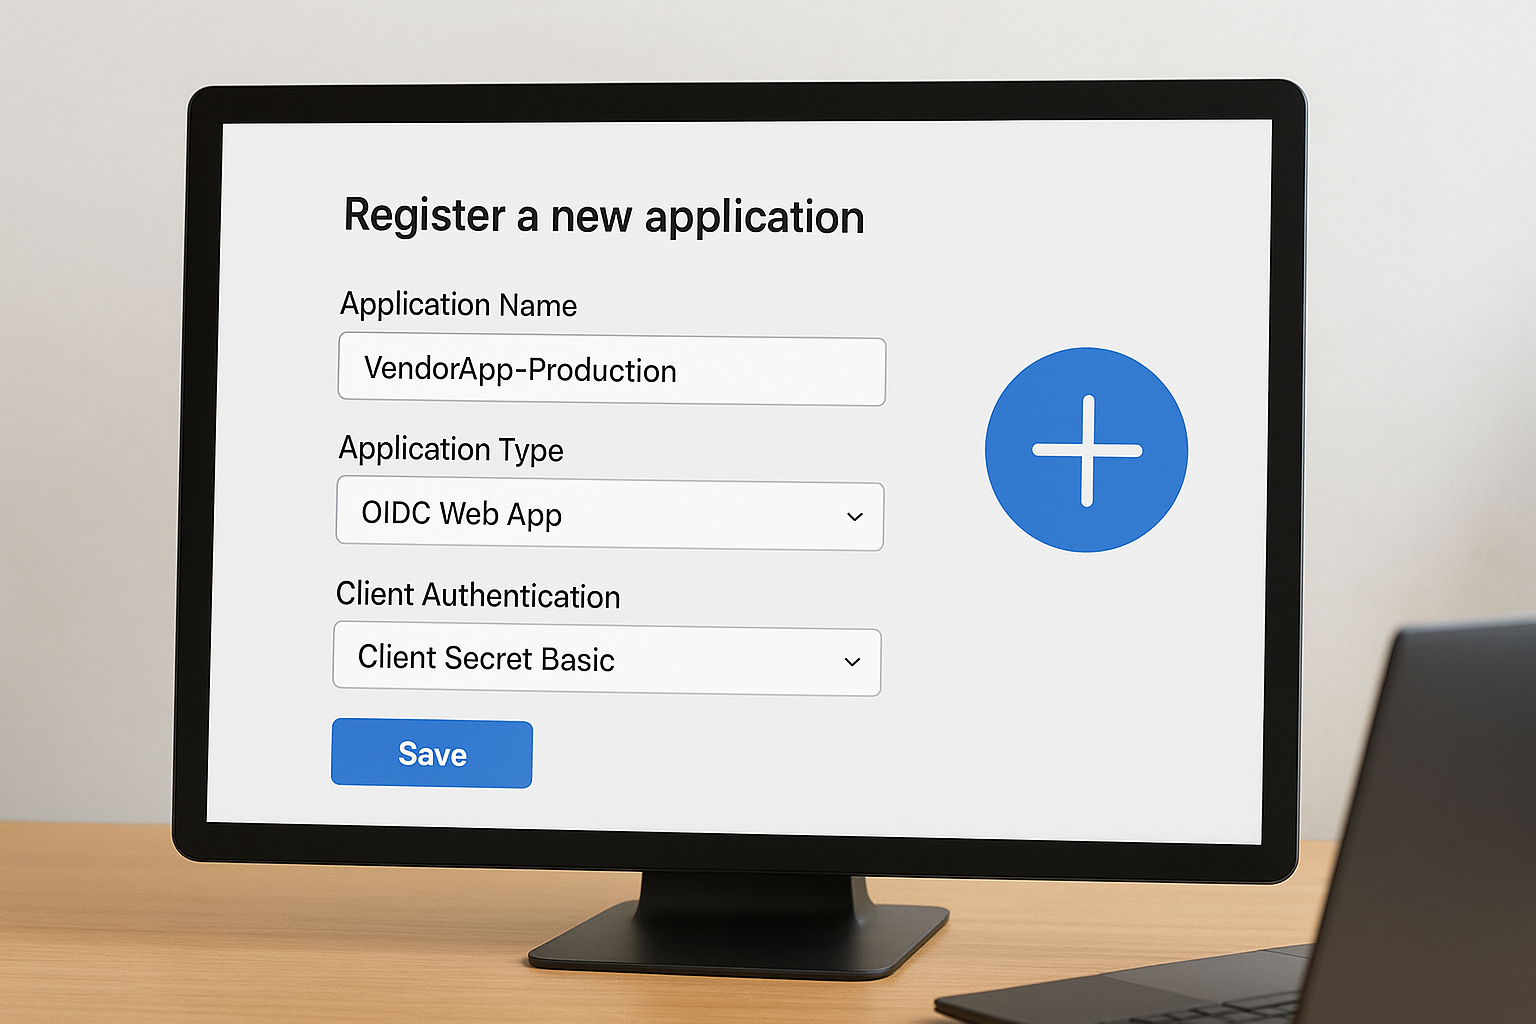
Here are the key fields to complete during registration:
- Application Name: Use something descriptive, like
VendorApp-Production - Application Type: OIDC Web App (or Native for mobile)
- Client Authentication: Client Secret Basic for confidential clients
Locate your client credentials
After saving, Ping Identity OpenID Connect surfaces your Client ID and Client Secret on the application's Configuration tab. Copy both values immediately and store them in your secrets manager or environment variables. Never hard-code them directly into your source code, as that creates a security exposure that health system security reviews will flag.
Step 3. Configure redirect URIs, scopes, and claims
After registering your app, the next critical step in your Ping Identity OpenID Connect setup is configuring redirect URIs, scopes, and claims accurately. These settings control where Ping sends users after authentication and what user data your app receives in the ID token.
A mismatched redirect URI is the most frequent cause of authentication errors in OIDC integrations.
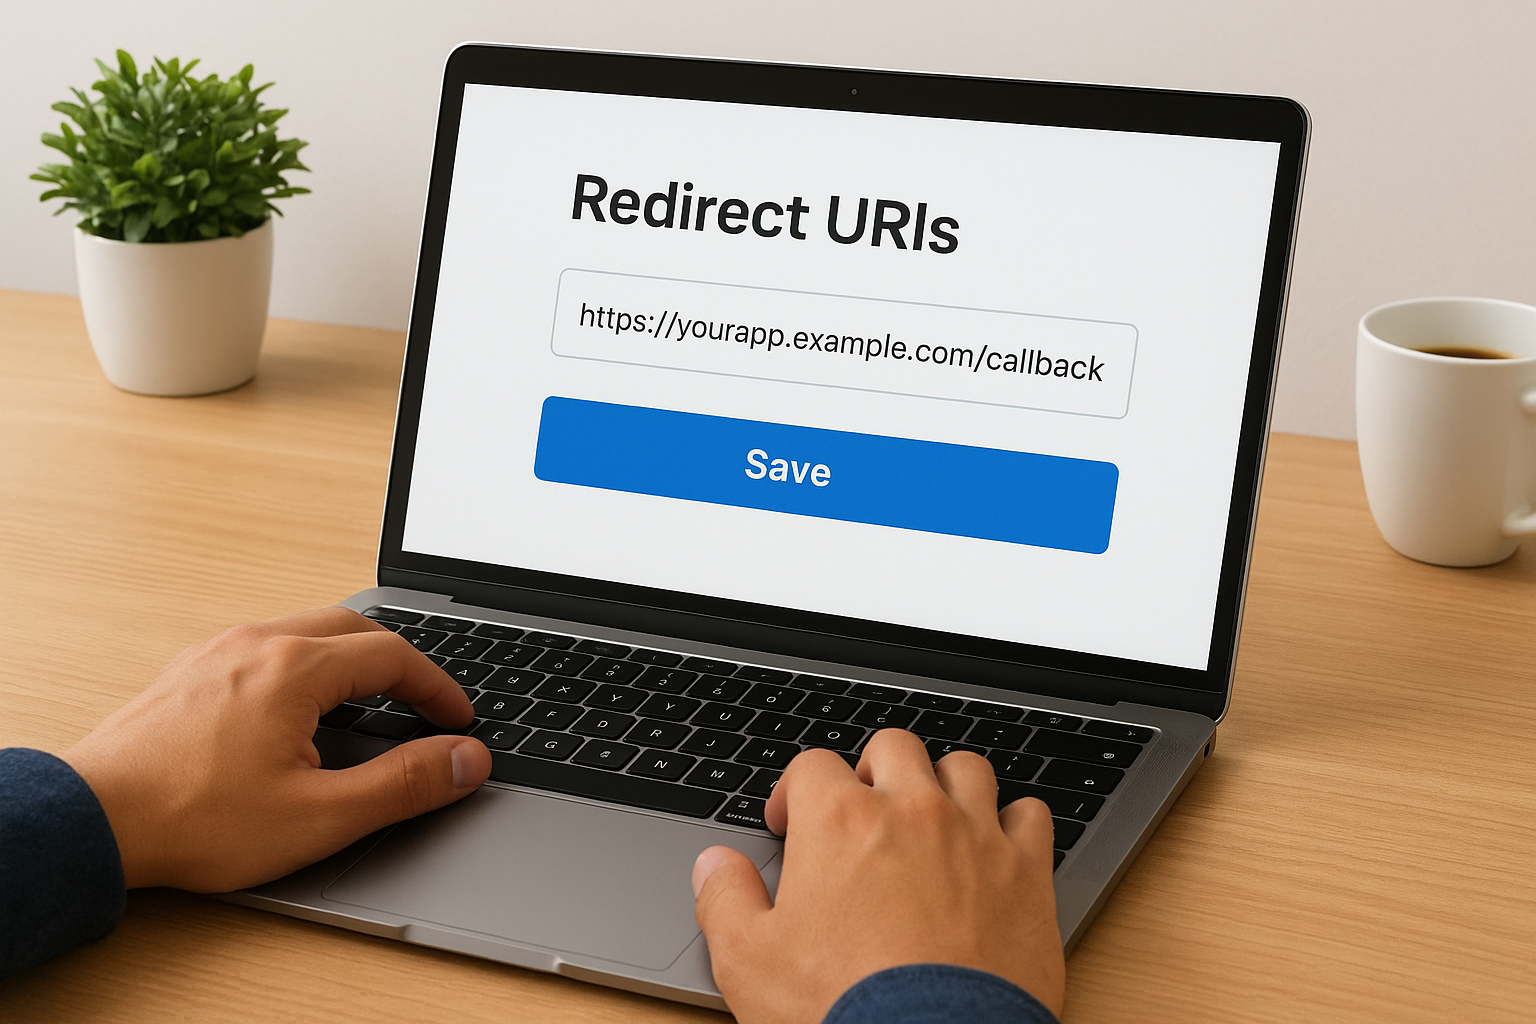
Set your redirect URIs
Your redirect URI must exactly match the callback URL your app handles, including the protocol, domain, and path. Add one URI per environment. In PingOne, navigate to the Redirect URIs field under your application's Configuration tab and enter each URI on a separate line, for example https://yourapp.example.com/callback for production and https://localhost:3000/callback for local development.
Define scopes and claims
Scopes determine what user information Ping includes in the token response. Start with the required openid scope, then add only what your application actually needs:
| Scope | Data Returned |
|---|---|
openid |
Subject identifier (required) |
profile |
Name, username |
email |
Email address |
For healthcare applications, request the minimum necessary scopes to satisfy both your app's requirements and the health system's data minimization policies. Over-requesting scopes signals poor security hygiene and will surface during vendor security reviews.
Step 4. Wire up your app and validate tokens
With your Ping Identity OpenID Connect app configured, you're ready to connect your application code and confirm that the full authentication flow works end to end. Start by building the authorization request URL your app sends to Ping when a user initiates login.
Build the authorization request
Your app redirects the user to Ping's authorization endpoint with the required query parameters. Here is a working example for the Authorization Code + PKCE flow:
GET https://{ping-domain}/as/authorization.oauth2
  ?response_type=code
  &client_id=YOUR_CLIENT_ID
  &redirect_uri=https://yourapp.example.com/callback
  &scope=openid profile email
  &code_challenge=YOUR_CODE_CHALLENGE
  &code_challenge_method=S256
  &state=RANDOM_STATE_VALUE
Replace {ping-domain} with your PingFederate base URL or PingOne environment URL.
Validate the ID token
After Ping returns an authorization code to your callback URL, exchange it for tokens at the token endpoint using your client_id, client_secret, and code_verifier. Once you receive the ID token, validate these fields before trusting it:
Never skip token validation. An unvalidated token is an open security gap.
iss: matches your Ping issuer URLaud: matches your Client IDexp: timestamp is in the futurenonce: matches the value you sent in the request
Wrap-up and what to do next
You now have a complete, working Ping Identity OpenID Connect implementation: the right flow selected, your app registered, redirect URIs and scopes locked in, and ID tokens validated against the required fields. Each step builds on the last, so if something breaks, trace it back to the first point where a value mismatches.
From here, test your full login flow against a staging environment before pushing to production. Confirm that token expiration and refresh handling work correctly, because expired tokens that silently fail are a common source of production incidents in healthcare integrations.
If you're building a healthcare vendor application that also needs to integrate with EPIC EHR systems, authentication is just one piece of the puzzle. VectorCare handles OIDC, SMART on FHIR compliance, and the full EPIC App Orchard submission process for you. See how VectorCare deploys your SMART on FHIR app in weeks, not months.
The Future of Patient Logistics
Exploring the future of all things related to patient logistics, technology and how AI is going to re-shape the way we deliver care.
Thank you! Your submission has been received!
Oops! Something went wrong while submitting the form.