OpenID Connect Dynamic Client Registration: How It Works

When a client application needs to register itself with an OpenID Provider, doing it manually works fine, until you're managing dozens or hundreds of registrations across different environments. OpenID Connect Dynamic Client Registration solves this by letting applications register programmatically, without a human filling out forms or exchanging credentials through back channels.
This matters especially in healthcare interoperability. SMART on FHIR applications, the kind that plug into EPIC and other EHR systems, depend on OAuth 2.0 and OpenID Connect for authentication and authorization. Understanding how dynamic client registration works gives vendors a clearer picture of what happens under the hood when their app connects to a new health system for the first time.
At VectorCare, we handle this layer of complexity so healthcare vendors don't have to. Our no-code platform manages SMART on FHIR compliance, including the authentication and registration workflows required for EPIC integration. But whether you're building it yourself or using a managed platform, knowing how DCR operates makes you a better-informed decision maker. This article breaks down the specification, walks through the registration flow step by step, and explains where dynamic client registration fits into real-world OIDC implementations.
What dynamic client registration solves
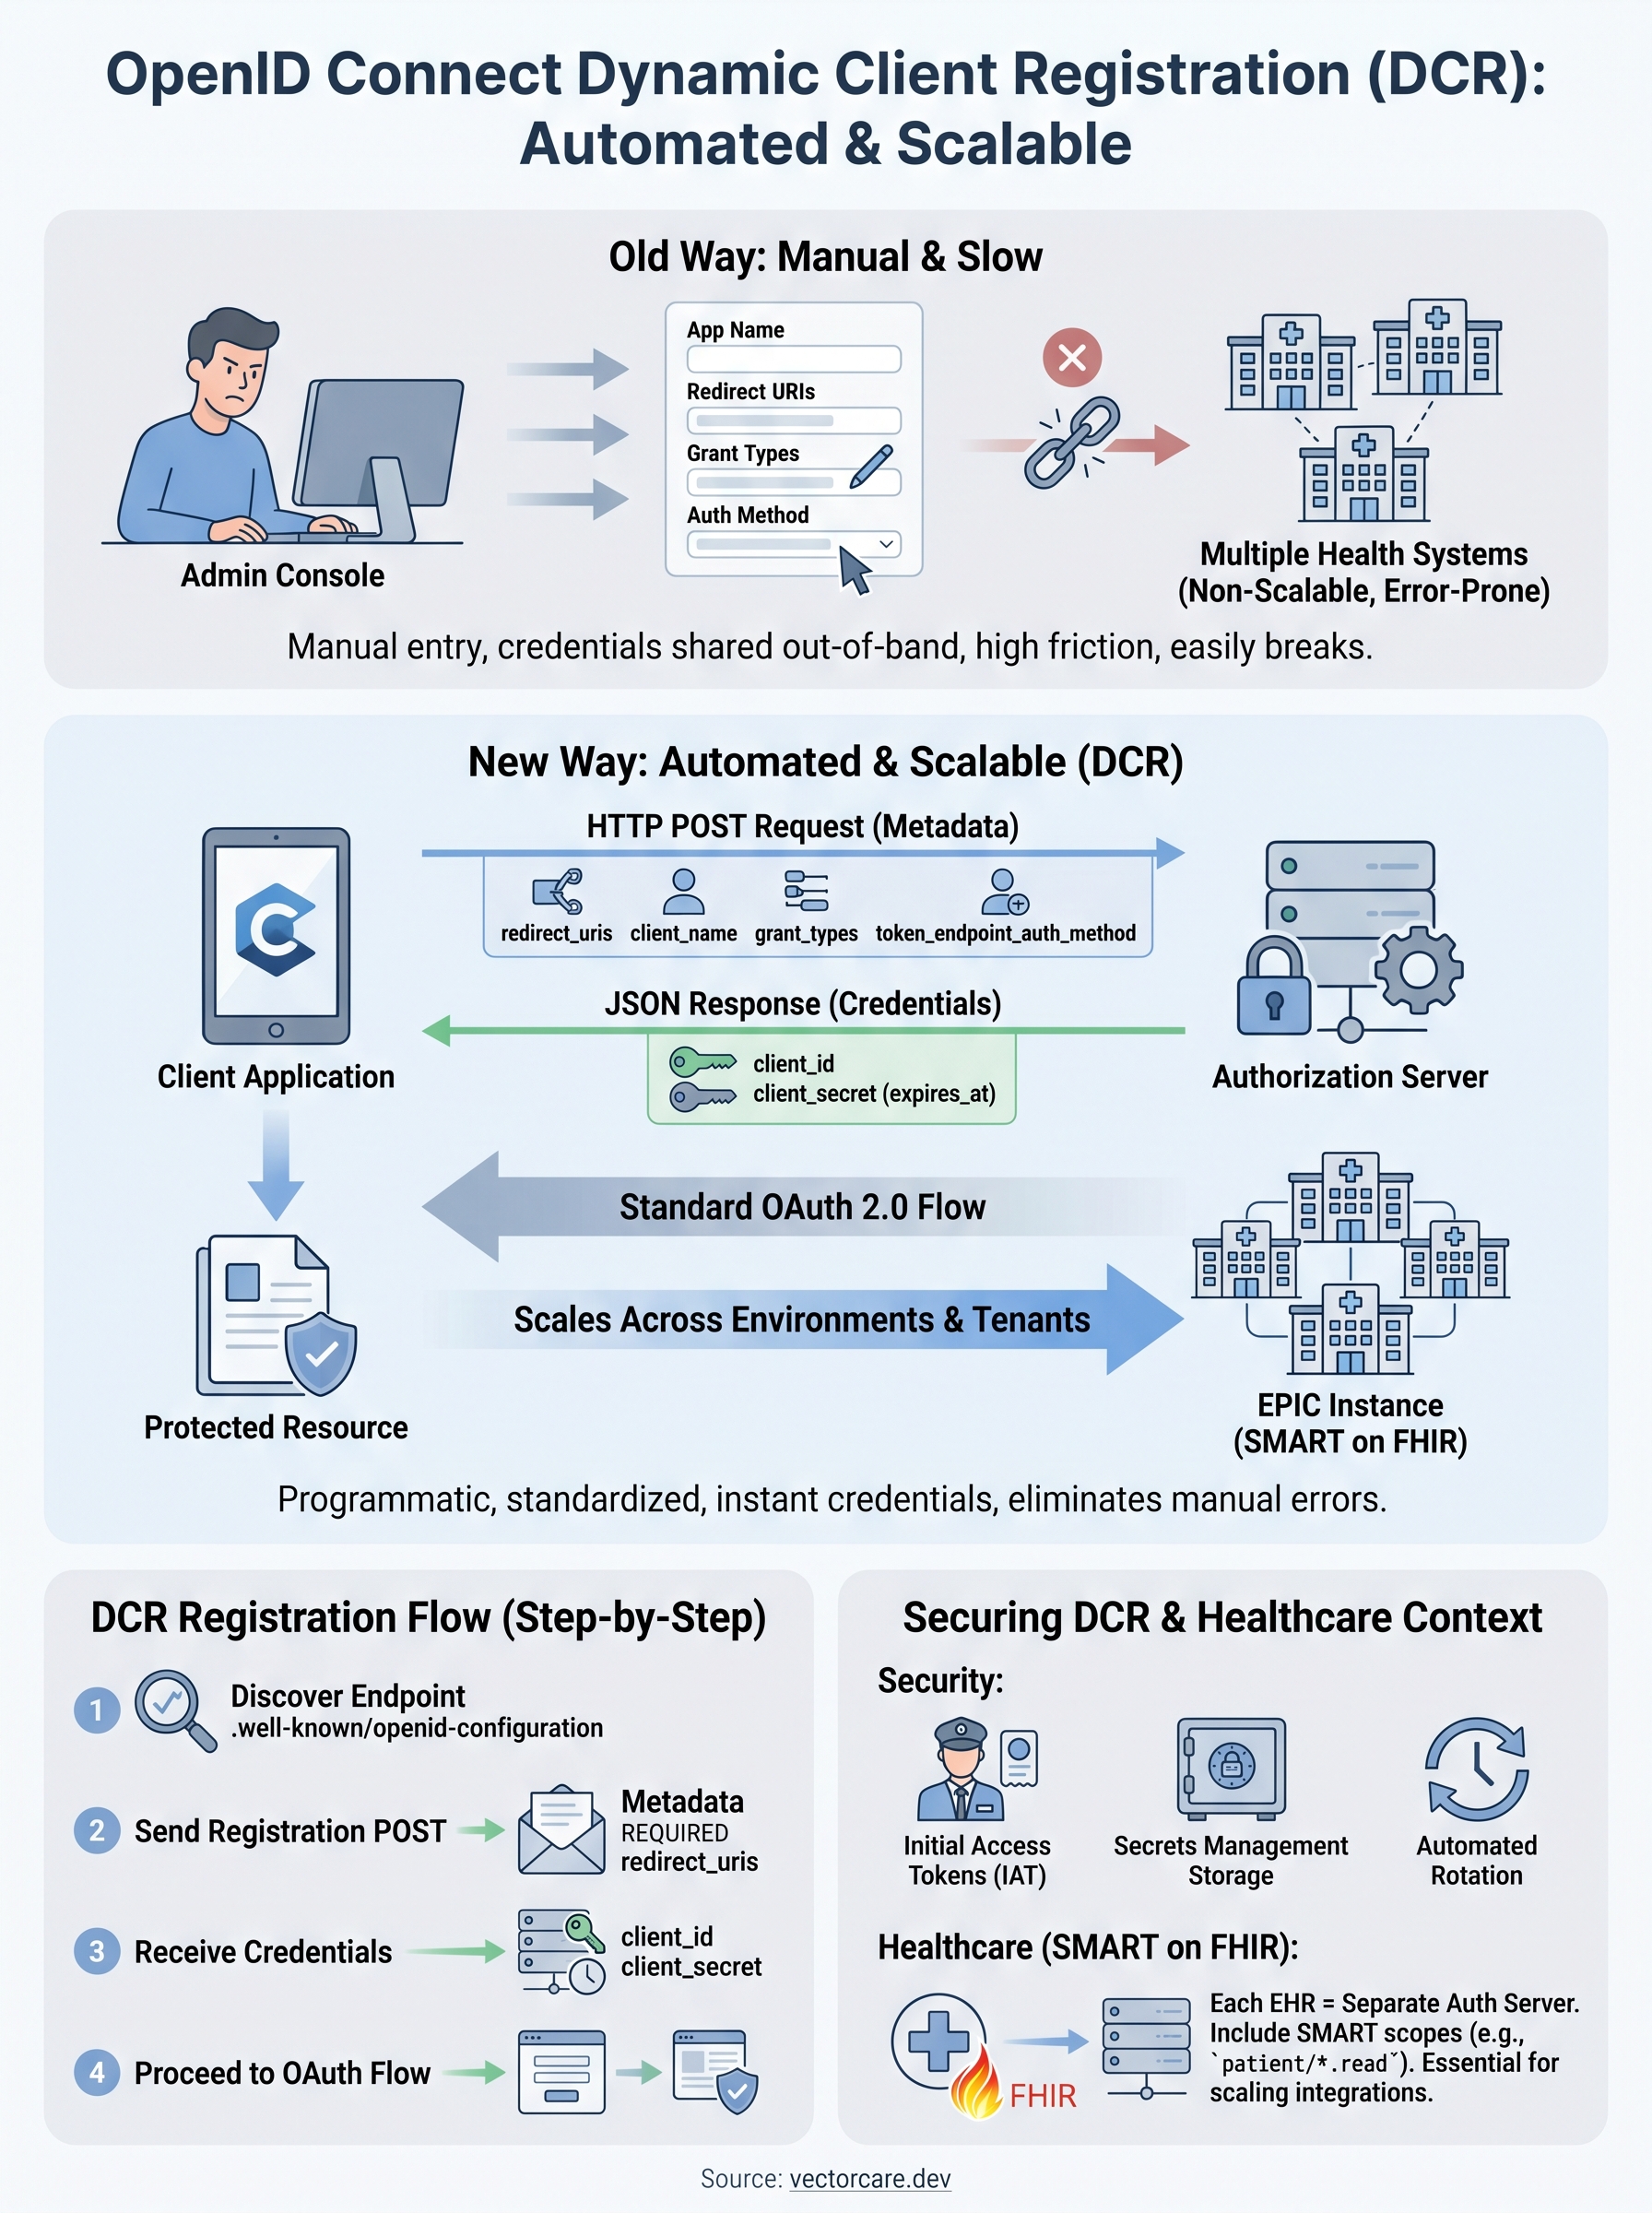
Before dynamic client registration existed, every client application had to be registered with an authorization server through a manual, out-of-band process. A developer would log into an admin console, fill out a form, receive a client ID and secret, then hardcode those values into the application. For a single integration in a stable environment, this approach is manageable. For anything more complex, it breaks down fast.
The manual registration bottleneck
Manual registration creates operational friction at every stage of the integration lifecycle. When you need to register the same client across a development environment, a staging environment, and multiple production tenants, you multiply the administrative work by every environment you operate. Each registration is a separate task, often requiring coordination between your engineering team and the authorization server administrator on the other side.
This problem compounds in healthcare. Health systems run their own identity and authorization infrastructure, which means each hospital or clinic network you integrate with controls its own OpenID Provider. If your application needs to connect to ten health systems, that is ten separate manual registration workflows, ten sets of credentials to manage, and ten points of failure if any credential rotates or expires without your knowledge.
Manual client registration does not scale when the number of authorization servers grows beyond a handful.
Scaling across health systems
OpenID Connect Dynamic Client Registration, defined in the OpenID Connect specification, solves this by giving client applications a standardized API endpoint they can call to register themselves programmatically. Instead of a human completing a form, your application sends an HTTP POST request with its metadata to the registration endpoint, and the authorization server responds with a client ID and, if applicable, a client secret.
This changes the operational model entirely. Your application can register itself the first time it encounters a new authorization server, store the returned credentials, and proceed through the normal OAuth 2.0 authorization flow without any manual intervention. For healthcare vendors building SMART on FHIR applications, this is particularly relevant because health systems frequently provision new instances of their EHR environments, and each instance may require a fresh client registration.
Automation also reduces human error. When credentials are generated and stored programmatically, you eliminate the risk of a developer miscopying a client secret or accidentally registering the wrong redirect URI. The registration request is constructed from configuration, not from someone reading instructions in a browser window, which means the process is repeatable and auditable from the start.
How OIDC dynamic client registration works
The registration process follows a defined specification outlined in the OpenID Connect Registration standard and RFC 7591. Your application acts as the client registrant, sending its metadata to the authorization server's registration endpoint and receiving back the credentials it needs to participate in the OAuth 2.0 flow.
The registration endpoint
Authorization servers that support openid connect dynamic client registration expose a dedicated registration endpoint, typically discoverable through the OpenID Provider's discovery document at the .well-known/openid-configuration path. When your application fetches that document, it finds the registration_endpoint field, which tells it exactly where to send the registration request. No prior coordination with the authorization server administrator is required to locate this endpoint.
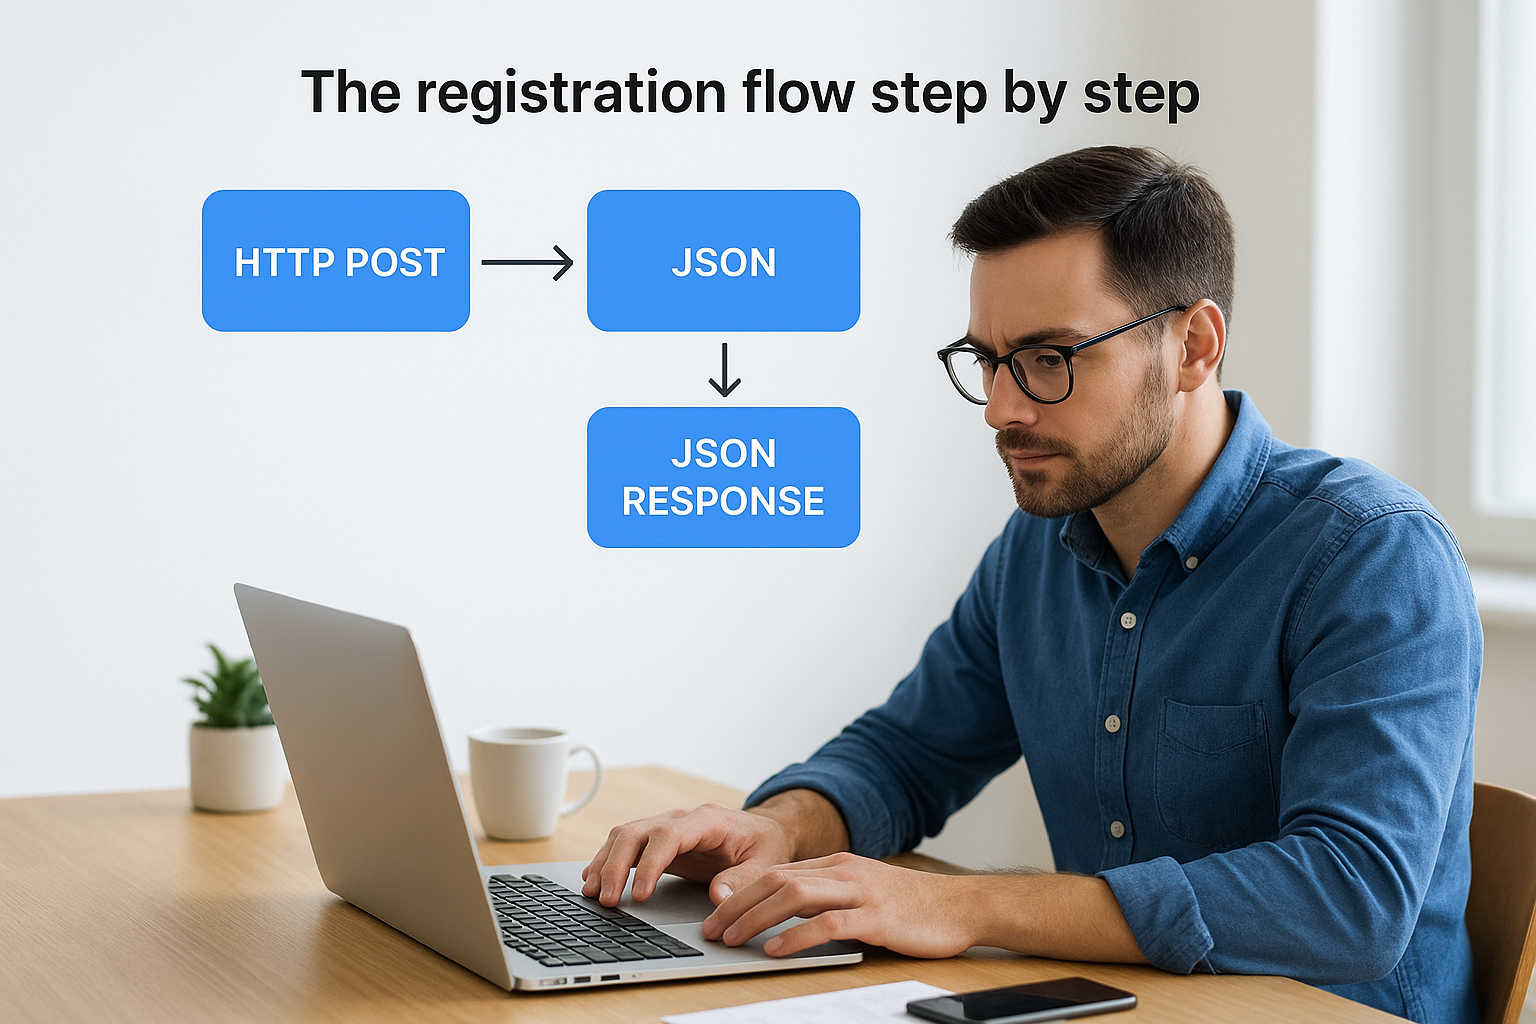
The registration flow step by step
Your application sends an HTTP POST request to the registration endpoint with a JSON body containing its client metadata. This metadata includes the application's name, the redirect URIs it will use, the grant types it needs, and the token endpoint authentication method it supports. The authorization server validates the request, creates a new client record, and returns a JSON response containing a unique client ID and, depending on the token endpoint method, a client secret.
The entire exchange happens over HTTPS, which means the registration credentials are protected in transit from the moment the server issues them.
After storing the returned client ID and client secret, your application proceeds through the standard OpenID Connect authentication flow just as a statically registered client would. The only difference is that the credentials were obtained automatically rather than through a manual process. For SMART on FHIR applications connecting to EPIC environments, this flow runs per instance, so each health system connection gets its own isolated set of credentials.
Key request and response fields you must know
Understanding the specific fields involved in openid connect dynamic client registration lets you build registration requests that succeed on the first attempt and handle responses without surprises. The specification defines which fields are required, which are optional, and what each one controls about how your client behaves during authentication.
What to include in the registration request
Your registration request body is a JSON object sent as the POST payload. The fields you include determine how the authorization server treats your client for every subsequent OAuth 2.0 flow.
| Field | Required | Purpose |
|---|---|---|
redirect_uris |
Yes | Lists the URIs the server may redirect to after authorization |
client_name |
Recommended | Human-readable name displayed on consent screens |
grant_types |
Recommended | Specifies authorization_code, client_credentials, or others |
token_endpoint_auth_method |
Recommended | Defines how your client authenticates at the token endpoint |
scope |
Recommended | Declares the scopes your client will request |
jwks_uri |
Conditional | Required if you use private key JWT authentication |
Redirect URIs are the most critical field you provide. The server will reject authorization requests that use a redirect URI not listed here, so your configuration must be exact, including trailing slashes and protocol schemes.
A mismatch between a registered redirect URI and the one used at runtime is one of the most common causes of authorization failures in production environments.
What the server sends back
The server's response gives you the client credentials and a copy of the applied metadata. The client_id field is always present and is your application's unique identifier for that authorization server. If your chosen token_endpoint_auth_method requires a secret, the response includes a client_secret along with a client_secret_expires_at timestamp that tells you exactly when to rotate it.
Securing dynamic client registration in production
OpenID connect dynamic client registration is powerful, but an open registration endpoint that accepts requests from any caller is a serious security liability. Authorization servers give you several mechanisms to restrict who can register and under what conditions, and you should use them from day one rather than treating security as something to add later.
Control who can register
Most authorization servers support initial access tokens, which are short-lived bearer tokens required to accompany the registration request. Only callers who possess a valid initial access token can create a new client record. Your operations team issues these tokens through a privileged administrative process, then hands them off to the systems that need to register. This approach keeps open registration closed while still automating the client creation step.
Requiring an initial access token shifts the trust boundary from the network to the token itself, which is far easier to audit and revoke.
Some environments go further and require the registration request to be signed with a private key, which the authorization server verifies against a previously shared public key. This is common in SMART on FHIR deployments where regulatory requirements demand a stronger proof of client identity at registration time.
Protect the credentials you receive
Once the server returns a client ID and client secret, your application must store them with the same care it applies to any privileged credential. Store secrets in a dedicated secrets management service such as AWS Secrets Manager or Azure Key Vault rather than in configuration files or environment variables that get checked into source control. Monitor the client_secret_expires_at timestamp the server returns and build automated rotation logic so your application renews credentials before expiry rather than failing at runtime.
Where DCR fits in SMART on FHIR apps
SMART on FHIR is the standard that governs how third-party applications authenticate and access data within EHR systems like EPIC. It layers OAuth 2.0 and OpenID Connect on top of FHIR resources, which means client registration is a foundational step before any data exchange can happen. Dynamic client registration slots directly into this model by automating the point where your application establishes its identity with a health system's authorization server.
How EPIC handles client registration
EPIC follows the SMART on FHIR specification, which references dynamic client registration as a supported mechanism for app onboarding. When your application connects to a new EPIC instance at a health system, that instance runs its own authorization server. Rather than requiring your team to manually configure credentials in each environment, openid connect dynamic client registration lets your application send its metadata once and receive back the client ID it needs to proceed through the authorization flow.

Each EPIC instance is treated as a separate authorization server, so your application may register multiple times across different health system deployments.
What this means for your deployment
Your registration request must include SMART-specific scopes such as patient/*.read or launch to tell the authorization server exactly what clinical data your application needs access to. Getting the scope declaration wrong at registration time creates problems that surface later during authorization, not during registration itself, which makes them harder to diagnose quickly.
For healthcare vendors deploying across multiple health systems, automating this registration step is not a convenience; it is a prerequisite for scaling. Each new health system contract you sign brings a new EPIC instance, and handling those registrations manually reintroduces the operational friction that dynamic client registration was designed to eliminate.
Final takeaways
OpenID Connect dynamic client registration removes the manual bottleneck that slows down every new authorization server integration. Instead of coordinating credentials through an admin console, your application sends a structured registration request, receives a client ID and secret, and moves straight into the OAuth 2.0 flow. That automation matters most when you are connecting to multiple health systems, each running its own EPIC instance with its own authorization server.
Securing the process requires initial access tokens, encrypted credential storage, and automated secret rotation before expiry. Getting the SMART-specific scopes right in your registration request prevents authorization errors that are difficult to trace back to their source. Each decision you make at registration time shapes how your application behaves across every subsequent clinical workflow.
If you want this entire layer handled for you, explore VectorCare's no-code SMART on FHIR platform and see how quickly your app can reach production.
The Future of Patient Logistics
Exploring the future of all things related to patient logistics, technology and how AI is going to re-shape the way we deliver care.
Thank you! Your submission has been received!
Oops! Something went wrong while submitting the form.