ForgeRock OpenID Connect: Setup, Configuration, Examples

ForgeRock OpenID Connect is one of those integrations that sounds straightforward until you're knee-deep in configuration screens, token endpoints, and claim mappings. ForgeRock Access Management is a powerful identity platform, and its OIDC implementation gives you fine-grained control over authentication flows, but that control comes with complexity. If you're a healthcare vendor trying to connect your application to health systems that rely on ForgeRock for identity and access management, getting OIDC right isn't optional. It's the front door.
At VectorCare, we build no-code tooling that helps healthcare vendors integrate with EPIC EHR systems using SMART on FHIR, a framework that sits directly on top of OAuth 2.0 and OpenID Connect. We deal with OIDC-based authentication flows daily, and we've seen firsthand how much time teams burn configuring identity providers when they could be shipping product. Understanding how ForgeRock handles OIDC is foundational work, whether you're building a custom integration or evaluating managed platforms like ours that abstract the heavy lifting.
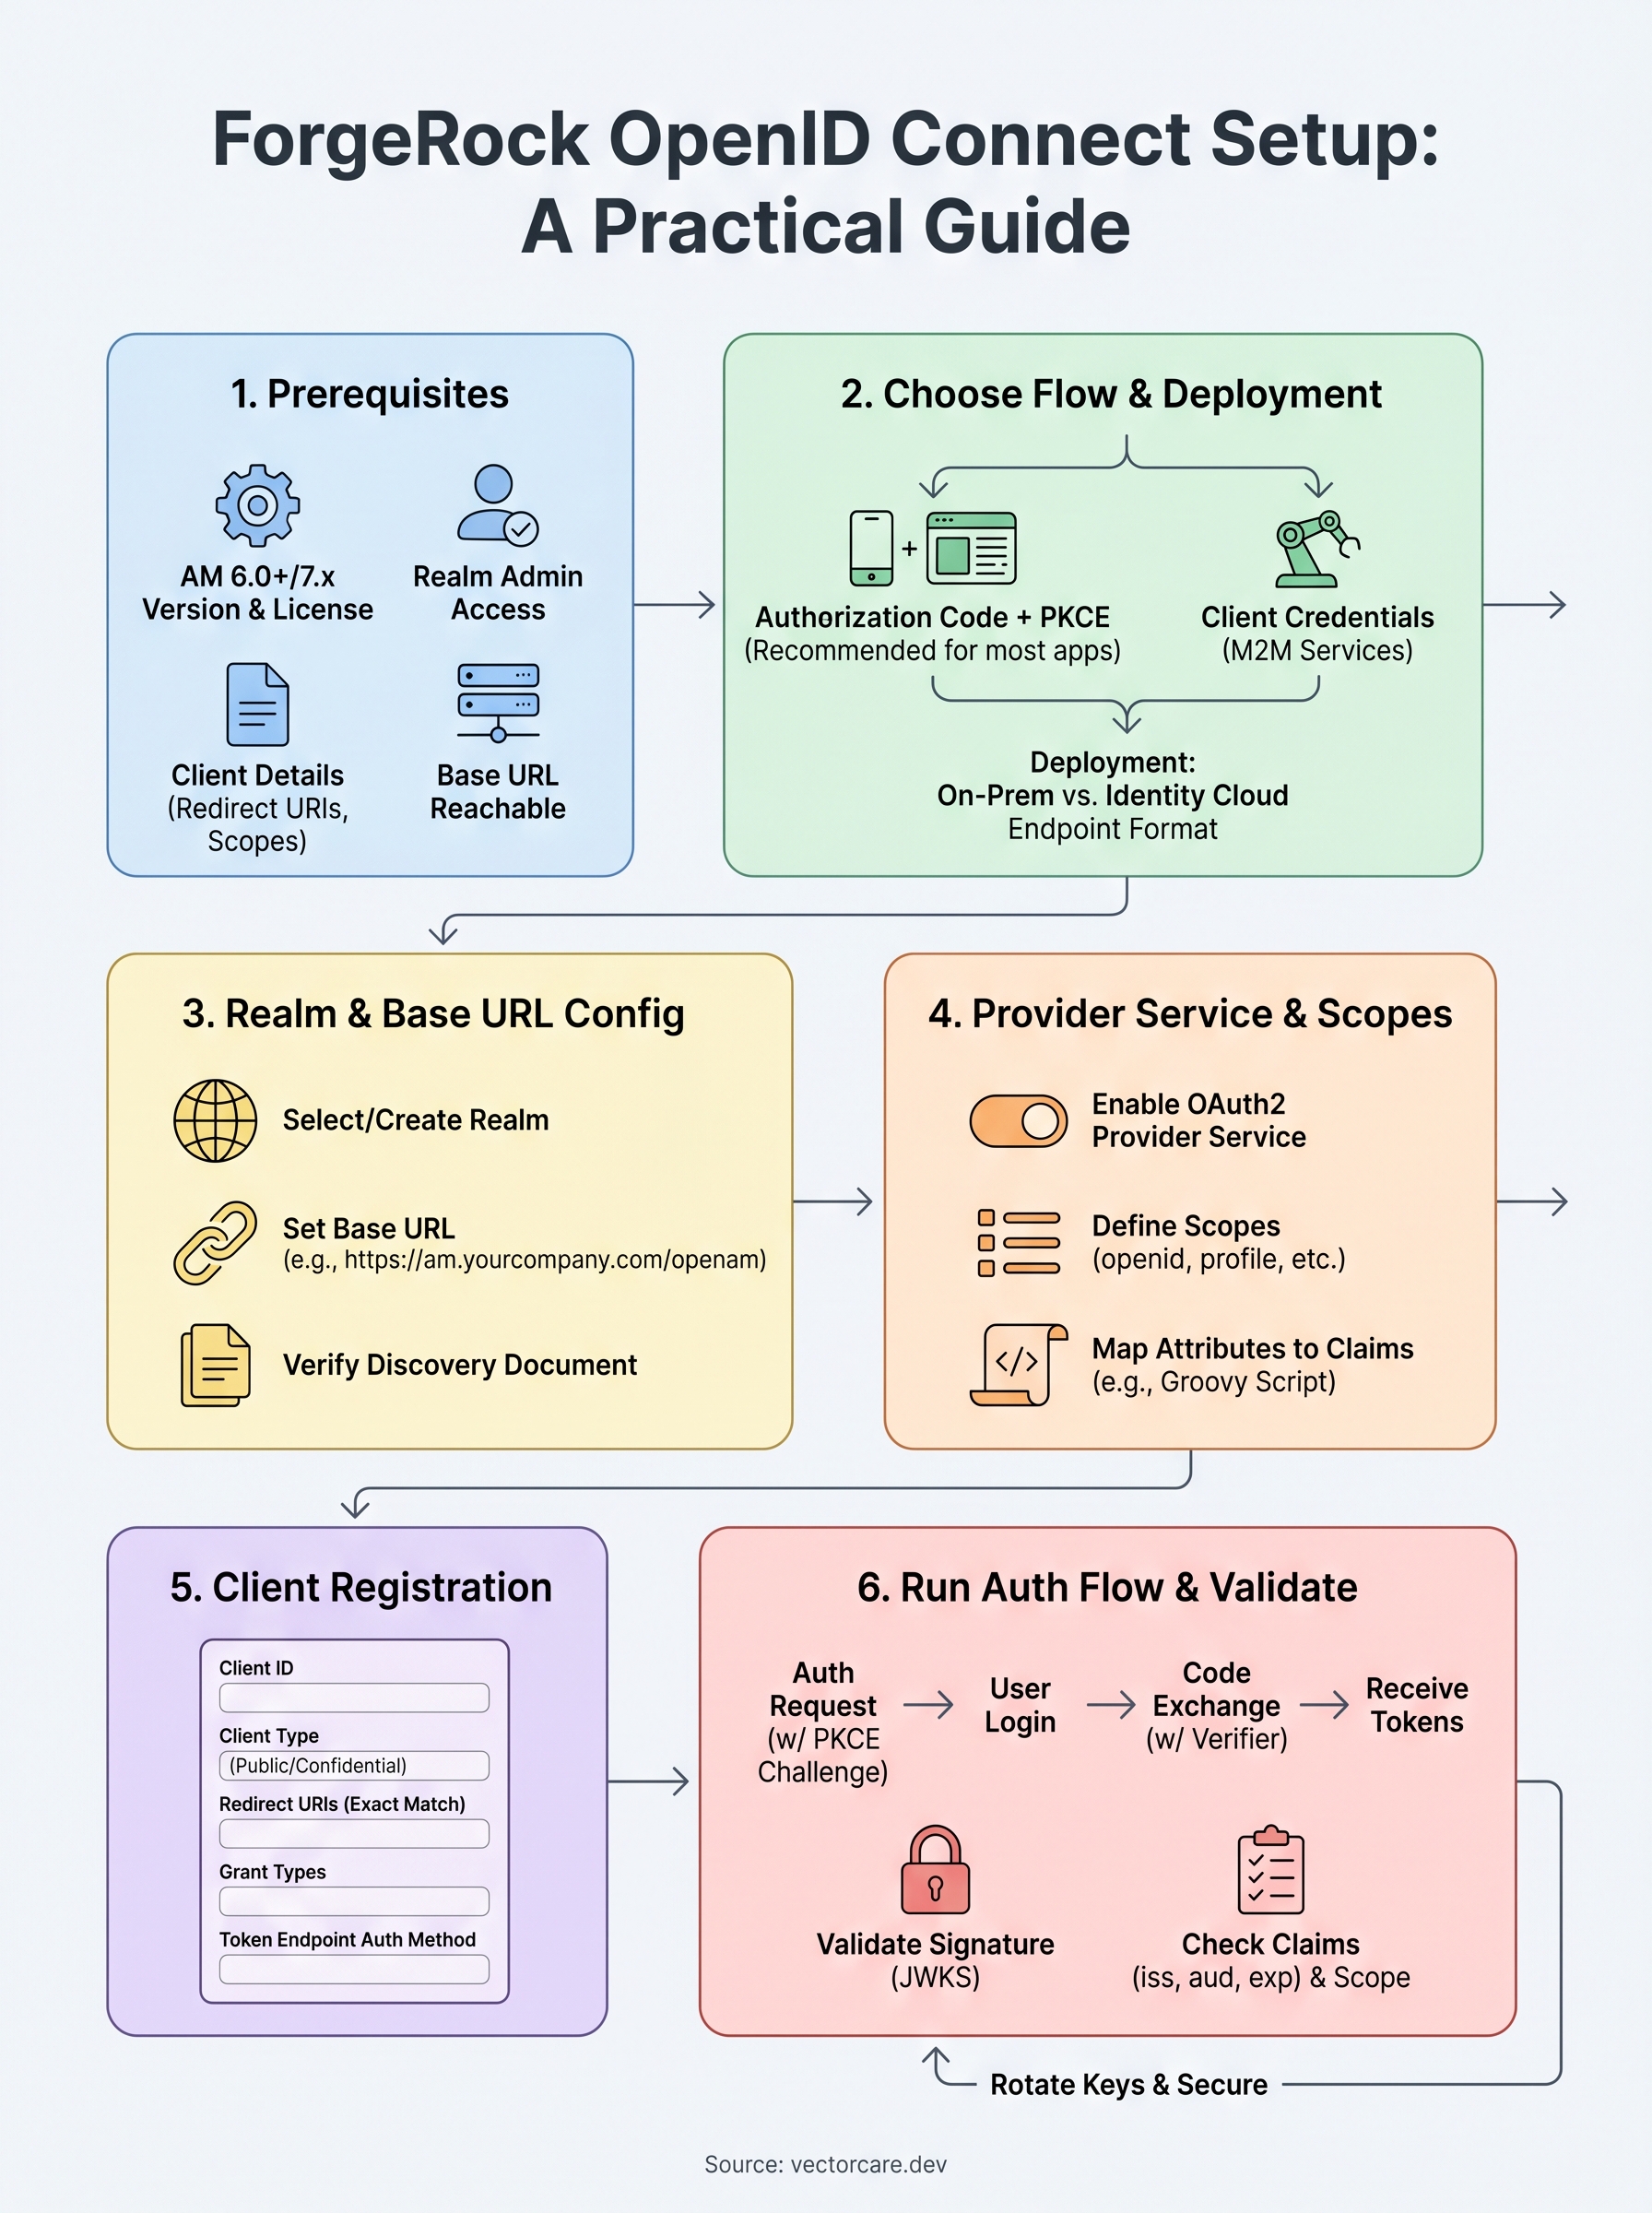
This guide walks you through ForgeRock OpenID Connect setup from start to finish: configuring OAuth 2.0 providers, registering OIDC clients, setting up claims and scopes, handling token validation, and working through real configuration examples. Everything here is practical and implementation-focused, built to get you from zero to a working OIDC integration without the guesswork.
What you need before you start
Before you touch a single configuration screen, you need to confirm your environment is ready. Setting up ForgeRock OpenID Connect without the right prerequisites leads to cryptic errors and wasted debugging time. This section covers exactly what you need: the correct version of ForgeRock Access Management, the right admin roles, and the technical details your client application must supply before the integration can work.
ForgeRock AM version and licensing
ForgeRock OIDC support is available in ForgeRock Access Management 6.0 and later, with the most complete feature set in AM 7.x, which includes improved PKCE enforcement, better discovery endpoint handling, and more granular scope management. If you're running an older version, check your release notes against the features in this guide, since some configurations may differ or be unavailable.
Your AM deployment also needs the OAuth 2.0 and OpenID Connect service enabled at the realm level. This is not on by default in every environment. Log into the AM console, navigate to your target realm, open Services, and confirm the OAuth2 Provider service is listed. If it isn't, you'll add it during the setup steps later in this guide. Verify with your ForgeRock account team that your license covers OAuth/OIDC functionality before you invest time in configuration.
Running ForgeRock AM in a cloud-hosted or containerized environment? Confirm your base URL is reachable from external clients before starting - mismatched hostnames cause a large share of OIDC discovery failures.
Required accounts and admin permissions
You need realm administrator access or higher to configure the OAuth 2.0 provider, manage service settings, and register clients. A read-only account cannot make the changes this guide requires. If you're working in a shared environment, coordinate with your identity team to scope the right permissions to the specific realm you're targeting rather than requesting global admin access.
Also prepare a test user account in the same realm with at least one attribute you plan to map to an OIDC claim, such as email address, given name, or an employee identifier. You'll use this account to validate token issuance and confirm that your claim mappings return the expected data during testing.
Client application prerequisites
Your client application must supply specific registration details before you can register it in ForgeRock AM. Gather these before you open the console:
- Redirect URIs: The exact callback URLs your app uses after authentication. These must match precisely - trailing slashes and query strings matter.
- Client type: Whether your app is confidential (server-side, can store a secret) or public (browser or mobile app that cannot).
- Required scopes: The OIDC scopes your app will request, such as
openid,profile,email, or any custom scopes you've defined. - Grant types: Authorization code, client credentials, or refresh token depending on your use case.
- Token endpoint auth method: How your client authenticates at the token endpoint -
client_secret_basic,client_secret_post, orprivate_key_jwt.
Having these details in hand prevents incomplete registrations that fail silently during authorization requests. If you're building a public client such as a single-page app or mobile app, confirm that your application can generate a code verifier and code challenge, since PKCE replaces the client secret for public clients.
Pick your OIDC flow and deployment model
Choosing the wrong OAuth 2.0 flow before you start configuration wastes significant time because ForgeRock Access Management enforces flow-specific grant type settings at the client level. Your choice depends on two factors: what type of application you're building (server-side, browser-based, or machine-to-machine) and how your ForgeRock environment is deployed. Get this decision right upfront, and the rest of your configuration follows a predictable pattern.

Authorization code flow with PKCE
The authorization code flow with PKCE is the correct choice for the majority of healthcare vendor integrations, including server-side web apps, single-page apps, and mobile clients. It's also the flow that SMART on FHIR mandates, which matters if your application needs to connect with EPIC or other EHR platforms that use ForgeRock as their identity provider. PKCE replaces the client secret for public clients and adds a code verifier/challenge step that prevents authorization code interception attacks.
If your application handles protected health information, use authorization code with PKCE regardless of client type. It's the most secure option ForgeRock supports for user-facing flows.
For confidential server-side apps, you can use the standard authorization code flow with a client secret, but PKCE is still recommended as an additional layer. ForgeRock AM 7.x enforces PKCE by default for public clients, so confirm your client type during registration matches your actual deployment.
Client credentials flow
The client credentials flow applies only to machine-to-machine scenarios where no end user is involved, such as a backend service querying a FHIR API on its own behalf. This flow does not issue an ID token, which means it operates outside the full OIDC specification - you receive an access token, not user identity claims. Use it for service accounts and automated data pipelines, not for authenticating clinicians or patients.
On-premises vs. cloud deployment
Your ForgeRock deployment model affects how you configure your base URL, discovery endpoint, and redirect URI validation. On-premises AM installations require you to manage your own SSL certificates and DNS, while ForgeRock Identity Cloud handles these at the platform level. The OIDC discovery endpoint format differs between the two:
| Deployment | Discovery endpoint format |
|---|---|
| On-premises AM | https://<host>/openam/oauth2/<realm>/.well-known/openid-configuration |
| Identity Cloud | https://<tenant>.forgeblocks.com/am/oauth2/<realm>/.well-known/openid-configuration |
Confirm your endpoint format before you configure any client application, since an incorrect discovery URL is one of the most common sources of ForgeRock OpenID Connect setup failures.
Configure your realm and base URL settings
Realm and base URL configuration is where most ForgeRock OpenID Connect setups break down before they even reach the client registration step. ForgeRock AM uses realms to isolate identity domains, and every OIDC service you configure lives within a specific realm. If your base URL doesn't match what AM advertises in its discovery document, every client that relies on dynamic discovery will fail to locate the token or authorization endpoints correctly.
Create or select your realm
Log into the AM admin console and navigate to Realms in the left panel. You'll either work within the top-level root realm or create a dedicated realm for your integration. Creating a separate realm is strongly recommended for healthcare vendor integrations because it keeps identity data isolated and simplifies access policy management. To create a new realm, click "Create Realm," enter a name (use lowercase, no spaces), and confirm the realm is active before saving.
Once your realm exists, select it from the realm dropdown at the top of the console. Every configuration step in this guide happens inside the realm context, so confirm you're operating in the correct one before making changes. Switching realms mid-configuration without noticing is a common source of settings that appear saved but don't take effect.
Set the correct base URL
Navigate to Deployment > Server > Global > Platform > Platform Administration and locate the Platform Base URL setting. This value must exactly match the externally reachable hostname of your AM instance. For example:
https://am.yourcompany.com/openam
An incorrect base URL propagates through every OIDC endpoint URL that ForgeRock generates, including the discovery document, authorization endpoint, and token endpoint - fix it here before configuring anything else.
Your realm-specific OIDC endpoints will append the realm name to this base URL automatically. For a realm named clinical, your discovery document will appear at:
https://am.yourcompany.com/openam/oauth2/clinical/.well-known/openid-configuration
Confirm this endpoint returns a valid JSON response before moving forward. If you receive a 404 or a redirect to the AM login screen, the OAuth2 Provider service is not yet enabled in your realm, which you'll address in the next section. Run a quick curl against the discovery URL to verify connectivity:
curl -s https://am.yourcompany.com/openam/oauth2/clinical/.well-known/openid-configuration | python3 -m json.tool
A valid response outputs a JSON object containing issuer, authorization_endpoint, token_endpoint, and jwks_uri keys. If any of those are missing, your base URL or realm configuration has an error that needs correction before you proceed.
Set up ForgeRock as an OpenID Provider
Setting up ForgeRock as an OpenID Provider requires you to enable and configure the OAuth2 Provider service within your realm before any client can request tokens. This service is the engine behind ForgeRock OpenID Connect, and its settings determine how tokens are issued, signed, and validated across every client you register. Without this service active and correctly configured, your authorization and token endpoints simply won't respond.
Enable the OAuth2 Provider service
Inside your realm, navigate to Services and click "Add a Service." Select OAuth2 Provider from the service type list and click Create. ForgeRock will generate a default configuration you'll tune in the next step. If the service already exists in your realm, open it directly without creating a duplicate.
You can only have one OAuth2 Provider service per realm, so if you see it already listed, edit the existing instance rather than attempting to add another.
Once created, the service configuration screen opens automatically. Confirm that "Use Stateless Access and Refresh Tokens" matches your infrastructure preference. Stateless tokens scale better in distributed environments since AM doesn't need to persist them, but stateful tokens simplify revocation. For most healthcare vendor deployments, stateless tokens are the better fit.
Configure core provider settings
With the service open, work through these key fields before saving:
| Setting | Recommended value |
|---|---|
| Token Signing Algorithm | RS256 |
| ID Token Encryption Algorithm | RSA-OAEP (if encryption required) |
| Authorization Code Lifetime | 120 seconds |
| Access Token Lifetime | 3600 seconds |
| Refresh Token Lifetime | 43200 seconds |
| OIDC Claims Script | Select your custom script or use the default |
Set the Token Signing Algorithm to RS256, which uses asymmetric keys and allows external clients to verify signatures using your published JWKS endpoint without sharing a secret. Symmetric algorithms like HS256 require clients to know the shared secret, which creates key distribution problems in multi-client environments.
Under the OpenID Connect tab within the service settings, confirm that "Allow Open Dynamic Client Registration" is disabled unless you explicitly need it. Open dynamic registration lets any client register without credentials, which is a significant security risk in production healthcare environments. Save your changes after reviewing all fields, then re-run the discovery endpoint curl command from the previous section to confirm the service now returns a complete configuration document.
Configure scopes, claims, and attribute mapping
Scopes and claims are how ForgeRock OpenID Connect controls what information a client receives in the ID token and UserInfo response. Without this configuration, your tokens will authenticate users but return no meaningful identity data, which breaks any application that relies on user attributes to drive authorization decisions. You configure scopes at the OAuth2 Provider level and map them to specific user profile attributes stored in your directory.
Define and assign scopes
Open your realm's OAuth2 Provider service and navigate to the Scopes tab. ForgeRock includes a default set of OIDC scopes, but you should verify each one maps to real attributes in your user store before any client requests them. The standard scopes and their associated claims look like this:
| Scope | Claims returned |
|---|---|
openid |
sub (required, no additional claims) |
profile |
name, given_name, family_name, locale |
email |
email, email_verified |
phone |
phone_number |
Add any custom scopes your application needs by clicking "Add Scope," entering the scope name, and saving. Custom scopes do not return claims automatically - you must explicitly link them to claim mappings in the next step, or they'll appear in the token with no associated data.
Only request and expose the scopes your application actually needs - over-permissioned tokens are a common source of data exposure in healthcare integrations.
Map directory attributes to OIDC claims
ForgeRock uses OIDC Claims Scripts to pull user attributes from the directory and include them in tokens. Navigate to Scripts in your realm, locate the "OIDC Claims" script (it uses Groovy by default), and edit it to map your directory attributes to claim names. The script receives a user object you query directly:
import org.forgerock.openam.auth.node.api.*

def claimValues = [:]

if (requestedClaims.contains("email")) {
    claimValues["email"] = identity.getAttribute("mail")?.first()
}

if (requestedClaims.contains("given_name")) {
    claimValues["given_name"] = identity.getAttribute("givenName")?.first()
}

return claimValues
Replace mail and givenName with the actual LDAP attribute names from your directory schema. After saving the script, return to the OAuth2 Provider service and confirm it references this updated script under the "Claims Provider Settings" section. Run a full authorization code flow and inspect the decoded ID token to verify the correct claim values appear before you move to client registration.
Register an OpenID Connect client in ForgeRock
Client registration is the step where your application gets its official identity within ForgeRock Access Management. Every application that participates in a ForgeRock OpenID Connect flow needs a registered client entry in the OAuth2 Provider, and the settings you enter here directly control what your app can request, which users it can authenticate, and how tokens are returned. Incomplete or mismatched registration details cause authorization failures that can look identical to network or server errors, so precision matters here.

Navigate to the client registration screen
Inside your realm, select Applications from the left navigation, then choose OAuth 2.0 from the submenu. This opens the client list view. Click "Add Client" to open the registration form. ForgeRock generates a client ID automatically, or you can enter a custom one. Use a descriptive, human-readable ID like clinical-portal-prod rather than a UUID, since this value appears in logs and makes debugging significantly faster when you're tracing specific client activity.
Client IDs cannot be changed after registration in most ForgeRock AM versions, so choose a naming convention that will still make sense as your integration scales.
Fill in the required client fields
The registration form requires several fields before you can save the client. Work through each one using the values you gathered in the prerequisites section:
| Field | Example value | Notes |
|---|---|---|
| Client ID | clinical-portal-prod |
Unique within the realm |
| Client Secret | Generated or custom string | Leave blank for public clients using PKCE |
| Redirection URIs | https://app.yourcompany.com/callback |
Exact match required |
| Scopes | openid profile email |
Space-separated list |
| Grant Types | authorization_code refresh_token |
Select all that apply |
| Token Endpoint Auth Method | client_secret_basic |
Use none for public PKCE clients |
| Response Types | code |
Use code for authorization code flow |
Set "Client Type" to Public if your app cannot securely store a secret, such as a browser-based single-page app or a native mobile client. ForgeRock will then require PKCE and will not issue a client secret for that registration.
Verify the client configuration before testing
After saving, reopen the client record and confirm every field persisted correctly, particularly the redirect URIs and grant types, since UI validation sometimes silently drops malformed values. Navigate to the Advanced tab and confirm that "Token Introspection" is enabled if your resource server needs to validate opaque access tokens at runtime. Copy your client ID and secret into your application configuration at this point, then move on to running your first authorization code flow.
Run the authorization code flow with PKCE
With your client registered and your OAuth2 Provider service configured, you're ready to execute a full authorization code flow with PKCE. This flow has three distinct steps: building the authorization request with a code challenge, redirecting the user to ForgeRock for authentication, and exchanging the returned authorization code for tokens. Each step has specific parameters that must be exact, and a single mismatch causes the entire flow to fail.

Build the authorization request
Start by generating a cryptographically random code verifier on your application server or client. The verifier must be between 43 and 128 characters, using only URL-safe characters. Then compute the code challenge by hashing the verifier with SHA-256 and encoding it as base64url. Here's a concrete example in Python:
import secrets
import hashlib
import base64

code_verifier = secrets.token_urlsafe(64)
digest = hashlib.sha256(code_verifier.encode()).digest()
code_challenge = base64.urlsafe_b64encode(digest).rstrip(b"=").decode()
Construct your authorization URL using the values from your ForgeRock OIDC discovery document. Append each parameter precisely as shown:
https://am.yourcompany.com/openam/oauth2/clinical/authorize
  ?response_type=code
  &client_id=clinical-portal-prod
  &redirect_uri=https://app.yourcompany.com/callback
  &scope=openid%20profile%20email
  &state=random-csrf-token
  &code_challenge=<your-base64url-encoded-challenge>
  &code_challenge_method=S256
Always include the
stateparameter and verify it on return - ForgeRock does not enforce CSRF protection automatically on the authorization endpoint.
Redirect your user to this URL. ForgeRock presents the login screen, authenticates the user, and redirects back to your redirect_uri with a short-lived authorization code appended as a query parameter.
Exchange the code for tokens
After your application receives the authorization code at the callback URL, make a POST request to the token endpoint immediately - the code expires in seconds. Include your original code verifier, not the challenge, in this request. ForgeRock uses it to verify the round-trip integrity of the flow:
curl -X POST https://am.yourcompany.com/openam/oauth2/clinical/access_token \
  -H "Content-Type: application/x-www-form-urlencoded" \
  -d "grant_type=authorization_code" \
  -d "client_id=clinical-portal-prod" \
  -d "redirect_uri=https://app.yourcompany.com/callback" \
  -d "code=<authorization-code>" \
  -d "code_verifier=<your-original-verifier>"
A successful response returns a JSON object with access_token, id_token, and optionally refresh_token. Store the refresh token securely server-side and never expose it to the browser. This completes the core ForgeRock OpenID Connect authorization code flow, and your application now holds the tokens it needs to authenticate the user and call protected APIs.
Validate ID tokens and access tokens
Token validation is a step that teams frequently skip during development and then scramble to add before production. When you receive tokens from a ForgeRock OpenID Connect flow, your application must verify them independently rather than trusting the payload at face value. An unverified token is not a security boundary, and any application that accepts tokens without checking signatures and claims is vulnerable to substitution and replay attacks.
Validate the ID token signature and claims
Your application receives the ID token as a signed JWT. Before you extract any user data from it, you need to verify the signature against ForgeRock's published public keys, then check the standard claims. Pull the JWKS from your discovery document's jwks_uri and use a JWT library in your language to run the full validation chain. Here's a concrete Python example using the python-jose library:
from jose import jwt
import requests

jwks_uri = "https://am.yourcompany.com/openam/oauth2/clinical/connect/jwk_uri"
jwks = requests.get(jwks_uri).json()

decoded = jwt.decode(
    token=id_token,
    key=jwks,
    algorithms=["RS256"],
    audience="clinical-portal-prod",
    issuer="https://am.yourcompany.com/openam/oauth2/clinical"
)
After decoding succeeds, verify the iss claim matches your ForgeRock realm's issuer exactly, the aud claim contains your registered client ID, and the exp claim is in the future. Reject the token immediately if any of these checks fail.
Never skip the
issandaudchecks - a valid signature only proves ForgeRock signed the token, not that it was issued for your application.
Introspect access tokens
Access tokens issued by ForgeRock may be opaque or JWT-formatted, depending on your OAuth2 Provider configuration. For opaque tokens, your resource server cannot decode them locally, so it must call the token introspection endpoint to determine validity. Make a POST request with the token and your client credentials:
curl -X POST https://am.yourcompany.com/openam/oauth2/clinical/introspect \
  -u "clinical-portal-prod:your-client-secret" \
  -d "token=<access-token>"
The response returns an active boolean field. If active is false, reject the request immediately without checking any other fields. For JWT access tokens, apply the same signature and claims validation steps you used for the ID token, but confirm the scope claim contains the exact permissions your API requires before allowing the request to proceed.
Configure discovery, JWKS, and key rotation
Your ForgeRock OpenID Connect discovery document is the single source of truth that client applications use to locate every endpoint they need. If this document is incorrect or unreachable, clients fail silently during initialization rather than at the moment of the actual authorization request, making the root cause hard to identify. Configure and validate discovery before any client goes near a real user.
Verify your discovery document
Your discovery endpoint lives at the .well-known/openid-configuration path under your realm's OAuth2 base URL. Fetch it directly and confirm every critical field is present and correct before you trust any client configuration that reads it dynamically:
curl -s https://am.yourcompany.com/openam/oauth2/clinical/.well-known/openid-configuration \
  | python3 -m json.tool
Check that the issuer value exactly matches what you've entered as the expected issuer in your application's token validation logic. Even a trailing slash difference between the discovery document and your application config causes signature validation to reject every token.
The
jwks_urifield in the discovery document must return your public keys directly - any redirect or authentication requirement on that endpoint breaks every client that relies on it.
Fetch and cache JWKS correctly
Your application should fetch the JWKS once at startup and cache the keys locally, not on every token validation request. Calling the JWKS endpoint on every request creates unnecessary load and introduces latency. Set a cache TTL between 15 and 60 minutes, and implement a fallback that re-fetches keys immediately when your library encounters a signature verification failure with an unknown kid. This pattern handles key rotation without breaking in-flight sessions. Most JWT libraries support this behavior through a JWKS client with automatic refresh on unknown key ID.
Rotate signing keys without breaking clients
ForgeRock AM supports multiple active signing keys simultaneously, which is the mechanism that makes zero-downtime key rotation possible. Before you retire an old key, add the new key to your AM keystore, update the OAuth2 Provider to use the new key for signing new tokens, and leave the old key in the JWKS endpoint for the duration of your longest-lived access token. Tokens signed with the old key remain verifiable during that window. After the old tokens expire, remove the old key from the keystore. This two-phase approach prevents validation failures for tokens your clients issued during the transition period.
Debug common ForgeRock OIDC errors fast
Most ForgeRock OpenID Connect errors trace back to a small set of misconfigured fields, and knowing where to look first cuts your debugging time significantly. Before you dig into AM logs, check the HTTP response body from the authorization or token endpoint directly - ForgeRock returns structured JSON error objects that identify the failure type without requiring you to parse log files.
Redirect URI mismatch and invalid_client errors
These two errors account for the majority of failed authorization requests. A redirect URI mismatch occurs when the redirect_uri in your authorization request does not exactly match the value registered on the client record, including the scheme, hostname, port, path, and any trailing slash. Open your client record in AM, copy the registered redirect URI exactly, and compare it character by character with what your application sends.
ForgeRock performs a strict string comparison on redirect URIs - URL encoding differences between the registered value and the request parameter count as a mismatch.
An invalid_client error at the token endpoint usually means your application is sending credentials in the wrong format. If you registered the client with client_secret_basic, your application must send the credentials as a Base64-encoded Authorization header, not in the POST body. Switching the auth method in your HTTP client is typically the fastest fix.
| Error | Most likely cause | Where to check |
|---|---|---|
redirect_uri_mismatch |
URI registered in AM doesn't match request | Client record in AM console |
invalid_client |
Wrong token endpoint auth method | Client settings, request headers |
invalid_scope |
Scope not registered on client or provider | Client scopes tab, OAuth2 Provider scopes |
invalid_grant |
Code expired or code verifier mismatch | Check code lifetime, verifier generation logic |
Token validation failures on the resource server
When your resource server rejects tokens despite a successful authorization flow, the problem is almost always an issuer mismatch or stale JWKS cache. Print the iss claim from the decoded ID token and compare it against the issuer value in your discovery document. A single difference in the realm path breaks every validation attempt.
For JWKS-related failures, force your application to re-fetch the public keys from the jwks_uri and log the kid from the token header alongside the key IDs in the fetched JWKS. If the token's kid is absent from the JWKS response, ForgeRock has rotated keys and your cache is stale. Implement an on-miss refresh in your JWT validation library to handle this automatically without requiring a service restart.
Wrap it up and keep it secure
You now have a complete path through ForgeRock OpenID Connect setup, from realm configuration and provider setup to client registration, token validation, and key rotation. Each section builds on the previous one, so if something breaks in production, you have a clear layer to isolate and inspect rather than debugging the entire stack at once.
Security in OIDC is not a one-time configuration task. Rotate your signing keys on a regular schedule, audit your registered clients quarterly to remove unused entries, and verify that your token validation logic checks both iss and aud claims on every request. Treat any client with broad scopes as a potential attack surface and tighten permissions as your understanding of actual usage matures.
If your integration needs to connect with EPIC EHR systems using SMART on FHIR, build your FHIR app without the engineering overhead and skip months of integration work.
The Future of Patient Logistics
Exploring the future of all things related to patient logistics, technology and how AI is going to re-shape the way we deliver care.
Thank you! Your submission has been received!
Oops! Something went wrong while submitting the form.