OneTrust SOC 2: How To Automate Evidence For Your Audit

Collecting evidence for a SOC 2 audit is one of those tasks that sounds straightforward until you're buried in screenshots, access logs, and policy documents across a dozen different systems. For healthcare vendors trying to prove their security posture to health systems and close contracts, the manual grind of evidence gathering can stall deals and drain engineering hours. That's where OneTrust SOC 2 automation enters the picture, a way to replace spreadsheet chaos with continuous, centralized evidence collection.
OneTrust offers a compliance automation platform that maps your existing controls to SOC 2 Trust Services Criteria, pulls evidence from integrated systems automatically, and keeps everything audit-ready year-round. Whether you're pursuing your first SOC 2 Type II report or maintaining an existing one, understanding how OneTrust handles evidence workflows can save your team hundreds of hours and reduce the risk of audit surprises.
At VectorCare, we built our no-code SMART on FHIR platform with SOC 2 compliance baked in, so the healthcare vendors we serve don't have to shoulder that burden for their EPIC integrations. But we also know that many of our customers and prospects are pursuing their own SOC 2 certifications for their core products, and they need practical tools to get there. This guide walks you through how to set up OneTrust for SOC 2 evidence automation step by step, from initial scoping through audit handoff, so you can spend less time chasing documentation and more time shipping your product into clinical workflows.
Prerequisites for automating SOC 2 evidence
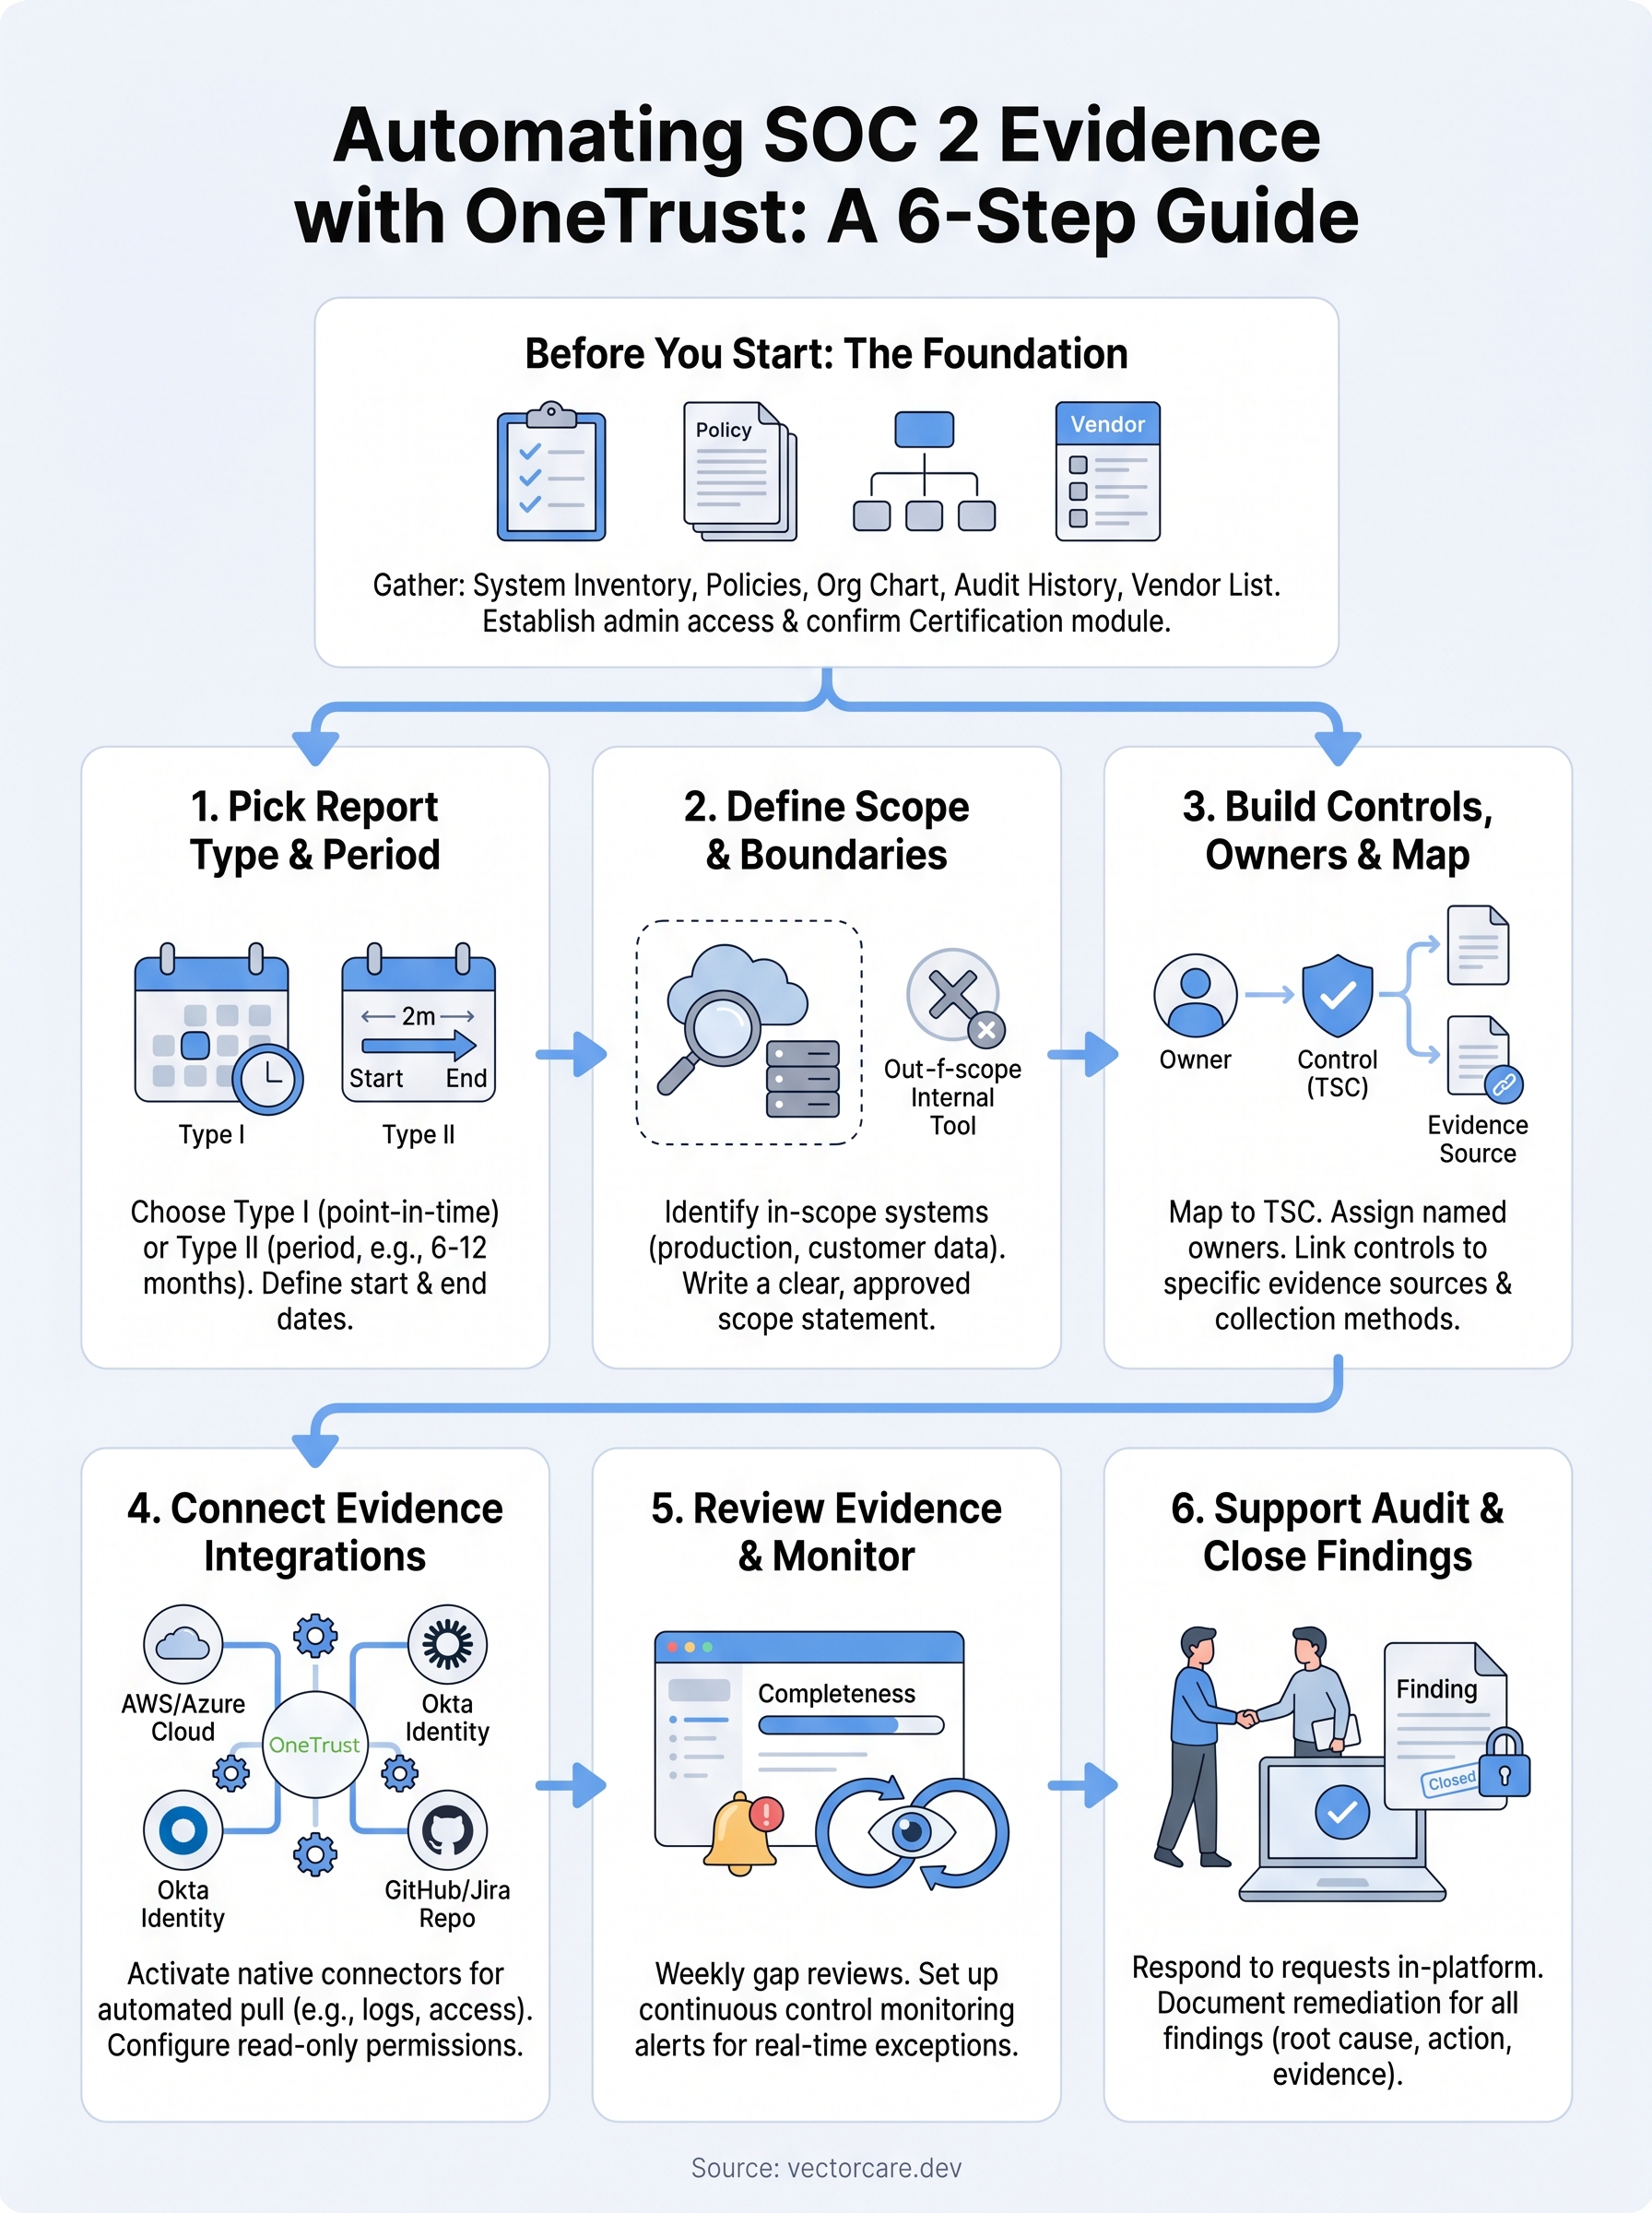
Before you configure anything in OneTrust, you need a clear foundation in place. SOC 2 automation tools amplify work you've already defined, not work you haven't started yet. If you open the platform without knowing your systems, your control owners, or your target Trust Services Criteria, you'll spend more time undoing bad configurations than building good ones. Taking two to four hours upfront to gather the right inputs will make your entire OneTrust SOC 2 implementation faster, cleaner, and easier to defend during auditor testing.
What you need before you open OneTrust
The most common reason compliance automation projects stall is incomplete preparation. Your system inventory is the most critical starting point: you need a list of every application, database, cloud environment, and third-party service that touches the data covered by your SOC 2 scope. Without it, you can't assign controls to the right systems or owners, and OneTrust will generate evidence requests that go to the wrong people or return empty results.

Here's what to gather before your first OneTrust session:
| Item | What to include |
|---|---|
| System inventory | Name, owner, data type processed (customer, employee, financial) |
| Policy library | Information security, access control, incident response, change management |
| Organizational chart | Names and roles for engineering, security, HR, legal, and operations |
| Audit history | Prior SOC 2 reports, penetration test results, vulnerability scans, risk assessments |
| Vendor list | Third-party tools that access in-scope data along with their risk tier |
If you can't name a specific person responsible for a control before you start setup, that gap will surface during auditor testing, and mid-audit ownership changes create unnecessary friction.
Access and permissions you must set up
You need administrator-level access to OneTrust from day one, because control mapping, integration setup, and user role assignment all require it. Beyond the platform itself, you need credentials for every system you plan to connect as an integration. OneTrust pulls evidence automatically from services like AWS, Azure, Google Cloud, Okta, GitHub, and Jira through API connections that require service accounts or tokens with specific permission scopes. Coordinate with your DevOps or IT team to generate those credentials before your first configuration session so you're not waiting on access requests mid-setup.
Confirming that your subscription tier includes OneTrust's Certification Automation module is an equally important early step. Some plans don't include it by default, and discovering that gap after you've started mapping controls wastes time you can't recover. Pull up your contract or contact your account rep, verify the module is active, and confirm that the right users have been granted access before you start adding control owners to the system.
Compliance knowledge baseline
You don't need to be a certified public accountant, but you do need a working understanding of the Trust Services Criteria (TSC). The American Institute of CPAs publishes five TSC categories: Security, Availability, Confidentiality, Processing Integrity, and Privacy. Most organizations start with Security alone (CC1 through CC9) and add other categories only when customer contracts or market requirements demand them.
OneTrust structures its entire control library around the TSC, so your ability to configure it correctly depends on knowing which criteria you're targeting before you start. Download the current TSC document directly from the AICPA and keep it open during your first OneTrust session. When you encounter a control like "CC6.1: Logical and Physical Access Controls," you'll need to identify exactly which systems and policies in your environment map to it, and that judgment call belongs to you rather than the software.
Step 1. Pick report type and audit period
The first configuration decision you make in OneTrust sets the foundation for everything else, so getting it right matters. SOC 2 Type I describes your controls at a specific point in time, while SOC 2 Type II covers whether those controls operated effectively over a defined period, typically six to twelve months. Before you build a single control in OneTrust, you need to know which report type you're pursuing, because the platform structures your evidence collection window and control testing schedule around that answer.
Type I vs. Type II: which one you actually need
Your choice between Type I and Type II depends on what your customers require and where you are in your compliance journey. Type I is faster to complete and works well as a starting point for early-stage companies that need to demonstrate a baseline security posture quickly. Type II carries significantly more weight with enterprise buyers, especially health systems evaluating healthcare vendors, because it shows that your controls actually held up under real operating conditions over time.
If a health system or large enterprise is already asking for your SOC 2 report, confirm which type they need before you start, because delivering a Type I when they expected a Type II will restart the process.
Most auditors recommend going directly for Type II if you have six to twelve months of documented control evidence available, since the additional time investment is modest compared to the trust it builds with buyers. Use this quick reference to decide:
| Situation | Recommended report type |
|---|---|
| First SOC 2, no prior audit history, need report within 3 months | Type I |
| First SOC 2, 6+ months of control evidence available | Type II |
| Renewing after a prior Type I | Type II |
| Enterprise or health system contract requires it | Type II |
Setting your audit period in OneTrust
Once you know your report type, you need to define your audit period start and end dates inside the platform. For Type I, your audit date is a single point in time, typically the date your auditor performs their assessment. For Type II, set a period that aligns with your readiness: most first-time organizations choose a six-month window rather than twelve to reduce the surface area of evidence collection.
Navigate to the Certification Automation module, open your OneTrust SOC 2 engagement, and enter your period dates before adding any controls. OneTrust uses these dates to time-stamp incoming evidence and flag gaps where evidence falls outside the audit window, so locking the period first prevents you from collecting evidence your auditor cannot use.
Step 2. Define scope and boundaries
Scope definition is where most SOC 2 projects run into trouble, and OneTrust cannot fix a scope that's been drawn incorrectly from the start. Your scope statement tells auditors exactly which systems, services, and data flows they're evaluating, and anything you misrepresent or omit becomes a potential finding. Before you add a single control in the platform, you need a written scope statement that your auditor has reviewed and approved.
What belongs inside your SOC 2 scope
Every system that stores, processes, or transmits the data covered by your SOC 2 report belongs in scope. For most software companies, that means your production environment, authentication system, monitoring tools, and the cloud infrastructure those services run on. It does not mean every internal tool your team uses. Your expense tracking software or internal wiki typically stays out of scope unless it touches customer data directly.
Use this checklist to decide whether a system belongs in scope:
- Does it store or process customer data?
- Does it have network access to a system that does?
- Do your engineers use it to deploy or modify in-scope services?
- Does it generate logs that serve as audit evidence?
If you answer yes to any of these, include the system in scope and document your reasoning. If you answer no to all of them, document that decision anyway, because auditors will ask.
A scope that's too narrow creates gaps in your control coverage; a scope that's too broad generates evidence requests for irrelevant systems and slows your entire audit down.
How to record your scope in OneTrust
Once you've agreed on scope with your auditor, you enter it directly into the OneTrust SOC 2 engagement settings as a scope narrative and a system list. Navigate to your engagement, open the Scope section, and paste your written scope statement into the description field. Then add each in-scope system as an asset using OneTrust's asset inventory feature so the platform can later link controls and evidence requests to the correct system automatically.

Your scope statement should follow this structure:
[Company Name] provides [product/service description] to [customer type].
The [product name] production environment, hosted on [cloud provider],
processes [data type] on behalf of customers. The following systems are
in scope for this SOC 2 [Type I/Type II] assessment covering [start date]
through [end date]: [System 1], [System 2], [System 3].
Keeping your scope statement under 150 words forces the precision that auditors expect. Vague language like "our cloud infrastructure" creates ambiguity that resurfaces during fieldwork, when neither you nor your auditor has time to revisit foundational decisions.
Step 3. Build controls, owners, and evidence map
With your scope locked and your audit period set, you're ready to build the core of your OneTrust SOC 2 configuration: the control library. This is where you translate the abstract Trust Services Criteria into specific, testable requirements tied to real systems and real people. Rushing through this step produces a control structure that looks complete but falls apart the moment an auditor asks who owns a control or where the evidence lives.
Map controls to Trust Services Criteria
OneTrust provides a pre-built control library aligned to the AICPA Trust Services Criteria, which saves you from building every control from scratch. Navigate to the Controls section of your SOC 2 engagement, select the TSC criteria you're targeting, and activate the controls that apply to your environment. For each control, you'll write a control description that explains how your organization satisfies the requirement.
Write your control descriptions in plain language that reflects what your team actually does, not what you aspire to do, because auditors will test against your description directly.
Use this template for each control description to keep them consistent:
Control ID: [CC6.1]
Control Name: Logical Access Control
Description: [Company] restricts access to production systems
using role-based permissions managed in [Okta/Azure AD].
Access is reviewed quarterly by the [Engineering Lead].
Evidence: Access logs, quarterly review records, provisioning tickets.
Assign control owners
Every control in your library needs a named owner, not a team or a department. Navigate to each control in OneTrust and assign the specific person responsible for maintaining it and supplying evidence when requested. Your engineering lead typically owns infrastructure and access controls, your HR manager owns background check and onboarding controls, and your security lead owns incident response and vulnerability management controls.
Assigning ownership without confirming the person accepts responsibility creates silent gaps. Send each owner a short email confirming their controls, what evidence they need to provide, and your cadence for evidence requests (monthly, quarterly, or event-driven). If an owner leaves the company during your audit period, update OneTrust immediately, because a control with no active owner is a finding waiting to happen.
Build your evidence map
Your evidence map is a document that links each control to its expected evidence type, source system, and collection frequency. OneTrust lets you attach evidence requirements directly to each control, so build this inside the platform rather than in a separate spreadsheet. For each control, specify the evidence format (screenshot, log export, signed policy, ticket record), the system it comes from, and whether collection is manual or automated via integration.

| Control | Evidence type | Source system | Collection method |
|---|---|---|---|
| CC6.1 Logical access | Access roster | Okta | Automated |
| CC7.2 Incident response | Incident tickets | Jira | Automated |
| CC9.1 Risk assessment | Risk register | Manual upload | Manual |
| CC1.3 Board oversight | Meeting minutes | Manual upload | Manual |
Step 4. Connect OneTrust integrations for evidence
OneTrust's real advantage over manual spreadsheets is its ability to pull evidence directly from the tools your team already uses, without anyone screenshotting dashboards at 11pm the night before an auditor request. This step is where your OneTrust SOC 2 configuration shifts from a static control library into a living, continuously updated evidence engine. The integrations you configure here determine how much of your evidence collection becomes automatic versus how much stays manual.
Choose which integrations to activate
Start by cross-referencing your system inventory from the prerequisites phase with OneTrust's available connector library. OneTrust supports native integrations with cloud providers, identity management tools, code repositories, and ticketing systems. Prioritize connecting systems that generate high-volume, repeating evidence like access logs, deployment records, and alert histories, because those are the most painful to collect manually.
The most commonly used integrations for SOC 2 evidence collection are:
| System | Evidence pulled | TSC relevance |
|---|---|---|
| AWS | CloudTrail logs, IAM policies, config changes | CC6, CC7 |
| Azure Active Directory | User access rosters, role assignments | CC6.1 |
| Okta | Login activity, MFA enrollment, provisioning logs | CC6.1, CC6.2 |
| GitHub | Code review records, branch protection settings | CC8.1 |
| Jira | Change tickets, incident records, approval workflows | CC7.2, CC8.1 |
If a critical in-scope system doesn't appear in OneTrust's connector list, contact your account team before assuming it's unsupported, because custom connectors are available for some enterprise plans.
Configure each integration correctly
Navigate to the Integrations section inside your OneTrust SOC 2 engagement and select each system you want to connect. For cloud providers, you'll generate a read-only service account with permissions scoped to the specific resources OneTrust needs to query. Giving the integration broader access than necessary creates a security risk and may surface evidence from out-of-scope systems.
Follow this sequence for each integration:
- Create a read-only service account or API token in the source system.
- Copy the credentials into OneTrust's integration configuration panel.
- Map the integration output to the specific controls that require it.
- Run a test pull and confirm the returned evidence matches the expected format.
- Set the collection frequency to match your audit period (daily for logs, weekly for access rosters).
Handle systems without native integrations
Not every in-scope system will have a direct connector, and that's normal. For tools like HR platforms, document management systems, or niche vendor portals, OneTrust supports manual evidence uploads through its request workflow. Assign the relevant control owner a recurring task inside OneTrust to upload evidence on a defined schedule, and attach a file naming convention so submissions stay consistent across your entire audit period.
Step 5. Review evidence and monitor controls
Collecting evidence automatically through integrations does not mean you can walk away and trust the process completely. OneTrust SOC 2 gives you a centralized dashboard to review incoming evidence, but identifying gaps, stale submissions, and control failures still requires a deliberate weekly review habit from your compliance lead. Set a recurring calendar block to audit the platform's evidence status before your auditor begins fieldwork, not the week they arrive.
Run your evidence gap review
Your first task in each review session is to pull the evidence completeness report from the OneTrust Certification Automation module. This report shows you every control in your library alongside its evidence status: collected, missing, expired, or pending review. Any control marked missing or expired needs immediate attention, because an auditor who requests evidence for a 12-month period and receives records covering only 8 months will flag it as a gap.

A single missing month of access logs for a critical control like CC6.1 can result in a qualified opinion, which costs far more time to remediate than a weekly review would have taken to prevent.
Use this checklist during each weekly review to keep your evidence current:
- Confirm all automated integrations ran successfully and returned results within the expected date range.
- Check for controls with manual upload requirements where the assigned owner has not submitted on schedule.
- Flag any evidence file that falls outside your audit period's start and end dates.
- Verify that policy documents referenced in your control descriptions reflect your current procedures, not outdated versions.
- Review any system alerts from OneTrust's monitoring module that indicate a control may have failed or drifted from its configured state.
Set up continuous control monitoring
Beyond reviewing evidence already collected, OneTrust lets you configure real-time control monitoring alerts that notify you when a connected system reports a condition that violates your control requirements. For example, if your Okta integration detects a user account provisioned outside your standard onboarding workflow, OneTrust can surface that as a control exception so you can investigate it before your auditor does.
Navigate to the Monitoring section of your engagement and enable alerts for the controls most likely to generate exceptions during your audit period: access provisioning, multi-factor authentication enrollment, and change management approvals. For each alert, assign the relevant control owner as the notification recipient and set a resolution deadline that gives them enough time to investigate and document remediation before the audit window closes. Documenting your response to every exception, even ones you resolve quickly, builds a remediation record that auditors treat as evidence of a functioning control environment rather than a failure.
Step 6. Support auditor testing and close findings
When your auditor begins fieldwork, your job shifts from collecting evidence to responding clearly and quickly to every request they send. This is the phase where the preparation you've built inside your OneTrust SOC 2 engagement pays off. Auditors test controls by requesting specific evidence, interviewing control owners, and reviewing exceptions flagged during the audit period. Your goal is to provide what they need without introducing new gaps through slow responses or inconsistent documentation.
Respond to auditor requests inside OneTrust
OneTrust lets you manage auditor communications and evidence submissions directly inside the platform rather than through email threads that fragment your records. Navigate to the Requests section of your engagement and confirm your auditor has been added as an external user with the appropriate read-only access. When they submit a request for evidence, assign it to the correct control owner immediately and set a 48-hour response target to keep fieldwork on schedule.
Use this response template to keep submissions consistent across your team:
Request ID: [OneTrust Request #]
Control: [e.g., CC6.1 Logical Access]
Evidence submitted: [File name and format]
Period covered: [Start date] to [End date]
Submitted by: [Control owner name]
Notes: [Any context the auditor needs to interpret the evidence]
If an auditor requests evidence that falls outside what your integrations captured automatically, pull it manually and document the reason for the manual submission directly in the notes field.
Document remediation for every finding
Your auditor will likely issue one or more findings during fieldwork, ranging from minor observations to exceptions that require formal remediation. Do not treat findings as emergencies. Treat them as documented opportunities to show your control environment responds and improves. For each finding, create a remediation record in OneTrust that captures the root cause, the corrective action you took, the person responsible, and the target completion date.
Follow this structure for every remediation entry:
Finding ID: [Auditor-assigned reference]
Control affected: [e.g., CC8.1 Change Management]
Root cause: [Why the gap occurred]
Corrective action: [Specific change made to process, system, or policy]
Evidence of remediation: [File name or system record]
Owner: [Name]
Completion date: [Date]
Closing findings promptly and with clear evidence of remediation strengthens your audit report rather than weakening it. Auditors expect mature organizations to find gaps during fieldwork and fix them systematically. What concerns auditors far more than a finding is a finding with no documented owner, no corrective action, and no timeline. Use OneTrust to assign, track, and close every finding before your auditor finalizes the report, so nothing slips into the final opinion unresolved.
What to do next
You now have a complete, step-by-step path for setting up OneTrust SOC 2 evidence automation, from scoping your audit period through closing findings with your auditor. The six steps in this guide work as a sequence: skipping the prerequisites or rushing through control ownership assignments will cost you time during fieldwork that you cannot recover. Start with your system inventory and policy library, get your integrations connected, and build a weekly review habit before your audit window opens.
If your product needs to integrate with EPIC EHR systems as part of your go-to-market strategy, your SOC 2 is a prerequisite that health systems will ask for on day one of a contract conversation. Closing that compliance gap is easier when your underlying platform already handles HIPAA and SMART on FHIR requirements for you. Take a look at how VectorCare's no-code EPIC integration platform handles the technical and compliance groundwork so your team can focus on building your core product.
The Future of Patient Logistics
Exploring the future of all things related to patient logistics, technology and how AI is going to re-shape the way we deliver care.
Thank you! Your submission has been received!
Oops! Something went wrong while submitting the form.